Author: Youngjin Joo
Recently, we have seen many companies that use Docker and Kubernetes to serve as containers. CUBRID also provide the container mechanism and will be serviced in Docker and Kubernetes environments.
Docker first comes across in the book ‘ Docker for the Really Impatient’. We highly recommend you to read this book and it is publicly available in website: http://pyrasis.com/docker.html. Meanwhile, there is a slide summary of the book on the page: https://www.slideshare.net/pyrasis/docker-fordummies-44424016. However, all of this material are written in Korean.
Docker is the result of an open source Container project created using a virtualization technology provided by the OS by a company called Docker. A container is similar to a virtual machine in that it configures a guest environment on the host, but it does not require an OS to be installed separately, and has the advantage of being able to achieve the same performance as the host. There are many other advantages, but I think the biggest advantage is that it is easy to deploy; and Kubernetes makes good use of this advantage.
Kubernetes is an open source container orchestration system created by Google to automate and manage container deployment. Deploying and managing containers on multiple hosts is not an easy task because it takes into account the host's resources and network connectivity issues, including containers, but Kubernetes does it for you.
There are many well-organized articles about Docker and Kubernets, including its conceptual content, strengths, and weaknesses. Rather than overlapping the concept of these articles, I would like to talk more about the process of constructing the Docker and Kubernets environment and making CUBRID into containers in this article.
Content
1. Node Configuration
2. Installing the Docker
3. Firewall Settings
4. Installing Kubernets
5. Installing pod network add-on
6. kubedm join
7. Installing Kubernets Dashboard
8. Creating a CUBRID container image
9. Upload CUBRID Container Image to Docker Hub
10. Deploy CUBRID Containers to Kubernets Environments
1. Node Configuration
At least two nodes (Master, Worker) are required to utilize Kubernetes to deploy and service containers. I tested it with 3 nodes to see if the container is created on different nodes. The OS for each node was downloaded from the 'https://www.centos.org/download/' page from the CentOS 7.8.2003 ISO file and installed as Minimal.
1-1. Hostname setting:
# hostnamectl set-hostname master
# hostnamectl set-hostname worker1
# hostnamectl set-hostname worker2
1-2. /etc/hosts setting:
# cat > /etc/hosts
192.168.56.110 master
192.168.56.111 worker1
192.168.56.112 worker2
EOF
2. Installing the Docker
Kubernetes only automates and manages the deployment of containers, and Docker is the real container service. Therefore, Docker must be installed before installing Kubernetes. Docker Community Edition (CE) need to be installed. (For installation on Docker CE, refer to: https://docs.docker.com/install/linux/docker-ce/centos/.)
2-1. Installing the YUM Package required for the Docker installation
You need to install the yum-util package, which includes the yum-config-manager utility used when adding the YUM Repository, and the device-mapper-persistent-data and lvm2 packages required to use the devicemapper storage driver.
# yum install -y yum-utils device-mapper-persistent-data lvm2
2-2. Add Docker CE Repository using yum-config-manager utility
# yum-config-manager --add-repo https://download.docker.com/linux/centos/docker-ce.repo
2-3. Install docker-ce from Docker CE Repository
For kubernets compatibility, see https://kubernetes.io/docs/setup/production-environment/container-runtimes/#docker to install versions supported by kubernets.
# yum list docker-ce --showduplicates | sort -r
# yum update -y && yum install -y \
  containerd.io-1.2.13 \
  docker-ce-19.03.11 \
  docker-ce-cli-19.03.11
2-4. Docker autostart setting when OS boots
# systemctl enable docker
2-5. Start Docker
# systemctl start docker
2-6. docker command check
By default, non-root users cannot execute the docker command. You must log in with the root user or a user account with sudo privileges and run the docker command.
# docker
2-7. Add non-root user to Docker group
In addition to logging in with the root user or a user account with sudo privileges, non-root users must be added to the Docker group to run docker commands.
# usermod -aG docker your-user
2-8. Delete Docker
# yum remove -y docker \
    docker-client \
    docker-client-latest \
    docker-common \
    docker-latest \
    docker-latest-logrotate \
    docker-logrotate \
    docker-selinux \
    docker-engine-selinux \
    docker-engine
# rm -rf /var/lib/docker
3. Firewall Settings
The ports used in the Kubernetes environment can be checked on the 'https://kubernetes.io/docs/setup/independent/install-kubeadm/#check-required-ports' page. The ports used vary depending on the node type (Master, Worker).
3-1. Master note
|
Protocol |
Direction |
Port Range |
Purpose |
Userd By |
|
TCP |
Inbound |
6443 |
Kubernetes API server |
All |
|
TCP |
Inbound |
2379~2380 |
etcd server client API |
kube-apiserver, etcd |
|
TCP |
Inbound |
10250 |
Kubelet API |
Self, Control plane |
|
TCP |
Inbound |
10251 |
kube-scheduler |
Self |
|
TCP |
Inbound |
10252 |
kube-controller-manager |
Self |
# firewall-cmd --permanent --zone=public --add-port=6443/tcp
# firewall-cmd --permanent --zone=public --add-port=2379-2380/tcp
# firewall-cmd --permanent --zone=public --add-port=10250/tcp
# firewall-cmd --permanent --zone=public --add-port=10251/tcp
# firewall-cmd --permanent --zone=public --add-port=10252/tcp
# firewall-cmd --reload
3-2. Work Note
|
Protocol |
Direction |
Port Range |
Purpose |
Userd By |
|
TCP |
Inbound |
10250 |
Kubelet API |
Self, Control plane |
|
TCP |
Inbound |
30000-32767 |
NodePort Services |
All |
# firewall-cmd --permanent --zone=public --add-port=10250/tcp
# firewall-cmd --permanent --zone=public --add-port=30000-32767/tcp
# firewall-cmd --reload
3-3. pod network add-on
The ports used by Calico to be installed as pod network add-ons must also be opened. The ports used by Calico can be found on the'https://docs.projectcalico.org/v3.3/getting-started/kubernetes/requirements' page.
|
Configuration |
Host(s) |
Connection type |
Port/protocol |
||
|
All |
Bidirectional |
TCP 179 |
4. Installing Kubernets
For Kubernetes installation, refer to the https://kubernetes.io/docs/setup/independent/install-kubeadm/ page.
4-1. Add Kubernetes Repository
# cat << EOF > /etc/yum.repos.d/kubernetes.repo
[kubernetes]
name=Kubernetes
baseurl=https://packages.cloud.google.com/yum/repos/kubernetes-el7-x86_64
enabled=1
gpgcheck=1
repo_gpgcheck=1
gpgkey=https://packages.cloud.google.com/yum/doc/yum-key.gpg https://packages.cloud.google.com/yum/doc/rpm-package-key.gpg
exclude=kube*
EOF
4-2. Set to SELinux Permissive Mode
# setenforce 0
# sed -i 's/^SELINUX=enforcing$/SELINUX=permissive/' /etc/selinux/config

# sestatus

SELinux status:                 enabled
SELinuxfs mount:                /sys/fs/selinux
SELinux root directory:         /etc/selinux
Loaded policy name:             targeted
Current mode:                   permissive
Mode from config file:          permissive
Policy MLS status:              enabled
Policy deny_unknown status:     allowed
Max kernel policy version:      31
4-3. Install kubelet, kubeadm, and kubectl
- kubeadm: the command to bootstrap the cluster.
- kubelet: the component that runs on all of the machines in your cluster and does things like starting pods and containers.
- kubectl: the command line util to talk to your cluster.
# yum install -y kubelet kubeadm kubectl --disableexcludes=kubernetes
4-4. Setting kubelet auto start when OS boots
# systemctl enable kubelet
4-5. Start kubelet
# systemctl start kubelet
4-6. Setting net.bridge.bridge-nf-call-iptables
# cat << EOF >  /etc/sysctl.d/k8s.conf
net.bridge.bridge-nf-call-ip6tables = 1
net.bridge.bridge-nf-call-iptables = 1
EOF

# sysctl --system
4-7. swap off
Kubernetes must switch off both Master and Worker nodes. If swap is not off, an error message such as "[ERROR Swap]: running with swap on is not supported. Please disable swap" is displayed at kubeadm init.
# swapoff -a
# sed s/\\/dev\\/mapper\\/centos-swap/#\ \\/dev\\/mapper\\/centos-swap/g -i /etc/fstab
4-8. kubeadm init
For initialization, refer to the https://kubernetes.io/docs/setup/independent/create-cluster-kubeadm/ . Depending on the type of pod network add-on, the setting value of --pod-network-cidr should be different. In this case, using Calico as a pod network add-on, the setting value of --pod-network-cidr should be 192.168.0.0/16, but it overlaps with the virtual machine network band 192.168.56.0/24, so change it to 172.16.0.0/16. Use.
# kubeadm init --pod-network-cidr=172.16.0.0/16 --apiserver-advertise-address=192.168.56.110

# mkdir -p $HOME/.kube
# cp -i /etc/kubernetes/admin.conf $HOME/.kube/config
# chown $(id -u):$(id -g) $HOME/.kube/config
5. Installing pod network add-on
In the Kubernetes environment, pod network add-on is required for pods to communicate. CoreDNS will not start until the pod network add-on is installed. After checking'kubeadm init' with'kubectl get pods -n kube-system', you can see that CoreDNS has not started yet. If the pod network overlaps with the host network, problems may occur. So, instead of using the 192.168.0.0/16 network overlapping the virtual machine network band in the'kubeadm init' step, it was changed to 172.16.0.0/16.
kubeadm only supports Container Network Interface (CNI) based networks, not kubenet. Container Network Interface (CNI) is one of the projects of the Cloud Native Computing Foundation (CNCF) and is a standard interface for creating plug-ins that can control networking between containers. There are several types of pod network add-ons created based on the CNI (Container Network Interface), installation instructions are provided for each network add-on: https://kubernetes.io/docs/setup/production-environment/tools/kubeadm/create-cluster-kubeadm/#pod-network. Here we are going to use Calico.
Instructions for installing Calico can be found on the page above and the following link: https://docs.projectcalico.org/v3.3/getting-started/kubernetes/installation/calico. Calico is built on the third layer, also known as Layer 3 or the network layer, of the Open System Interconnection (OSI) model. Calico uses the Border Gateway Protocol (BGP) to build routing tables that facilitate communication among agent nodes. By using this protocol, Calico networks offer better performance and network isolation.
5-1. Calico Setting
If the pod network add-on is not installed, you can see that CoreDNS has not started yet.
# kubectl get pods -n kube-system

NAME                                       READY   STATUS    RESTARTS   AGE
coredns-66bff467f8-s8d9q                   1/1     Running   0          6h16m
coredns-66bff467f8-t4mpw                   1/1     Running   0          6h16m
etcd-master                                1/1     Running   0          6h16m
kube-apiserver-master                      1/1     Running   0          6h16m
kube-controller-manager-master             1/1     Running   0          6h16m
kube-proxy-kgrxj                           1/1     Running   0          6h11m
kube-scheduler-master                      1/1     Running   0          6h16m
The pod network add-on installation is done only on the Master node. In the'kubeadm init' step, we changed the setting value of --pod-network-cidr to 172.16.0.0/16, but we had to install it by changing the value in the Calico YAML file.
# kubectl apply -f https://docs.projectcalico.org/v3.3/getting-started/kubernetes/installation/hosted/rbac-kdd.yaml

# wget https://docs.projectcalico.org/v3.3/getting-started/kubernetes/installation/hosted/kubernetes-datastore/calico-networking/1.7/calico.yaml
# sed s/192.168.0.0\\/16/172.16.0.0\\/16/g -i calico.yaml
# kubectl apply -f calico.yaml
After installing the pod network add-on, you can check the status that CoreDNS started normally.
# kubectl get pods -n kube-system

NAME                                       READY   STATUS    RESTARTS   AGE
calico-kube-controllers-578894d4cd-fnwtn   1/1     Running   0          6h13m
coredns-66bff467f8-s8d9q                   1/1     Running   0          6h16m
coredns-66bff467f8-t4mpw                   1/1     Running   0          6h16m
etcd-master                                1/1     Running   0          6h16m
kube-apiserver-master                      1/1     Running   0          6h16m
kube-controller-manager-master             1/1     Running   0          6h16m
kube-proxy-kgrxj                           1/1     Running   0          6h11m
kube-scheduler-master                      1/1     Running   0          6h16m
6. kubedm join
In order to become a worker node, you need to register the master node by executing the'kubeadm join' command.
# kubeadm token create --print-join-command
6-1. Worker node registration
$ kubeadm join 192.168.56.110:6443 --token vyx68j.mu3vdmm3rscy60pd --discovery-token-ca-cert-hash sha256:258640f0d92a1d49da2012be529d3c240594fb007e8666015d0a99adc421ffd1
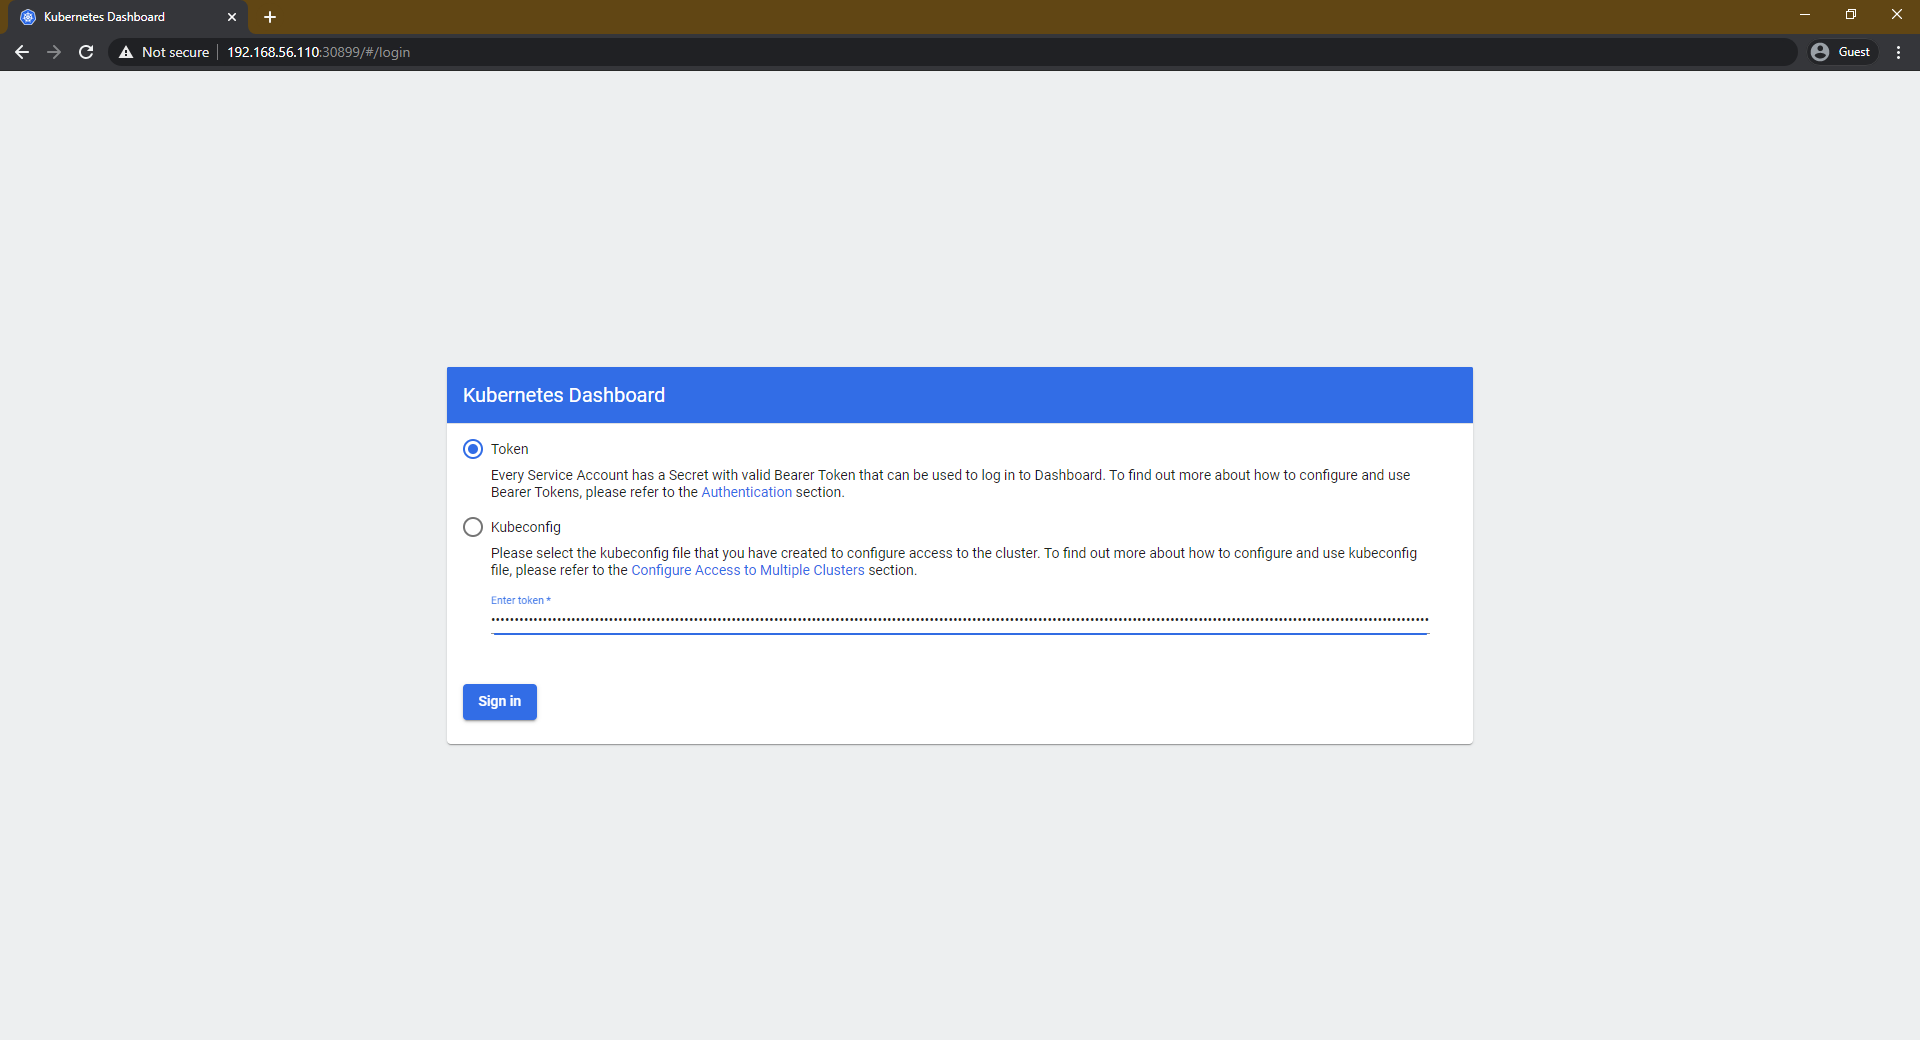
7. Installing Kubernets Dashboard
You can check how to install Dashboard on https://github.com/kubernetes/dashboard/wiki/Installation . There are two ways to install Kubernetes Dashboard: Recommended setup and Alternative setup. Alternative setup installation is not recommended as a method to access Dashboard using HTTP without using HTTPS.
7-1. Certificate generation
To access the Dashboard directly without 'kubectl proxy', you need to establish a secure HTTPS connection using a valid certificate.
# mkdir ~/certs
# cd ~/certs

# openssl genrsa -des3 -passout pass:x -out dashboard.pass.key 2048
# openssl rsa -passin pass:x -in dashboard.pass.key -out dashboard.key
# openssl req -new -key dashboard.key -out dashboard.csr
# openssl x509 -req -sha256 -days 365 -in dashboard.csr -signkey dashboard.key -out dashboard.crt
7-2. Recommended setup
# kubectl create secret generic kubernetes-dashboard-certs --from-file=$HOME/certs -n kube-system
# kubectl apply -f https://raw.githubusercontent.com/kubernetes/dashboard/v2.0.3/aio/deploy/recommended.yaml
7-3. Dashboard service changed to NodePort
If you change the Dashboard service to NodePort, you can connect directly through NodePort without a'kubectl proxy'.
# kubectl edit service kubernetes-dashboard -n kubernetes-dashboard
# Please edit the object below. Lines beginning with a '#' will be ignored,
# and an empty file will abort the edit. If an error occurs while saving this file will be
# reopened with the relevant failures.
#
apiVersion: v1
kind: Service
metadata:
  annotations:
    kubectl.kubernetes.io/last-applied-configuration: |
      {"apiVersion":"v1","kind":"Service","metadata":{"annotations":{},"labels":{"k8s-app":"kubernetes-dashboard"},"name":"kubernetes-dashboard","namespace":"kubernetes-dashboard"},"spec":{"ports":[{"port":443,"targetPort":8443}],"selector":{"k8s-app":"kubernetes-dashboard"}}}
  creationTimestamp: "2020-07-31T04:14:49Z"
  labels:
    k8s-app: kubernetes-dashboard
  managedFields:
  - apiVersion: v1
    fieldsType: FieldsV1
    fieldsV1:
      f:metadata:
        f:annotations:
          .: {}
          f:kubectl.kubernetes.io/last-applied-configuration: {}
        f:labels:
          .: {}
          f:k8s-app: {}
      f:spec:
        f:externalTrafficPolicy: {}
        f:ports:
          .: {}
          k:{"port":443,"protocol":"TCP"}:
            .: {}
            f:port: {}
            f:protocol: {}
            f:targetPort: {}
        f:selector:
          .: {}
          f:k8s-app: {}
        f:sessionAffinity: {}
        f:type: {}
    manager: kubectl
    operation: Update
    time: "2020-07-31T04:15:28Z"
  name: kubernetes-dashboard
  namespace: kubernetes-dashboard
  resourceVersion: "2308"
  selfLink: /api/v1/namespaces/kubernetes-dashboard/services/kubernetes-dashboard
  uid: 44d10147-c353-4f0c-8181-9a16ec6ebd73
spec:
  clusterIP: 10.111.64.103
  externalTrafficPolicy: Cluster
  ports:
  - nodePort: 30899
    port: 443
    protocol: TCP
    targetPort: 8443
  selector:
    k8s-app: kubernetes-dashboard
  sessionAffinity: None
  type: NodePort
status:
  loadBalancer: {}
7-4. Dashboard access information confirm
# kubectl get service -n kubernetes-dashboard

NAME                        TYPE        CLUSTER-IP      EXTERNAL-IP   PORT(S)         AGE
dashboard-metrics-scraper   ClusterIP   10.97.22.234    <none>        8000/TCP        6h15m
kubernetes-dashboard        NodePort    10.111.64.103   <none>        443:30899/TCP   6h15m
7-5. Dashboard account creation
# kubectl create serviceaccount cluster-admin-dashboard-sa
# kubectl create clusterrolebinding cluster-admin-dashboard-sa --clusterrole=cluster-admin --serviceaccount=default:cluster-admin-dashboard-sa
7-6. Check account token information required when accessing Dashboard
The contents of the token value can be checked by decoding it on: https://jwt.io/ .
# kubectl get secret $(kubectl get serviceaccount cluster-admin-dashboard-sa -o jsonpath="{.secrets[0].name}") -o jsonpath="{.data.token}" | base64 --decode

eyJhbGciOiJSUzI1NiIsImtpZCI6IngzMkZJLWM3N054dnZOb0Y0NTlYWUQ1YUF6SHBlYUZRcDdOSmtPVHM0RDAifQ.eyJpc3MiOiJrdWJlcm5ldGVzL3NlcnZpY2VhY2NvdW50Iiwia3ViZXJuZXRlcy5pby9zZXJ2aWNlYWNjb3VudC9uYW1lc3BhY2UiOiJkZWZhdWx0Iiwia3ViZXJuZXRlcy5pby9zZXJ2aWNlYWNjb3VudC9zZWNyZXQubmFtZSI6ImNsdXN0ZXItYWRtaW4tZGFzaGJvYXJkLXNhLXRva2VuLXg1a2NqIiwia3ViZXJuZXRlcy5pby9zZXJ2aWNlYWNjb3VudC9zZXJ2aWNlLWFjY291bnQubmFtZSI6ImNsdXN0ZXItYWRtaW4tZGFzaGJvYXJkLXNhIiwia3ViZXJuZXRlcy5pby9zZXJ2aWNlYWNjb3VudC9zZXJ2aWNlLWFjY291bnQudWlkIjoiMWZkNWExNTItZDQ3MS00MjRjLWFlMGEtMDAzYzdiZWU3YzBmIiwic3ViIjoic3lzdGVtOnNlcnZpY2VhY2NvdW50OmRlZmF1bHQ6Y2x1c3Rlci1hZG1pbi1kYXNoYm9hcmQtc2EifQ.NZQ7I5Fvd-7-DXmy7cAEX15sSiL8K73vFRvS2fCc5Q8eoa0LPYpTEegoINyvVoyvXMOOV-fTIAInGZDKwgwInih1A8igOL3QjN_l1vltNC2MXbTPj61vQEIpFa2OJXhKCULdUPDjZkI5VbvTOgu657JSq-ZbtPcIGM5loxfTEskBhdBtojAz_ZbxVBR_KnynEKEOEKPNtsb85GcNVEMXNzfbb3cms0IKcbhX1cPCMKeq_H7gsz2c5YmBBPpUDYbu-LSCKS8XVJpkCNAiMwTlSCYjaxEJ2B6zBI1zBzDw832xqBCcndT1y6Oer-kOypN5e_nl94aOvKbDpJQT8c_rfw
7-7. Dashboard connection check
8. Creating a CUBRID container image
8-1. Dockerfile
FROM centos:7

ENV CUBRID_VERSION 10.2.1
ENV CUBRID_BUILD_VERSION 10.2.1.8849-de852d6

RUN yum install -y epel-release; \
    yum update -y; \
    yum install -y sudo \
                   java-1.8.0-openjdk-devel; \
    yum clean all;

RUN mkdir /docker-entrypoint-initdb.d

RUN useradd cubrid; \
    sed 102s/#\ %wheel/%wheel/g -i /etc/sudoers; \
    sed s/wheel:x:10:/wheel:x:10:cubrid/g -i /etc/group; \
    sed -e '61 i\cubrid\t\t soft\t nofile\t\t 65536 \
    cubrid\t\t hard\t nofile\t\t 65536 \
    cubrid\t\t soft\t core\t\t 0 \
    cubrid\t\t hard\t core\t\t 0\n' -i /etc/security/limits.conf; \
    echo -e "\ncubrid     soft    nproc     16384\ncubrid     hard    nproc     16384" >> /etc/security/limits.d/20-nproc.conf

RUN curl -o /home/cubrid/CUBRID-$CUBRID_BUILD_VERSION-Linux.x86_64.tar.gz -O http://ftp.cubrid.org/CUBRID_Engine/$CUBRID_VERSION/CUBRID-$CUBRID_BUILD_VERSION-Linux.x86_64.tar.gz > /dev/null 2>&1 \
    && tar -zxf /home/cubrid/CUBRID-$CUBRID_BUILD_VERSION-Linux.x86_64.tar.gz -C /home/cubrid \
    && mkdir -p /home/cubrid/CUBRID/databases /home/cubrid/CUBRID/tmp /home/cubrid/CUBRID/var/CUBRID_SOCK

COPY cubrid.sh /home/cubrid/

RUN echo ''; \
    echo 'umask 077' >> /home/cubrid/.bash_profile; \
    echo ''; \
    echo '. /home/cubrid/cubrid.sh' >> /home/cubrid/.bash_profile; \
    chown -R cubrid:cubrid /home/cubrid

COPY docker-entrypoint.sh /usr/local/bin/
RUN chmod +x /usr/local/bin/docker-entrypoint.sh; \
    ln -s /usr/local/bin/docker-entrypoint.sh /entrypoint.sh

VOLUME /home/cubrid/CUBRID/databases

EXPOSE 1523 8001 30000 33000

ENTRYPOINT ["docker-entrypoint.sh"]
8-2. cubrid.sh
export CUBRID=/home/cubrid/CUBRID
export CUBRID_DATABASES=$CUBRID/databases
if [ ! -z $LD_LIBRARY_PATH ]; then
  export LD_LIBRARY_PATH=$CUBRID/lib:$LD_LIBRARY_PATH
else
  export LD_LIBRARY_PATH=$CUBRID/lib
fi
export SHLIB_PATH=$LD_LIBRARY_PATH
export LIBPATH=$LD_LIBRARY_PATH
export PATH=$CUBRID/bin:$PATH

export TMPDIR=$CUBRID/tmp
export CUBRID_TMP=$CUBRID/var/CUBRID_SOCK

export JAVA_HOME=/usr/lib/jvm/java
export PATH=$JAVA_HOME/bin:$PATH
export CLASSPATH=.
export LD_LIBRARY_PATH=$JAVA_HOME/jre/lib/amd64:$JAVA_HOME/jre/lib/amd64/server:$LD_LIBRARY_PATH
8-3. docker-entrypoint.sh
#!/bin/bash
set -eo pipefail
shopt -s nullglob
# Set the database default character set.
# '$CUBRID_CHARSET' If the environment variable is not set,set'ko_KR.utf8' as the default character set.
if [[ -z "$CUBRID_CHARSET" ]]; then
    CUBRID_CHARSET='ko_KR.utf8'
fi
# set the database name to be created when the container starts.
# If you do not set the'$CUBRID_DATABASE' environment variable, set'demodb' as the default database.
if [[ -z "$CUBRID_DATABASE" ]]; then
    CUBRID_DATABASE='demodb'
fi
# Set the name of the user account to use in the database.
# If the'$CUBRID_USER' environment variable is not set,'dba' is set as the default user.
if [[ -z "$CUBRID_USER" ]]; then
    CUBRID_USER='dba'
fi
# Set the password for the'dba' account to use in the database and the password for the user account.
# '$CUBRID_DBA_PASSWORD', '$CUBRID_PASSWORD' Check the environment variables and set them individually.
# If only one of the two environment variables is set, set both environment variables to the same value.
# If neither environment variable is set, set the'$CUBRID_PASSWORD_EMPTY' environment variable value to 1.
if [[ ! -z "$CUBRID_DBA_PASSWORD" || -z "$CUBRID_PASSWORD" ]]; then
    CUBRID_PASSWORD="$CUBRID_DBA_PASSWORD"
elif [[ -z "$CUBRID_DBA_PASSWORD" || ! -z "$CUBRID_PASSWORD" ]]; then
    CUBRID_DBA_PASSWORD="$CUBRID_PASSWORD"
elif [[ -z "$CUBRID_DBA_PASSWORD" || -z "$CUBRID_PASSWORD" ]]; then
    CUBRID_PASSWORD_EMPTY=1
fi
# Check if you are currently connected to an account that can manage CUBRID.
if [[ "$(id -un)" = 'root' ]]; then
    su - cubrid -c  "mkdir -p \$CUBRID_DATABASES/$CUBRID_DATABASE"
elif [[ "$(id -un)" = 'cubrid' ]]; then
    . /home/cubrid/cubrid.sh
    mkdir -p "$CUBRID_DATABASES"/"$CUBRID_DATABASE"
else
    echo 'ERROR: Current account is not vaild.'; >&2
    echo "Account : $(id -un)" >&2
    exit 1
fi
# When the container starts, it creates a database with the name set in the'$CUBRID_DATABASE' environment variable.
su - cubrid -c "mkdir -p \$CUBRID_DATABASES/$CUBRID_DATABASE && cubrid createdb -F \$CUBRID_DATABASES/$CUBRID_DATABASE $CUBRID_DATABASE $CUBRID_CHARSET"
su - cubrid -c "sed s/#server=foo,bar/server=$CUBRID_DATABASE/g -i \$CUBRID/conf/cubrid.conf"
# If the default user account is'dba' or'$CUBRID_USER' environment variable, the user account is created.
if [[ ! "$CUBRID_USER" = 'dba' ]]; then
    su - cubrid -c "csql -u dba $CUBRID_DATABASE -S -c \"create user $CUBRID_USER\""
fi
# If the default database is'demodb', DEMO data is created in the account set with the'$CUBRID_USER' environment variable.
if [[ "$CUBRID_DATABASE" = 'demodb' ]]; then
    su - cubrid -c "cubrid loaddb -u $CUBRID_USER -s \$CUBRID/demo/demodb_schema -d \$CUBRID/demo/demodb_objects -v $CUBRID_DATABASE"
fi
# '$CUBRID_PASSWORD_EMPTY' If the environment variable value is not 1, set the password for the DBA account as the environment variable value of'$CUBRID_DBA_PASSWORD'.
if [[ ! "$CUBRID_PASSWORD_EMPTY" = 1 ]]; then
    su - cubrid -c "csql -u dba $CUBRID_DATABASE -S -c \"alter user dba password '$CUBRID_DBA_PASSWORD'\""
fi
# '$CUBRID_PASSWORD_EMPTY' If the environment variable value is not 1, set the user account password as the'$CUBRID_PASSWORD' environment variable value.
if [[ ! "$CUBRID_PASSWORD_EMPTY" = 1 ]]; then
    su - cubrid -c "csql -u dba -p '$CUBRID_DBA_PASSWORD' $CUBRID_DATABASE -S -c \"alter user $CUBRID_USER password '$CUBRID_PASSWORD'\""
fi
# '/Docker-entrypoint-initdb.d' Execute'*.sql' files in the directory as csql utility.
echo
for f in /docker-entrypoint-initdb.d/*; do
    case "$f" in
        *.sql)    echo "$0: running $f"; su - cubrid -c "csql -u $CUBRID_USER -p $CUBRID_PASSWORD $CUBRID_DATABASE -S -i \"$f\""; echo ;;
        *)        echo "$0: ignoring $f" ;;
    esac
    echo
done
# Remove the two environment variables,'$CUBRID_DBA_PASSWORD', and'$CUBRID_PASSWORD', which have the password for the'dba' account and the password for the user account set.
unset CUBRID_DBA_PASSWORD
unset CUBRID_PASSWORD
echo
echo 'CUBRID init process complete. Ready for start up.'
echo
su - cubrid -c "cubrid service start"
tail -f /dev/null
8-4. build.sh
docker build --rm -t cubridkr/cubrid-test:10.2.1.8849 .
8-5. Build to create Docker images
# sh build.sh
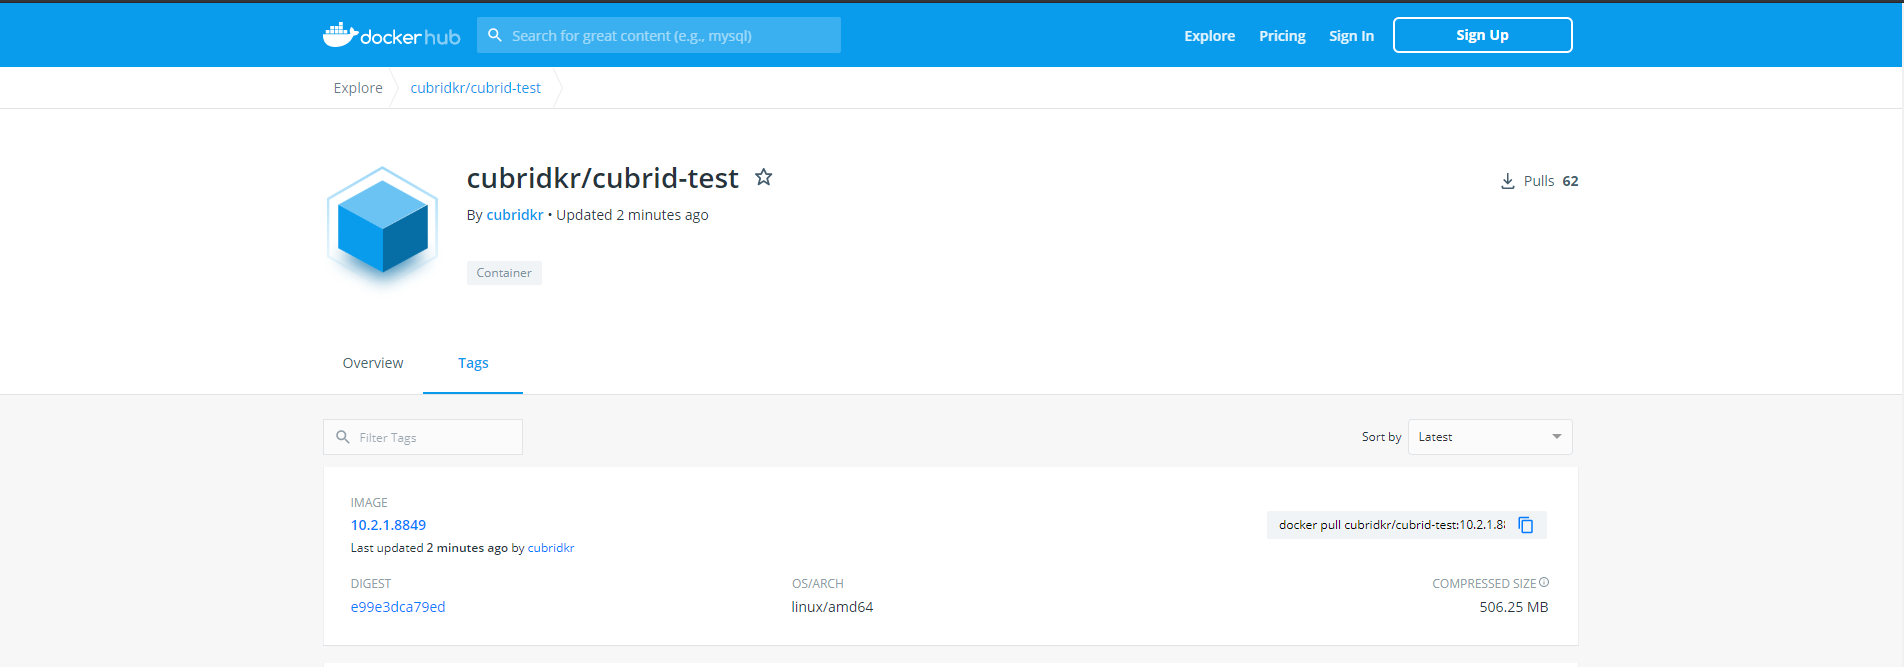
9. Upload CUBRID Container Image to Docker Hub
To upload a Docker image to Docker Hub, you must first create a Docker Hub account and repository. However, this part is simple, so I will skip it and introduce only the process of uploading a Docker image while the Docker Hub Repository is created.
9-1. Docker Hub Login
# docker login --username [username]
9-2. Uploading Docker images to Docker Hub
# docker push cubridkr/cubrid-test:10.2.1.8849
9-3. Docker Hub Confirm
10. Deploy CUBRID Containers to Kubernets Environments
You can deploy a Kubernetes environment Docker container by writing the Kubernetes YAML format.
# cat << EOF | kubectl create -f -
apiVersion: apps/v1
kind: Deployment
metadata:
  name: cubrid
spec:
  selector:
    matchLabels:
      app: cubrid
  replicas: 1
  template:
    metadata:
      labels:
        app: cubrid
    spec:
      containers:
      - name: cubrid
        image: cubridkr/cubrid-test:10.2.1.8849
        imagePullPolicy: Always
        ports:
        - name: manager
          containerPort: 8001
        - name: queryeditor
          containerPort: 30000
        - name: broker1
          containerPort: 33000
---
apiVersion: v1
kind: Service
metadata:
  name: cubrid
spec:
  type: NodePort
  ports:
  - name: manager
    port: 8001
  - name: queryeditor
    port: 30000
  - name: broker1
    port: 33000
  selector:
    app: cubrid
EOF
10-1. Distribution of CUBRID container by accessing Dashboard
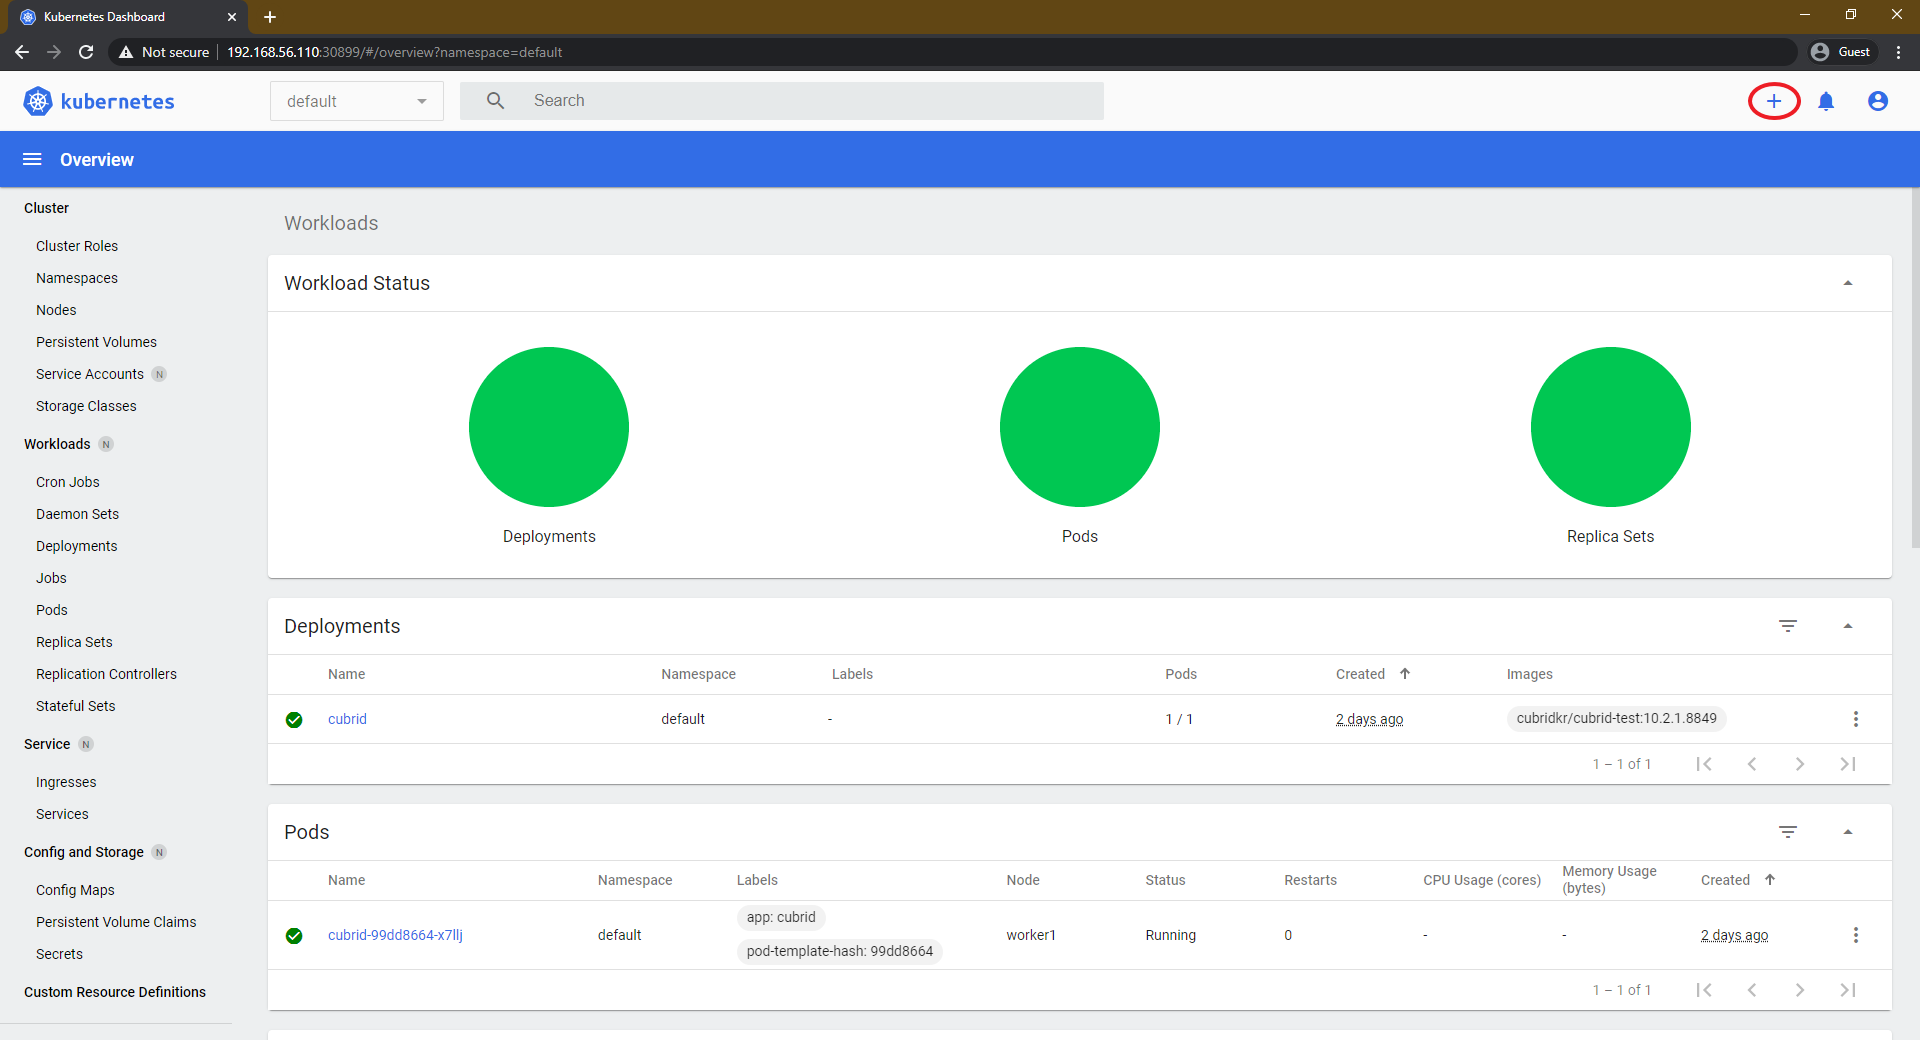
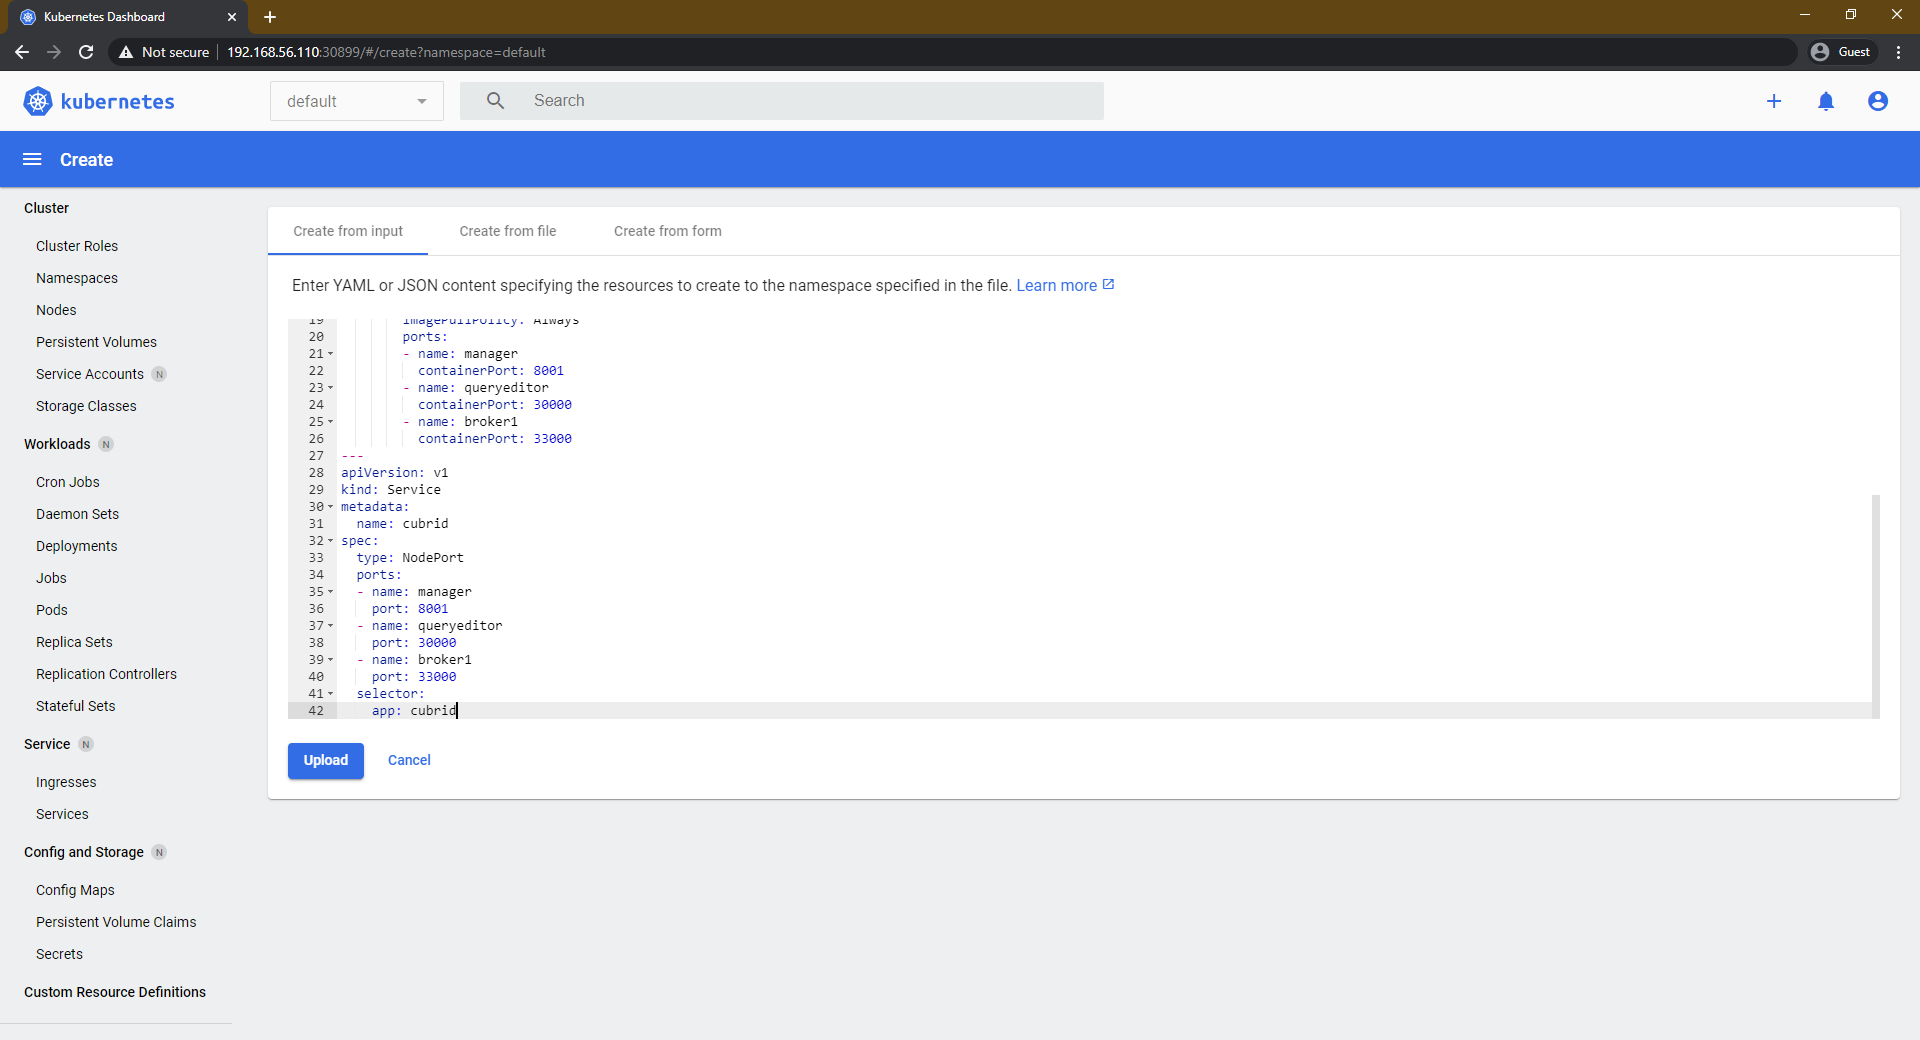
10-2. Check connection information
# kubectl get service cubrid NAME TYPE CLUSTER-IP EXTERNAL-IP PORT(S) AGE cubrid NodePort 10.96.161.199 <none> 8001:31290/TCP,30000:30116/TCP,33000:32418/TCP 179m
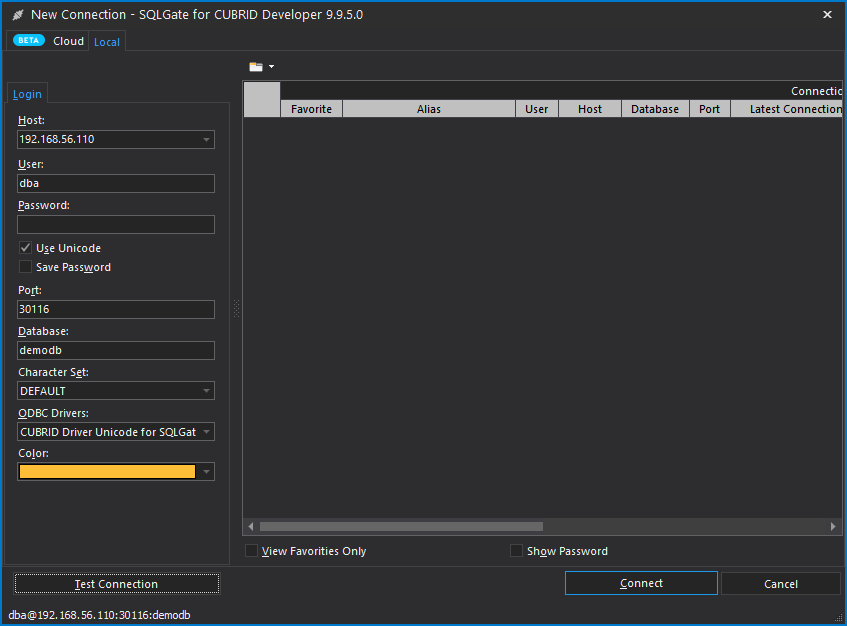
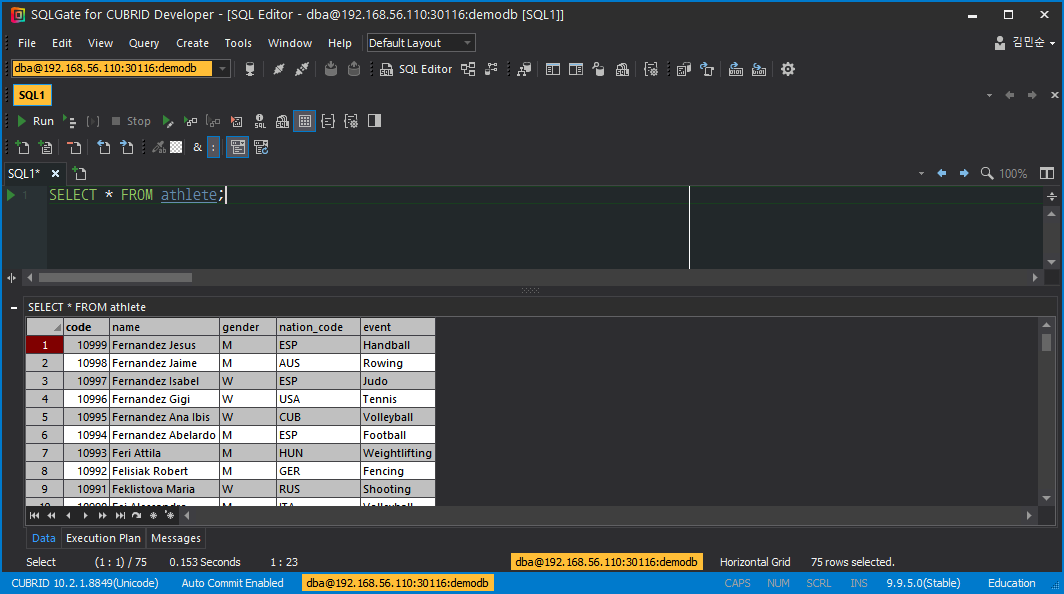
10-3. Connect to SQLGate and test.

 CUBRID Manager Import Wizard Useful Tips!


