
Recently, Node.js has become one of the most favorite tools for developers to create new Web services or network applications because of its event-driven and non-blocking I/O architecture which allow developers to create very lightweight, efficient, and highly scalable real-time applications that run across distributed servers.
Node.js has been widely adopted by individual developers as well as large corporations such as LinkedIn, Yahoo!, Microsoft, and others. It has become so popular that developers have started writing and publishing so called Node Packaged Modules which further extends the functionality of the Node.js platform. In fact, there are over 17,000 registered modules at https://www.npmjs.com/ which have been downloaded over 12,000,000 times during the last month only. That popular the Node.js platform is
node-cubrid
To allow Node.js developers to connect and work with CUBRID Database Server, we have developed the node-cubrid module and published it at NPM.
node-cubrid provides a set of APIs to connect to and query CUBRID databases. Besides the database specific APIs, the module also supplies several helper APIs which are useful to sanitize and validate user input values, format and parameterize SQL statements.
Compatibility
node-cubrid has been developed in pure JavaScript, therefore it has no dependency on any external library. This allows users to develop CUBRID Database based Node.js applications on any Node.js compatible platform such as Linux, Mac OS X, and Windows. For the same reason, node-cubrid is designed to work with any version of CUBRID RDBMS.
This is different from other CUBRID drivers such as PHP/PDO, Python, Perl, Ruby, OLEDB, and ODBC which have dynamic dependency on CUBRID C Interface (CCI). Since CUBRID is available only on Linux and Windows OS, these drivers are also limited to these platforms as well as the specific CUBRID versions. However, CUBRID’s Node.js as well as ADO.NET drivers do not have any dependency, therefore can be used on any platform where the particular run-time environment is capable of running on.
Installation
Installing and using node-cubrid is easy. To install, one has to initiate NPM install command with node-cubrid module name as an argument in the directory where a Node.js application is located.
NPM install node-cubrid
This will install the latest version available at https://www.npmjs.com/package/node-cubrid. Once it is installed, the module can be accessed by requiring the node-cubrid module:
const CUBRID = require('node-cubrid');
The node-cubrid module exports the following properties and functions:
- Helpers: an object which provides a set of helper functions.
- createConnection( ) (alias createCUBRIDConnection() ): a function which returns a connection object to work with a user defined CUBRID host and database.
- createDefaultCUBRIDDemodbConnection(): a function which returns a connection object to work with a local demodb database.
Request flow in node-cubrid
The request flow in node-cubrid module is illustrated below.
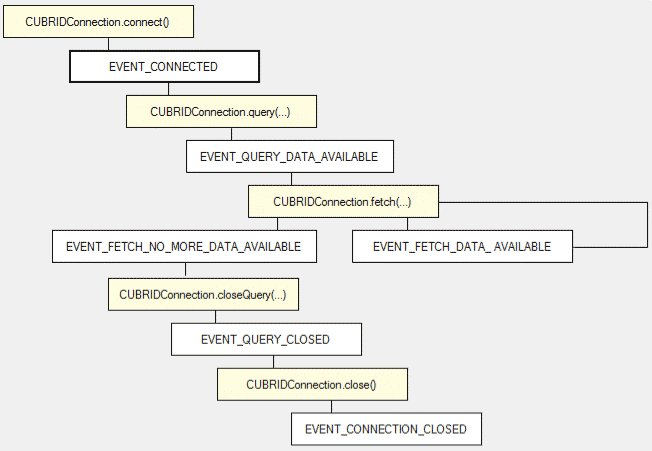
Because node-cubrid is developed to take the full advantage of JavaScript and Node.js programming, when executing a SQL statement in node-cubrid, developers need to listen for an EVENT_QUERY_DATA_AVAILABLE and EVENT_ERROR events, or provide a callback function which will be called once there is a response from the server.
When the request is sent to the server, CUBRID executes it, and returns the response, which can be either a query result set, or the error code. It is by design that CUBRID does not return any identification about the request sender. In other words, to associate the response with a request, the driver has to have only one active request which can be the only owner of this response.
For this reason, if a developer wants to execute several queries, they must execute them one after another, i.e. sequentially, NOT in parallel. This is how the communication between the driver and the server is implemented in CUBRID and many other database systems. Perhaps, in the future the CUBRID Engine may have this feature to include a request identifier.
If there is a vital need to run queries in parallel, developers can use connection pooling modules. We will explain this technique in the examples below.
Using node-cubrid
Establishing a connection
First, user establishes a connection with a CUBRID server by providing a
- host name (default: ‘localhost’),
- the broker port (default: 33000),
- database username (default: ‘public’),
- password (default: empty string),
- the database name (default: ‘demodb’).
const CUBRID = require(‘node-cubrid’);
const dbConf = {
host: ‘localhost’,
port: 33000,
user: ‘dba',
password: ‘‘,
database: ‘demodb’
};
const client = CUBRID.createConnection(dbConf);

client.connect(function (err) {
     if (err) {
         throw err;
     } else {
         console.log('connection is established');

         client.close(function (err) {
            if (err) {
                throw err;
            } else {
                console.log('connection is closed');
            }
         });
     }
});
The above code illustrates a callback style when a function is passed as an argument to a connect() API which is called if the connection has been successfully established. Alternatively, developers can write applications based on a Promise style. For example, the above code can be rewritten as:
client
    .connect()
    .then( ( ) => {
         console.log('connection is established');
         return client.close();
    })
    .catch( err => {
        throw err;
    });
If you prefer the Promise style, you can refer to the node-cubrid npm page to learn more about other events.
Executing queries
Once connected, users can start executing SQL queries. There are several APIs you can use to execute queries in node-cubrid:
READ queries
- query(sql, params,callback);
- queryAsObjects(sql, params, callback);
- getMetaData(queryHandle, callback);
- queryAll(sql, params, callback);
- queryAllAsObjects(sql, params, callback);
Query() Example
// Callback style.
client.query(sql, callback);
client.query(sql, params, callback)

// Promise style.
const promise = client.query(sql);
const promise = client.query(sql, params)
1. `sql`: a string representation of a single READ query. Required.
2. `params`: is an array of parameter values or the value itself which a user wants to bind instead of `?` placeholders in the `sql` query. If no placeholder is found, the `sql` will not be modified. This argument is optional. When omitted, `sql` will be sent to the server unmodified. This `params` argument is available since version 2.1.0.
3. `callback`: is a function which will be invoked when the query finishes executing. Optional. The `callback` function can be omitted in which case users need to handle the return value of the `Promise`.
Callback example
Here is an example which executes a simple SELECT query
const CUBRID = require(‘node - cubrid’);

//  Connection is established implicitly.
client.query(‘SELECT * FROM nation’, function(err, result, queryHandle) {
  if (err) {
    throw err;
  } else {
    const rows = result.ColumnValues;
    const rowsCount = result.RowsCount;

    for (let i = 0; i < rowsCount; i++) {
      let columns = rows[i];

      for (let j = 0, columnsCount = columns.length; j < columnsCount; j++) {
        console.log(columns[j]);
      }
    }
    // Fetch more data using queryHandle if necessary.
    // Refer to examples below.
  }
});
Promise example
const promise = client
  .query(‘SELECT * FROM nation’)
  .then(response => {
    const result = response.result;
    const queryHandle = response.queryHandle;
    const rowsCount = result.RowsCount;
    const rows = result.ColumnValues;

    for (let i = 0; i < rowsCount; i++) {
      let columns = rows[i];

      for (let j = 0, columnsCount = columns.length; j < columnsCount; j++) {
        colsole.log(columns[j]);
      }
    }

    // Do something more.
  })
  .catch(err => {
    // Handle the error.
  });
Fetching more data
Sometimes, when quering a database, it happens that the results set is quite large that it has to be retrieve in multiple steps. Below you can see how to keep fetching more data until all data is retrieved.
// Callback style.
client.fetch(queryHandle, all, callback);
// Promise style.
const promise = client.query(queryHandle, all);
1. `queryHandle`: an interger ID for the query handle obtained from `query()` function.
2. `all`: a Boolean that tells whether to fetch all available records or just the next batch. Defaults to `false`. Since `3.0.0`.
3. `callback(err, result, queryHandle)`: function accepts the same three arguments accepted by the `query()` function.
Callback example
client.query(‘SELECT * FROM nation’, function(err, result, queryHandle) {
  if (err) {
    throw err;
  } else {
    const rows = result.ColumnValues;
    const rowsCount = result.RowsCount;

    for (let i = 0; i < rowsCount; i++) {
      let columns = rows[i];

      for (let j = 0; columnsCount = columns.length; j < columnsCount; j++) {
        console.log(columns[j]);
      }
    }

    // Fetch more data using the `queryHandle`.
    client.fetch(queryHandle, function(err, result, queryHandle) {
      // Handle the error and response.
      // Note that the fetch does not return all the records
      // but only some. So, users need to fetch records in batches.
    });
  }
});
Promise example
const promise = client
  .query('SELECT * FROM nation')
  .then(response => {
    const result = response.result;
    const queryHandle = response.queryHandle;

    const rowsCount = result.RowsCount;
    const rows = result.ColumnValues;

    for (let i = 0; i < rowsCount; i++) {
      let columns = rows[i];

      for (let j = 0, columnsCount = columns.length; j < columnsCount; j++) {
        console.log(columns[j]);
      }
    }

    return client.fetch(queryHandle);
  })
  .then(response => {
    // The same `response` as after `query()`.
  })
  .catch(err => {
    // Handle the error.
  });
Close Query
It is vital to always close all the READ queries when they are no longer necessary. When you query, CUBRID allocates a part of memory to hold the query statement information necessary to return values on consecutive fetch() requests. Unless the connection with the client is disconnected, CUBRID will keep this information in memory. When not released during the lifetime of the connection, eventual OOM (Out Of Memory) problems can occur on the server side. This is why when you are done with the query results, close the queries. If the connection is disconnected, CUBRID will automatically close all the query statements to free the memory.
client.closeQuery(queryHandle, callback);
1. `queryHandle`: an interger ID for the query handle obtained from `query()` or the last `fetch()`.
2. `callback(err)`: function that accepts one argument `err` an error object if any.
All READ queries must be closed explicitly except when you call queryAll in which case the driver will close queries for you because there is no more data that you may possibly request.
Callback example
client.query(sql, function(err, result, queryHandle) {
  const arr = result.ColumnValues;

  if (arr.length) {
    // Try to fetch more.
  } else {
    client.closeQuery(queryHandle, function(err) {
      // Do something else.
    });
  }
});
Promise example
const promise = client
  .query(sql)
  .then(response => {
    // Do something with response.

    return client.closeQuery(response.queryHandle);
  })
  .catch(err => {
    // Handle the error.
  });
WRITE queries
- execute(sql, params, callback);
- executeWithTypedParams(sql, params, dataTypes, callback);
- batchExecuteNoQuery();
Execute() Example
// Callback style.
client.execute(sql, callback);
client.execute(sql, params, callback)
// Promise style.
const promise = client.execute(sql);
const promise = client.execute(sql, params);
1. `sql`: a string representation a WRITE query or an array of strings for batch processing. `sql` must be a string if `params` are provided.
2. `params`: is an array of parameter values or the value itself which a user wants to bind instead of `?` placeholders in the `sql` query. If no placeholder is found, the `sql` will not be modified. This argument is optional. When omitted, `sql` will be sent to the server unmodified. Available since `3.0.0`.
3. `callback(err)`: a function that accepts one argument, `err` an error object if any.
Note: After executing WRITE queries there is no need to close the query.
Callback example
Here is an example which executes a simple ‘INSERT’ query.
client.execute('INSERT INTO tbl VALUES(1, 2, 3)', function(err) {
  // Handle the error;
});
The following example shows how to set placeholders and bind values in ‘INSERT’ queries.
client.execute('INSERT INTO tbl VALUES(?, ?, ?)', [1, 2, 3], function(err) {
  // Handle the error;
});
Promise example
const promise = client
  .query('INSERT INTO tbl VALUES(1, 2, 3) ')
  .then(response => {
    // Do something more.
  })
  .catch(err => {
    // Handle the error.
  });
Queueing
Almost all requests that start network communication from node-cubrid version 2.1.0 pass through the internal queue. This includes READ and WRITE queries, close query requests, fetch requests, and rollback/commit requests.
Thus, in order to put queries into a queue, all you need to do is call query() / execute() and their equivalent functions one after another. They will be added into the queue as they come in (FIFO).
Here is an example.
client.execute('CREATE TABLE tbl_test(id INT)', callback);
client.execute('INSERT INTO tbl_test (id) VALUES (1), (2), (3)', callback);
client.query('SELECT * FROM tbl_test', callback);
client.execute('DROP TABLE tbl_test', callback);
Remember that the callback is optional in which case you should handle the promises.
Check if queue is empty
In case you are interested in checking if the queue is empty, call the following function. Returns ‘true’ or ‘false’.
client.isQueueEmpty();
Get queue depth
The below function will return the number of requests currently in the queue. Remember that this number represents all requests, including READ and WRITE, and fetch, and rollback/commit, etc. Briefly all requests which initiate a network communication, including those which are currently in-flight.
client.getQueueDepth();
Closing a connection
// Callback style.
client.close(callback);
client.end(callback)
`close()` or its alias `end()` functions accept one argument, the alias `end()` function is available since 2.1.0,
1. `callback(err)`: accepts one argument, `err` an error object if any.
// Promise style.
const promise = client.close();
const promise = client.end();
Callback example
client.close(function(err) {
  if (err) {
    throw err;
  } else {
    console.log('connection is closed');
  }
});
Promise example
const promise = client
  .connect()
  .then(() => {
    return client.close();
  });
When a connection is closed by calling ‘close()’ or ‘end()’, all pending/queued requests will be removed from the internal queue. All in-flight queries will be requested to be closed.
Using a connection pool manager
Node-cubrid does not support connection pool yet, but you can use cubrid connection pool using a module called generic-pool.
The installation of generic-pool is as follows:
npm install generic-pool [--save]
CUBRID connection pool is created as follows:
const genericPool = require('generic-pool');
const CUBRID = require(‘node - cubrid’);

const dbConf = {
  host: ‘localhost’,
  port: 33000,
  user: ‘dba ',
  password: ‘‘,
  database: ‘demodb’
};

const factory = {
  name: ‘CUBRID’,
  create: function() {
    var client = CUBRID.createConnection(dbConf);
    client.query(‘select 1’);
    return client;
  },
  destroy: function(client) {
    client.disconnect();
  }
};

const opts = {
  max: 10, // maximum size of the pool
  min: 2 // minimum size of the pool
};

const myPool = genericPool.createPool(factory, opts);
Below is the code to get and use the connection in the CUBRID connection pool.
const resourcePromise = myPool.acquire();

resourcePromise
  .then(function(client) {
      client.quert(“select * from nation”, function(err, result, queryHandle) {
          const rows = result.ColumnValues;
          const rowCount = result.RowsCount;

          for (let i = 0; i < rowsCount; i++) {
            let columns = rows[i];
            for (let j = 0; columnsCount = columns.length; j < columnsCount; j++) {
              console.log(columns[j]);
            }
          }
          return client;
          mypool.release(client);
        )
      };
    )
  }
  .catch((err) => {
    console.log(err);
  });
For a detailed description of generic-pool npm, see generic-pool.
 CUBRID Backup & Restore – Part I (Backup)
 CUBRID Triggers