Author: Dongyun Park
CUBRID provides a command called restoreslave from version 10.1 onwards.
Until CUBRID 9.3.x version, the shell script provided by itself was used for online reconfiguration. Starting from 10.1 version, you can work more comfortably through the restoreslave command. Regardless of the operation status of the master, the slave can be rebuilt through the command, and the scenario is as follows:
- When Redundancy is broken during HA service:
- Required Environment: Master - Slave duplication environment.
- Required File: Backup file of master server
- Scenario:
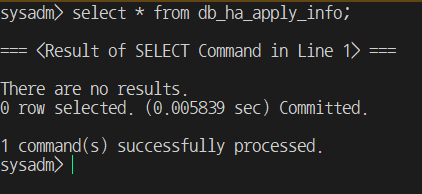
- Delete data from db_ha_apply_info of slab to reenact the breaking redundancy of DB.
- End the heartbeat of the slave.
slave)
$> cubrid hb stop
$> csql -S -u dba --sysadm demodb
sysadm> delete from db_ha_apply_info;
- If the above redundancy log is deleted, synchronization will no longer take place.
- Consider that DB redundancy has been broken due to the above actions and proceed with the double recovery.
- The backup file backed up from the master is transferred to the slave.
slave)
$> cbrid service stop -- cbrid service shutdown
$> ps -ef | grep cub -- Check if all CUBRID processes are down.
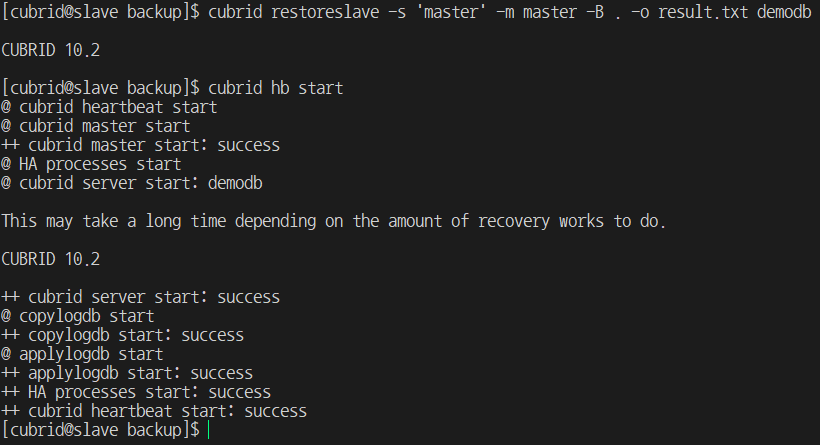
$> cbrid restoreslave -s 'master' -m host_name -B . o result.txt demodb
* The -s option refers to the node that received the backup. ('master', 'slave', 'replica')
* The -m option refers to the hostname of the master node.
* The -B option is the path to the backup file.
* The -o option output message
- When restoreslave is completed, check the normal operation status through the cubrid heartbeat start.
2. During HA service when the DB of slave is deleted due to external factors
- Required Environment: Master - Slave duplication environment.
- Required File: Backup file of master server
- Scenario:
- after stopping the service of the slave, delete the slave DB directory
slave)
$> cubrid service stop $> rm -rf db_name or $>cubrid deletedb db_name
- Then, create the same directory in the corresponding location by referring to the slave's databases.txt file.
* If deleted with eleted, the $CUBRID/databases/databases.txt file must be set to the same content as the master.
- As you can see from the command, since there is a restoredb function for DB, the redundancy is automatically performed after DB restoration.
- The backup file that was backed up by the master is transferred to the slave.
slave)
$> cubrid restoreslave -s 'master' -m host_name -B . -o result.txt -u demodb
* -u option: Recovers the DB in the corresponding location by referring to the databases.txt file.
- The difference from the above scenario is that the DB can be restored to the location registered in databases.txt with the -u option.
- When the restoreslave is completed, check whether the DB is properly restored in db_vol_path in the databases.txt file.
- Lastly, check whether it is normally operated through cubrid heartbeat start.
3. Considerations
1) When restoring a DB using the restoreslave command, the initial recovery point is the backup point.
2) That is, all transactions after the backup point are reflected after operation.
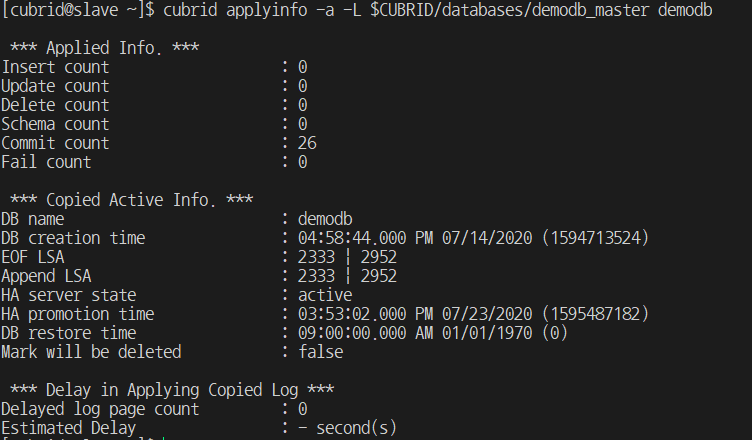
3) This information can be checked through the cubrid applyinfo command, and the delayed log page count must be 0 to reflect all transactions.
4) Therefore, it is easy to run backupdb on the master to work with the latest backup file before the work is done.


 What's New in CUBRID 10: 'String Compression'


