cubrid Management Utilities
The following shows how to use the cubrid management utilities.
cubrid utility_name
utility_name:
    createdb [option] <database_name> <locale_name>  --- Creating a database
    deletedb [option] <database_name>   --- Deleting a database
    installdb [option] <database-name>   --- Installing a database
    renamedb [option] <source-database-name> <target-database-name>  --- Renaming a database
    copydb [option] <source-database-name> <target-database-name>  --- Copying a database
    backupdb [option] <database-name>  --- Backing up a database
    restoredb [option] <database-name>  --- Restoring a database
    addvoldb [option] <database-name>  --- Adding a database volume file
    spacedb [option] <database-name>  --- Displaying details of database space
    lockdb [option] <database-name>  --- Displaying details of database lock
    tranlist [option] <database-name>  --- Checking transactions
    killtran [option] <database-name>  --- Removing transactions
    optimizedb [option] <database-name>  --- Updating database statistics
    statdump [option] <database-name>  --- Dumping statistic information of database server execution
    compactdb [option] <database-name>  --- Optimizing space by freeing unused space
    diagdb [option] <database-name>  --- Displaying internal information
    checkdb [option] <database-name>  --- Checking database consistency
    alterdbhost [option] <database-name>  --- Altering database host
    plandump [option] <database-name>  --- Displaying details of the query plan
    loaddb [option] <database-name>  --- Loading data and schema
    unloaddb [option] <database-name>  --- Unloading data and schema
    paramdump [option] <database-name>  --- Checking out the parameter values configured in a database
    changemode [option] <database-name>  --- Displaying or changing the server HA mode
    applyinfo [option] <database-name>   --- Displaying the status of being applied transaction log to the other node in HA replication environment
    synccolldb [option] <database-name>  --- Synchronizing the DB collation with the system collation
    genlocale [option] <database-name>  --- Compiling the locale information to use
    dumplocale [option] <database-name>   --- Printing human readable text for the compiled binary locale information
Database Users
A CUBRID database user can have members with the same authorization. If authorization A is granted to a user, the same authorization is also granted to all members belonging to the user. A database user and its members are called a "group."; a user who has no members is called a "user."
CUBRID provides DBA and PUBLIC users by default.
- DBA can access every object in the database, that is, it has authorization at the highest level. Only DBA has sufficient authorization to add, alter and delete the database users.
- All users including DBA are members of PUBLIC. Therefore, all database users have the authorization granted to PUBLIC . For example, if authorization B is added to PUBLIC group, all database members will automatically have the B authorization.
databases.txt File
CUBRID stores information on the locations of all existing databases in the databases.txt file. This file is called the "database location file." A database location file is used when CUBRID executes utilities for creating, renaming, deleting or replicating databases; it is also used when CUBRID runs each database. By default, this file is located in the databases directory under the installation directory. The directory is located through the environment variable CUBRID_DATABASES.
db_name db_directory server_host logfile_directory
The format of each line of a database location file is the same as defined by the above syntax; it contains information on the database name, database path, server host and the path to the log files. The following example shows how to check the contents of a database location file.
% more databases.txt

dist_testdb /home1/user/CUBRID/bin d85007 /home1/user/CUBRID/bin
dist_demodb /home1/user/CUBRID/bin d85007 /home1/user/CUBRID/bin
testdb /home1/user/CUBRID/databases/testdb d85007 /home1/user/CUBRID/databases/testdb
demodb /home1/user/CUBRID/databases/demodb d85007 /home1/user/CUBRID/databases/demodb
By default, the database location file is stored in the databases directory under the installation directory. You can change the default directory by modifying the value of the CUBRID_DATABASES environment variable. The path to the database location file must be valid so that the cubrid utility for database management can access the file properly. You must enter the directory path correctly and check if you have write permission on the file. The following example shows how to check the value configured in the CUBRID_DATABASES environment variable.
% set | grep CUBRID_DATABASES
CUBRID_DATABASES=/home1/user/CUBRID/databases
An error occurs if an invalid directory path is set in the CUBRID_DATABASES environment variable. If the directory path is valid but the database location file does not exist, a new location information file is created. If the CUBRID_DATABASES environment variable has not been configured at all, CUBRID retrieves the location information file in the current working directory.
Creating Database, Adding Volume, Deleting Database
The volumes of CUBRID database are classified as permanent volume, temporary volume and backup volume.
- In the permanent volumes,
- there are generic, data, index and temp volumes in database volumes.
- there are an active log, an archiving log and a background archiving log in log volumes.
- In temporary volume, there is a temporary temp volume.
For more details on volumes, see Database Volume Structure.
The following is an example of files related to the database when testdb database is operated.
| File name | Size | Type | Classification | Description |
|---|---|---|---|---|
| testdb | 40MB | generic | Database volume | The firstly created volume when DB is created. This is used as generic volume and includes the meta information of DB. The file size is 40M because "cubrid createdb" is executed after db_volume_size in cubrid.conf is specified as 40M or the option of "cubrid createdb", --db-volume-size is specified as 40M. |
| testdb_x001 | 40MB | one of generic, data, index and temp | Automatically created generic file or a file created by the user's command for adding a volume. The size of generic file which was automatically created became 40MB because DB was started after specifying db_volume_size in cubrid.conf as 40M. | |
| testdb_x002 | 40MB | one of generic, data, index and temp | Automatically created generic file or a file created by the user's command for adding a volume. | |
| testdb_x003 | 40MB | one of generic, data, index and temp | Automatically created generic file or a file created by the user's command for adding a volume. | |
| testdb_x004 | 40MB | one of generic, data, index and temp | Automatically created generic file or a file created by the user's command for adding a volume. | |
| testdb_x005 | 40MB | one of generic, data, index and temp | Automatically created generic file or a file created by the user's command for adding a volume. | |
| testdb_x006 | 2GB | one of generic, data, index and temp | Automatically created generic file or a file created by the user's command for adding a volume. The size became 2GB because DB was restarted after specifying db_volume_size in cubrid.conf as 2G or the option of "cubrid addvoldb", --db-volume-size is specified as 2G. | |
| testdb_t32766 | 360MB | temporary temp | None | a file created temporarily when the space of temp volume is insufficient during running the temp volume required query(e.g.: sorting, scanning, index creation). This is removed when DB is restarted. But, this should not be deleted arbitrarily. |
| testdb_lgar_t | 40MB | background archiving | Log volume | A log file which is related to the background archiving feature. This is used when storing the archiving log. |
| testdb_lgar224 | 40MB | archiving | Archiving logs are continuously archived and the files ending with three digits are created. At this time, archiving logs from 001~223 seem to be removed normally by "cubrid backupdb" -r option or the setting of log_max_archives in cubrid.conf. When archiving logs are removed, you can see the removed archiving log numbers in the REMOVE section of lginf file. See Managing Archive Logs. | |
| testdb_lgat | 40MB | active | Active log file |
- Database volume file
- In the above, testdb, testdb_x001 ~ testdb_x006 are classified as the database volume files.
- File size is determined by "db_volume_size" in cubrid.conf or the "--db-volume-size" option of "cubrid createdb" and "cubrid addvoldb".
- The type of an automatically created volume is always generic.
- Log volume file
- In the above, testdb_lgar_t, testdb_lgar22 and testdb_lgat are classified as the log volume files.
- File size is determined by "log_volume_size" in cubrid.conf or the "--log-volume-size" option of "cubrid createdb".
Note
Temp volume is a space where the intermediate and final results of query processing and sorting are temporarily stored; this is separated as temporary temp volume and permanent temp volume.
The examples of queries that can use permanent temp volume or temporary temp volume are as follows:
- Queries creating the resultset like SELECT
- Queries including GROUP BY or ORDER BY
- Queries including a subquery
- Queries executing sort-merge join
- Queries including the CREATE INDEX statement
When executing the queries above, the temp volume is used after exhausting the memory space (the space size is determined by the system parameter temp_file_memory_size_in_pages specified in cubrid.conf) assigned to store SELECT results or sort the data. The order in which the storage space is used to store the results of query processing and sorting is as follows: when the current storage space is exhausted, the next storage space is used.
- temp_file_memory_size_in_pages memory secured by the system parameter
- Permanent temp volume
- Temporary temp volume (for details, see the below)
To prevent the system from insufficient disk space (as the size of temporary temp volume is increased than expected because a query which requires a big-sized temp space is executed), we recommend that you should;
- secure the expected permanent temp volume in advance and
- limit the size of the space used in the temporary temp volume when a query is executed.
Permanent temp volume secures this space as running "cubrid addvoldb -p temp", and the maximum temporary temp space which is occupied during a query runs can be limited by the temp_file_max_size_in_pages (default is -1, which means infinite) parameter in cubrid.conf.
Creating Database
The cubrid createdb utility creates databases and initializes them with the built-in CUBRID system tables. It can also define initial users to be authorized in the database and specify the locations of the logs and databases. In general, the cubrid createdb utility is used only by DBA.
Warning
When you create database, a locale name and a charset name after a DB name must be specified(e.g. ko_KR.utf8). It affects the length of string type, string comparison operation, etc. The specified charset when creating database cannot be changed later, so you should be careful when specifying it.
For charset, locale and collation setting, see Globalization.
cubrid createdb [options] database_name locale_name.charset
- cubrid: An integrated utility for the CUBRID service and database management.
- createdb: A command used to create a new database.
- database_name: Specifies a unique name for the database to be created, without including the path name to the directory where the database will be created. If the specified database name is the same as that of an existing database name, CUBRID halts creation of the database to protect existing files.
- locale_name: A locale name to use in the database should be input. For a locale name which can be used in CUBRID, refer to Step 1: Selecting a Locale.
- charset: A characterset to use in the database should be input. A character set which can be used in CUBRID is iso88591, euckr or utf8.
- If locale_name is en_US and charset is omitted, a character set will be iso88591.
- If locale_name is ko_KR and charset is omitted, a character set will be utf8.
- All locale names except en_US and ko_KR cannot omit charset, and a charset can be specified only with utf8.
The maximum length of database name is 17 in English.
The following shows [options] available with the cubrid createdb utility.
-
--db-volume-size=SIZE¶ This option specifies the size of the database volume that will be created first. The default value is the value of the system parameter db_volume_size, and the minimum value is 20M. You can set units as K, M, G and T, which stand for kilobytes (KB), megabytes (MB), gigabytes (GB), and terabytes (TB) respectively. If you omit the unit, bytes will be applied.
The following example shows how to create a database named testdb and assign 512 MB to its first volume.
cubrid createdb --db-volume-size=512M testdb en_US
-
--db-page-size=SIZE¶ This option specifies the size of the database page; the minimum value is 4K and the maximum value is 16K (default). K stands for kilobytes (KB). The value of page size is one of the following: 4K, 8K, or 16K. If a value between 4K and 16K is specified, system rounds up the number. If a value greater than 16K or less than 4K, the specified number is used.
The following example shows how to create a database named testdb and configure its page size 16K.
cubrid createdb --db-page-size=16K testdb en_US
-
--log-volume-size=SIZE¶ This option specifies the size of the database log volume. The default value is the same as database volume size, and the minimum value is 20M. You can set units as K, M, G and T, which stand for kilobytes (KB), megabytes (MB), gigabytes (GB), and terabytes (TB) respectively. If you omit the unit, bytes will be applied.
The following example shows how to create a database named testdb and assign 256 MB to its log volume.
cubrid createdb --log-volume-size=256M testdb en_US
-
--log-page-size=SIZE¶ This option specifies the size of the log volume page. The default value is the same as data page size. The minimum value is 4K and the maximum value is 16K. K stands for kilobytes (KB). The value of page size is one of the following: 4K, 8K, or 16K. If a value between 4K and 16K is specified, system rounds up the number. If a value greater than 16K or less than 4K, the specified number is used.
The following example shows how to create a database named testdb and configure its log volume page size 8K.
cubrid createdb --log-page-size=8K testdb en_US
-
--comment=COMMENT¶ This option specifies a comment to be included in the database volume header. If the character string contains spaces, the comment must be enclosed in double quotes.
The following example shows how to create a database named testdb and add a comment to the database volume.
cubrid createdb --comment "a new database for study" testdb en_US
-
-F,--file_path=PATH¶ The -F option specifies an absolute path to a directory where the new database will be created. If the -F option is not specified, the new database is created in the current working directory.
The following example shows how to create a database named testdb in the directory /dbtemp/new_db.
cubrid createdb -F "/dbtemp/new_db/" testdb en_US
-
-L,--log_path=PATH¶ The -L option specifies an absolute path to the directory where database log files are created. If the -L option is not specified, log files are created in the directory specified by the -F option. If neither -F nor -L option is specified, database log files are created in the current working directory.
The following example shows how to create a database named testdb in the directory /dbtemp/newdb and log files in the directory /dbtemp/db_log.
cubrid createdb -F "/dbtemp/new_db/" -L "/dbtemp/db_log/" testdb en_US
-
-B,--lob-base-path=PATH¶ This option specifies a directory where LOB data files are stored when BLOB/CLOB data is used. If the --lob-base-path option is not specified, LOB data files are store in <location of database volumes created>/lob directory.
The following example shows how to create a database named testdb in the working directory and specify /home/data1 of local file system as a location of LOB data files.
cubrid createdb --lob-base-path "file:/home1/data1" testdb en_US
-
--server-name=HOST¶ This option enables the server of a specific database to run in the specified host when CUBRID client/server is used. The information of a host specified is stored in the databases.txt file. If this option is not specified, the current localhost is specified by default.
The following example shows how to create a database named testdb and register it on the host aa_host.
cubrid createdb --server-name aa_host testdb en_US
-
-r,--replace¶ This option creates a new database and overwrites an existing database if one with the same name exists.
The following example shows how to create a new database named testdb and overwrite the existing database with the same name.
cubrid createdb -r testdb en_US
-
--more-volume-file=FILE¶ This option creates an additional volume based on the specification contained in the file specified by the option. The volume is created in the same directory where the database is created. Instead of using this option, you can add a volume by using the cubrid addvoldb utility.
The following example shows how to create a database named testdb as well as an additional volume based on the specification stored in the vol_info.txt file.
cubrid createdb --more-volume-file vol_info.txt testdb en_US
The following is a specification of the additional volume contained in the vol_info.txt file. The specification of each volume must be written on a single line.
#xxxxxxxxxxxxxxxxxxxxxxxxxxxxxxxxxxxxxxxxxxxxxxxxxxxxxxxxxxxxxxxxxxxxxxxxxxxxxxxxx
# NAME volname COMMENTS volcmnts PURPOSE volpurp NPAGES volnpgs
NAME data_v1 COMMENTS "data information volume" PURPOSE data NPAGES 1000
NAME data_v2 COMMENTS "data information volume" PURPOSE data NPAGES 1000
NAME data_v3 PURPOSE data NPAGES 1000
NAME index_v1 COMMENTS "index information volume" PURPOSE index NPAGES 500
NAME temp_v1 COMMENTS "temporary information volume" PURPOSE temp NPAGES 500
NAME generic_v1 COMMENTS "generic information volume" PURPOSE generic NPAGES 500
#xxxxxxxxxxxxxxxxxxxxxxxxxxxxxxxxxxxxxxxxxxxxxxxxxxxxxxxxxxxxxxxxxxxxxxxxxxxxxxxxx
As shown in the example, the specification of each volume consists following.
NAME volname COMMENTS volcmnts PURPOSE volpurp NPAGES volnpgs
- volname: The name of the volume to be created. It must follow the UNIX file name conventions and be a simple name not including the directory path. The specification of a volume name can be omitted. If it is, the "database name to be created by the system_volume identifier" becomes the volume name.
- volcmnts: Comment to be written in the volume header. It contains information on the additional volume to be created. The specification of the comment on a volume can also be omitted.
- volpurp: It must be one of the following types: data, index, temp, or generic based on the purpose of storing volumes. The specification of the purpose of a volume can be omitted in which case the default value is generic.
- volnpgs: The number of pages of the additional volume to be created. The specification of the number of pages of the volume cannot be omitted; it must be specified.
-
--user-definition-file=FILE¶ This option adds users who have access to the database to be created. It adds a user based on the specification contained in the user information file specified by the parameter. Instead of using the --user-definition-file option, you can add a user by using the CREATE USER statement (for details, see Managing User).
The following example shows how to create a database named testdb and add users to testdb based on the user information defined in the user_info.txt file.
cubrid createdb --user-definition-file=user_info.txt testdb en_US
The syntax of a user information file is as follows:
USER user_name [ <groups_clause> | <members_clause> ] <groups_clause>: [ GROUPS <group_name> [ { <group_name> }... ] ] <members_clause>: [ MEMBERS <member_name> [ { <member_name> }... ] ]- The user_name is the name of the user who has access to the database. It must not include spaces.
- The GROUPS clause is optional. The group_name is the upper level group that contains the user_name . Here, the group_name can be multiply specified and must be defined as USER in advance.
- The MEMBERS clause is optional. The member_name is the name of the lower level member that belongs to the user_name . Here, the member_name can be multiply specified and must be defined as USER in advance.
Comments can be used in a user information file. A comment line must begin with a consecutive hyphen lines (--). Blank lines are ignored.
The following example shows a user information in which grandeur and sonata are included in sedan group, tuscan is included in suv group, and i30 is included in hatchback group. The name of the user information file is user_info.txt.
--
-- Example 1 of a user information file
--
USER sedan
USER suv
USER hatchback
USER grandeur GROUPS sedan
USER sonata GROUPS sedan
USER tuscan GROUPS suv
USER i30 GROUPS hatchback
The following example shows a file that has the same user relationship information as the file above. The difference is that the MEMBERS statement is used in the file below.
--
-- Example 2 of a user information file
--
USER grandeur
USER sonata
USER tuscan
USER i30
USER sedan MEMBERS sonata grandeur
USER suv MEMBERS tuscan
USER hatchback MEMBERS i30
-
--csql-initialization-file=FILE¶ This option executes an SQL statement on the database to be created by using the CSQL Interpreter. A schema can be created based on the SQL statement contained in the file specified by the parameter.
The following example shows how to create a database named testdb and execute the SQL statement defined in table_schema.sql through the CSQL Interpreter.
cubrid createdb --csql-initialization-file table_schema.sql testdb en_US
-
-o,--output-file=FILE¶ This option stores messages related to the database creation to the file given as a parameter. The file is created in the same directory where the database was created. If the -o option is not specified, messages are displayed on the console screen. The -o option allows you to use information on the creation of a certain database by storing messages, generated during the database creation, to a specified file.
The following example shows how to create a database named testdb and store the output of the utility to the db_output file instead of displaying it on the console screen.
cubrid createdb -o db_output testdb en_US
-
-v,--verbose¶ This option displays all information on the database creation operation onto the screen. Like the -o option, this option is useful in checking information related to the creation of a specific database. Therefore, if you specify the -v option together with the -o option, you can store the output messages in the file given as a parameter; the messages contain the operation information about the cubrid createdb utility and database creation process.
The following example shows how to create a database named testdb and display detailed information on the operation onto the screen.
cubrid createdb -v testdb en_US
Note
- temp_file_max_size_in_pages is a parameter used to configure the maximum number of pages assigned to store the temporary temp volume - used for complicated queries or storing arrays - on the disk. While the default value is -1, the temporary temp volume may be increased up to the amount of extra space on the disk specified by the temp_volume_path parameter. If the value is 0, the temporary temp volume cannot be created. In this case, the permanent temp volume should be added by using the cubrid addvoldb utility. For the efficient management of the volume, it is recommended to add a volume for each usage.
- By using the cubrid spacedb utility, you can check the reaming space of each volume. By using the cubrid addvoldb utility, you can add more volumes as needed while managing the database. When adding a volume while managing the database, you are advised to do so when there is less system load. Once the assigned volume for a usage is completely in use, a generic volume will be created, so it is suggested to add extra volume for a usage that is expected to require more space.
The following example shows how to create a database, classify volume usage, and add volumes such as data, index, and temp.
cubrid createdb --db-volume-size=512M --log-volume-size=256M cubriddb en_US
cubrid addvoldb -S -p data -n cubriddb_DATA01 --db-volume-size=512M cubriddb
cubrid addvoldb -S -p data -n cubriddb_DATA02 --db-volume-size=512M cubriddb
cubrid addvoldb -S -p index -n cubriddb_INDEX01 cubriddb --db-volume-size=512M cubriddb
cubrid addvoldb -S -p temp -n cubriddb_TEMP01 cubriddb --db-volume-size=512M cubriddb
Adding Database Volume
When the total free space size of the generic volumes has become smaller than the size which is specified at the system parameter generic_vol_prealloc_size (default: 50M) in Disk-Related Parameters, generic volume is added automatically. Automatically adding a volume is done when a new page is required; The volume is not expanded when only a SELECT queries are executed.
CUBRID volumes are separated by the purpose of the usage such as data storage, index storage, temporary result storage; generic volume can be used for data and index storage.
For the each type(purpose) of volumes, see Database Volume Structure.
In comparison, the command for adding a database volume manually is as follows.
cubrid addvoldb [options] database_name
- cubrid: An integrated utility for CUBRID service and database management.
- addvoldb: A command that adds a specified number of pages of the new volume to a specified database.
- database_name: Specifies the name of the database to which a volume is to be added without including the path name to the directory where the database is to be created.
The following example shows how to create a database, classify volume usage, and add volumes such as data, index, and temp.
cubrid createdb --db-volume-size=512M --log-volume-size=256M cubriddb en_US
cubrid addvoldb -S -p data -n cubriddb_DATA01 --db-volume-size=512M cubriddb
cubrid addvoldb -S -p data -n cubriddb_DATA02 --db-volume-size=512M cubriddb
cubrid addvoldb -S -p index -n cubriddb_INDEX01 cubriddb --db-volume-size=512M cubriddb
cubrid addvoldb -S -p temp -n cubriddb_TEMP01 cubriddb --db-volume-size=512M cubriddb
The following shows [options] available with the cubrid addvoldb utility.
-
--db-volume-size=SIZE¶ --db-volume-size is an option that specifies the size of the volume to be added to a specified database. If the --db-volume-size option is omitted, the value of the system parameter db_volume_size is used by default. You can set units as K, M, G and T, which stand for kilobytes (KB), megabytes (MB), gigabytes (GB), and terabytes (TB) respectively. If you omit the unit, bytes will be applied.
The following example shows how to add a volume for which 256 MB are assigned to the testdb database.
cubrid addvoldb -p data --db-volume-size=256M testdb
-
-n,--volume-name=NAME¶ This option specifies the name of the volume to be added to a specified database. The volume name must follow the file name protocol of the operating system and be a simple one without including the directory path or spaces. If the -n option is omitted, the name of the volume to be added is configured by the system automatically as "database name_volume identifier". For example, if the database name is testdb, the volume name testdb_x001 is automatically configured.
The following example shows how to add a volume for which 256 MB are assigned to the testdb database in standalone mode. The volume name testdb_v1 will be created.
cubrid addvoldb -S -n testdb_v1 --db-volume-size=256M testdb
-
-F,--file-path=PATH¶ This option specifies the directory path where the volume to be added will be stored. If the -F option is omitted, the value of the system parameter volume_extension_path is used by default.
The following example shows how to add a volume for which 256 MB are assigned to the testdb database in standalone mode. The added volume is created in the /dbtemp/addvol directory. Because the -n option is not specified for the volume name, the volume name testdb_x001 will be created.
cubrid addvoldb -S -F /dbtemp/addvol/ --db-volume-size=256M testdb
-
--commentCOMMENT¶ This option facilitates to retrieve information on the added volume by adding such information in the form of comments. It is recommended that the contents of a comment include the name of DBA who adds the volume, or the purpose of adding the volume. The comment must be enclosed in double quotes.
The following example shows how to add a volume for which 256 MB are assigned to the testdb database in standalone mode and inserts a comment about the volume.
cubrid addvoldb -S --comment "data volume added_cheolsoo kim" --db-volume-size=256M testdb
-
-p,--purpose=PURPOSE¶ This option specifies the purpose of the volume to be added. The reason for specifying the purpose of the volume is to improve the I/O performance by storing volumes separately on different disk drives according to their purpose. Parameter values that can be used for the -p option are data, index, temp and generic. The default value is generic. For the purpose of each volume, see Database Volume Structure.
The following example shows how to add a volume for which 256 MB are assigned to the testdb database in standalone mode.
cubrid addvoldb -S -p index --db-volume-size=256M testdb
-
-S,--SA-mode¶ This option accesses the database in standalone mode without running the server process. This option has no parameter. If the -S option is not specified, the system assumes to be in client/server mode.
cubrid addvoldb -S --db-volume-size=256M testdb
-
-C,--CS-mode¶ This option accesses the database in client/server mode by running the server and the client separately. There is no parameter. Even when the -C option is not specified, the system assumes to be in client/server mode by default.
cubrid addvoldb -C --db-volume-size=256M testdb
-
--max_writesize-in-sec=SIZE¶ The --max_writesize-in-sec is used to limit the impact of system operating when you add a volume to the database. This can limit the maximum writing size per second. The unit of this option is K(kilobytes) and M(megabytes). The minimum value is 160K. If you set this value as less than 160K, it is changed as 160K. It can be used only in client/server mode.
The below is an example to limit the writing size of the 2GB volume as 1MB. Consuming time will be about 35 minutes(= (2048MB/1MB) /60 sec.).
cubrid addvoldb -C --db-volume-size=2G --max-writesize-in-sec=1M testdb
Deleting Database
The cubrid deletedb utility is used to delete a database. You must use the cubrid deletedb utility to delete a database, instead of using the file deletion commands of the operating system; a database consists of a few interdependent files.
The cubrid deletedb utility also deletes the information on the database from the database location file (databases.txt). The cubrid deletedb utility must be run offline, that is, in standalone mode when nobody is using the database.
cubrid deletedb [options] database_name
- cubrid: An integrated utility for the CUBRID service and database management.
- deletedb: A command to delete a database, its related data, logs and all backup files. It can be executed successfully only when the database is in a stopped state.
- database_name: Specifies the name of the database to be deleted without including the path name.
The following shows [options] available with the cubrid deletedb utility.
-
-o,--output-file=FILE¶ This option specifies the file name for writing messages:
cubrid deletedb -o deleted_db.out testdb
The cubrid deletedb utility also deletes the database information contained in the database location file (databases.txt). The following message is returned if you enter a utility that tries to delete a non-existing database.
cubrid deletedb testdb
Database "testdb" is unknown, or the file "databases.txt" cannot be accessed.
-
-d,--delete-backup¶ This option deletes database volumes, backup volumes and backup information files simultaneously. If the -d option is not specified, backup volume and backup information files are not deleted.
cubrid deletedb -d testdb
Renaming Database, Altering Host, Copying/Moving Database, Registering Database
Renaming Database
The cubrid renamedb utility renames a database. The names of information volumes, log volumes and control files are also renamed to conform to the new database one.
In contrast, the cubrid alterdbhost utility configures or changes the host name of the specified database. In other words, it changes the host name configuration in the databases.txt file.
cubrid renamedb [options] src_database_name dest_database_name
- cubrid: An integrated utility for the CUBRID service and database management.
- renamedb: A command that changes the existing name of a database to a new one. It executes successfully only when the database is in a stopped state. The names of related information volumes, log volumes and control files are also changed to new ones accordingly.
- src_database_name: The name of the existing database to be renamed. The path name to the directory where the database is to be created must not be included.
- dest_database_name: The new name of the database. It must not be the same as that of an existing database. The path name to the directory where the database is to be created must not be included.
The following shows [options] available with the cubrid deletedb utility.
-
-E,--extended-volume-path=PATH¶ This option renames an extended volume created in a specific directory path (e.g. /dbtemp/addvol/), and then moves the volume to a new directory. This specifies a new directory path (e.g. /dbtemp/newaddvols/) where the renamed extended volume will be moved.
If it is not specified, the extended volume is only renamed in the existing path without being moved. If a directory path outside the disk partition of the existing database volume or an invalid one is specified, the rename operation is not executed. This option cannot be used together with the -i option.
cubrid renamedb -E /dbtemp/newaddvols/ testdb testdb_1
-
-i,--control-file=FILE¶ The option specifies an input file in which directory information is stored to change all database name of volumes or files and assign different directory at once. To perform this work, the -i option is used. The -i option cannot be used together with the -E option.
cubrid renamedb -i rename_path testdb testdb_1
The following are the syntax and example of a file that contains the name of each volume, the current directory path and the directory path where renamed volumes will be stored.
volid source_fullvolname dest_fullvolname
- volid: An integer that is used to identify each volume. It can be checked in the database volume control file (database_name_vinf).
- source_fullvolname: The current directory path to each volume.
- dest_fullvolname: The target directory path where renamed volumes will be moved. If the target directory path is invalid, the database rename operation is not executed.
-5  /home1/user/testdb_vinf       /home1/CUBRID/databases/testdb_1_vinf
-4  /home1/user/testdb_lginf      /home1/CUBRID/databases/testdb_1_lginf
-3  /home1/user/testdb_bkvinf     /home1/CUBRID/databases/testdb_1_bkvinf
-2  /home1/user/testdb_lgat       /home1/CUBRID/databases/testdb_1_lgat
 0  /home1/user/testdb            /home1/CUBRID/databases/testdb_1
 1  /home1/user/backup/testdb_x001/home1/CUBRID/databases/backup/testdb_1_x001
-
-d,--delete-backup¶ This option renames the testdb database and at once forcefully delete all backup volumes and backup information files that are in the same location as testdb. Note that you cannot use the backup files with the old names once the database is renamed. If the -d option is not specified, backup volumes and backup information files are not deleted.
cubrid renamedb -d testdb testdb_1
Renaming Database Host
The cubrid alterdbhost utility sets or changes the host name of the specified database. It changes the host name set in the databases.txt file.
cubrid alterdbhost [option] database_name
- cubrid: An integrated utility for the CUBRID service and database management
- alterdbhost: A command used to change the host name of the current database
The following shows the option available with the cubrid alterdbhost utility.
-
-h,--host=HOST¶ The -h option specifies the host name to be changed. When this option is omitted, specifies the host name to localhost.
Copying/Moving Database
The cubrid copydb utility copy or move a database to another location. As arguments, source and target name of database must be given. A target database name must be different from a source database name. When the target name argument is specified, the location of target database name is registered in the databases.txt file.
The cubrid copydb utility can be executed only offline (that is, state of a source database stop).
cubrid copydb [options] src-database-name dest-database-name
- cubrid: An integrated utility for the CUBRID service and database management.
- copydb: A command that copy or move a database from one to another location.
- src-database-name: The names of source and target databases to be copied or moved.
- dest-database-name: A new (target) database name.
If options are omitted, a target database is copied into the same directory of a source database.
The following shows [options] available with the cubrid copydb utility.
-
--server-name=HOST¶ The --server-name option specifies a host name of new database. The host name is registered in the databases.txt file. If this option is omitted, a local host is registered.
cubrid copydb --server-name=cub_server1 demodb new_demodb
-
-F,--file-path=PATH¶ The -F option specifies a specific directory path where a new database volume is stored with an -F option. It represents specifying an absolute path. If the specified directory does not exist, an error is displayed. If this option is omitted, a new database volume is created in the current working directory. And this information is specified in vol-path of the databases.txt file.
cubrid copydb -F /home/usr/CUBRID/databases demodb new_demodb
-
-L,--log-path=PATH¶ The -L option specifies a specific directory path where a new database volume is stored with an -L option. It represents specifying an absolute path. If the specified directory does not exist, an error is displayed. If this option is omitted, a new database volume is created in the current working directory. And this information is specified in log-path of the databases.txt file.
cubrid copydb -L /home/usr/CUBRID/databases/logs demodb new_demodb
-
-E,--extended-volume-path=PATH¶ The -E option specifies a specific directory path where a new database extended volume is stored with an -E. If this option is omitted, a new database extended volume is created in the location of a new database volume or in the registered path of controlling file. The -i option cannot be used with this option.
cubrid copydb -E home/usr/CUBRID/databases/extvols demodb new_demodb
-
-i,--control_file=FILE¶ The -i option specifies an input file where a new directory path information and a source volume are stored to copy or move multiple volumes into a different directory, respectively. This option cannot be used with the -E option. An input file named copy_path is specified in the example below.
cubrid copydb -i copy_path demodb new_demodb
The following is an example of input file that contains each volume name, current directory path, and new directory and volume names.
# volid   source_fullvolname   dest_fullvolname
0 /usr/databases/demodb        /drive1/usr/databases/new_demodb
1 /usr/databases/demodb_data1  /drive1/usr/databases/new_demodb new_data1
2 /usr/databases/ext/demodb index1 /drive2//usr/databases/new_demodb new_index1
3 /usr/ databases/ext/demodb index2  /drive2/usr/databases/new_demodb new_index2
- volid: An integer that is used to identify each volume. It can be checked in the database volume control file (database_name_vinf).
- source_fullvolname: The current directory path to each source database volume.
- dest_fullvolname: The target directory path where new volumes will be stored. You should specify a valid path.
-
-r,--replace¶ If the -r option is specified, a new database name overwrites the existing database name if it is identical, instead of outputting an error.
cubrid copydb -r -F /home/usr/CUBRID/databases demodb new_demodb
-
-d,--delete-source¶ If the -d option is specified, a source database is deleted after the database is copied. This execution brings the same the result as executing cubrid deletedb utility after copying a database. Note that if a source database contains LOB data, LOB file directory path of a source database is copied into a new database and it is registered in the lob-base-path of the databases.txt file.
cubrid copydb -d -F /home/usr/CUBRID/databases demodb new_demodb
-
--copy-lob-path=PATH¶ If the --copy-lob-path option is specified, a new directory path for LOB files is created and a source database is copied into a new directory path. If this option is omitted, the directory path is not created. Therefore, the lob-base-path of the databases.txt file should be modified separately. This option cannot be used with the -B option.
cubrid copydb --copy-lob-path demodb new_demodb
-
-B,--lob-base-path=PATH¶ If the -B option is specified, a specified directory is specified as for LOB files of a new database and a source database is copied. This option cannot be used with the --copy-lob-path option.
cubrid copydb -B /home/usr/CUBRID/databases/new_lob demodb new_demodb
Registering Database
The cubrid installdb utility is used to register the information of a newly installed database to databases.txt, which stores database location information. The execution of this utility does not affect the operation of the database to be registered.
cubrid installdb [options] database_name
- cubrid: An integrated utility for the CUBRID service and database management.
- installdb: A command that registers the information of a moved or copied database to databases.txt.
- database_name: The name of database to be registered to databases.txt.
If no [options] are used, the command must be executed in the directory where the corresponding database exists.
The following shows [options] available with the cubrid installdb utility.
-
--server-name=HOST¶ This option registers the server host information of a database to databases.txt with a specific host name. If this is not specified, the current host information is registered.
cubrid installdb --server-name=cub_server1 testdb
-
-L,--log-path=PATH¶ This option registers the absolute directory path of a database log volume to databases.txt by using the -L option. If this option is not specified, the directory path of a volume is registered.
cubrid installdb -L /home/cubrid/CUBRID/databases/logs/testdb testdb
Database Backup
A database backup is the procedure of storing CUBRID database volumes, control files and log files, and it is executed by using the cubrid backupdb utility or the CUBRID Manager. DBA must regularly back up the database so that the database can be properly restored in the case of storage media or file errors. The restore environment must have the same operating system and the same version of CUBRID as the backup environment. For such a reason, you must perform a backup in a new environment immediately after migrating a database to a new version.
To recover all database pages, control files and the database to the state at the time of backup, the cubrid backupdb utility copies all necessary log records.
cubrid backupdb [options] database_name[@hostname]
- @hostname: It is omitted when you do backup in standalone mode. If you do backup on the HA environment, specify "@hostname" after the database name. hostname is a name specified in $CUBRID_DATABASES/databases.txt. If you want to setup a local server, you can specify it as "@localhost".
The following shows options available with the cubrid backupdb utility (options are case sensitive).
-
-D,--destination-path=PATH¶ The following shows how to use the -D option to store backup files in the specified directory. The backup file directory must be specified before performing this job. If the -D option is not specified, backup files are stored in the log directory specified in the databases.txt file which stores database location information.
cubrid backupdb -D /home/cubrid/backup demodb
The following shows how to store backup files in the current directory by using the -D option. If you enter a period (.) following the -D option as an argument, the current directory is specified.
cubrid backupdb -D . demodb
-
-r,--remove-archive¶ Writes an active log to a new archive log file when the active log is full. If a backup is performed in such a situation and backup volumes are created, backup logs created before the backup will not be used in subsequent backups. The -r option is used to remove archive log files that will not be used anymore in subsequent backups after the current one is complete. The -r option only removes unnecessary archive log files that were created before backup, and does not have any impact on backup; however, if an administrator removes the archive log file after a backup, it may become impossible to restore everything. For this reason, archive logs should be removed only after careful consideration.
If you perform an incremental backup (backup level 1 or 2) with the -r option, there is the risk that normal recovery of the database will be impossible later on. Therefore, it is recommended that the -r option only be used when a full backup is performed.
cubrid backupdb -r demodb
-
-l,--level=LEVEL¶ The following shows how to execute an incremental backup of the level specified by using the -l option. If the -l option is not specified, a full backup is performed. For details on backup levels, see Incremental Backup .
cubrid backupdb -l 1 demodb
-
-o,--output-file=FILE¶ The following shows how to write the progress of the database backup to the info_backup file by using the -o option.
cubrid backupdb -o info_backup demodb
The following shows the contents of the info_backup file. You can check the information on the number of threads, compression method, backup start time, the number of permanent volumes, backup progress and backup end time.
[ Database(demodb) Full Backup start ]
- num-threads: 1
- compression method: NONE
- backup start time: Mon Jul 21 16:51:51 2008
- number of permanent volumes: 1
- backup progress status
-----------------------------------------------------------------------------
 volume name                  | # of pages | backup progress status    | done
-----------------------------------------------------------------------------
 demodb_vinf                  |          1 | ######################### | done
 demodb                       |      25000 | ######################### | done
 demodb_lginf                 |          1 | ######################### | done
 demodb_lgat                  |      25000 | ######################### | done
-----------------------------------------------------------------------------
# backup end time: Mon Jul 21 16:51:53 2008
[Database(demodb) Full Backup end]
-
-S,--SA-mode¶ The following shows how to perform backup in standalone mode (that is, backup offline) by using the -S option. If the -S option is not specified, the backup is performed in client/server mode.
cubrid backupdb -S demodb
-
-C,--CS-mode¶ The following shows how to perform backup in client/server mode by using the -C option and the demodb database is backed up online. If the -C option is not specified, a backup is performed in client/server mode.
cubrid backupdb -C demodb
-
--no-check¶ The following shows how to execute backup without checking the consistency of the database by using the --no-check option.
cubrid backupdb --no-check demodb
-
-t,--thread-count=COUNT¶ The following shows how to execute parallel backup with the number of threads specified by the administrator by using the -t option. Even when the argument of the -t option is not specified, a parallel backup is performed by automatically assigning as many threads as CPUs in the system.
cubrid backupdb -t 4 demodb
-
-z,--compress¶ The following shows how to compress the database and stores it in the backup file by using the -z option. The size of the backup file and the time required for backup can be reduced by using the -z option.
cubrid backupdb -z demodb
-
-e,--except-active-log¶ The following shows how to execute backup excluding active logs of the database by using the -e option. You can reduce the time required for backup by using the -e option. However, extra caution is required because active logs needed for completing a restore to the state of a certain point from the backup point are not included in the backup file, which may lead to an unsuccessful restore.
cubrid backupdb -e demodb
-
--sleep-msecs=NUMBER¶ This option allows you to specify the interval of idle time during the database backup. The default value is 0 in milliseconds. The system becomes idle for the specified amount of time whenever it reads 1 MB of data from a file. This option is used to reduce the performance degradation of an active server during a live backup. The idle time will prevent excessive disk I/O operations.
cubrid backupdb --sleep-msecs=5 demodb
Backup Strategy and Method
The following must be considered before performing a backup:
- Selecting the data to be backed up
- Determine whether it is valid data worth being preserved.
- Determine whether to back up the entire database or only part of it.
- Check whether there are other files to be backed up along with the database.
- Choosing a backup method
- Choose the backup method from one of incremental and online backups. Also, specify whether to use compression backup, parallel backup, and mode.
- Prepare backup tools and devices available.
- Determining backup time
- Identify the time when the least usage in the database occur.
- Check the size of the archive logs.
- Check the number of clients using the database to be backed up.
Online Backup
An online backup (or a hot backup) is a method of backing up a currently running database. It provides a snapshot of the database image at a certain point in time. Because the backup target is a currently running database, it is likely that uncommitted data will be stored and the backup may affect the operation of other databases.
To perform an online backup, use the cubrid backupdb -C command.
Offline Backup
An offline backup (or a cold backup) is a method of backing up a stopped database. It provides a snapshot of the database image at a certain point in time.
To perform an offline backup, use the cubrid backupdb -S command.
Incremental Backup
An incremental backup, which is dependent upon a full backup, is a method of only backing up data that have changed since the last backup. This type of backup has an advantage of requiring less volume and time than a full backup. CUBRID supports backup levels 0, 1 and 2. A higher level backup can be performed sequentially only after a lower lever backup is complete.
To perform an incremental backup, use the cubrid backupdb -l LEVEL command.
The following example shows incremental backup. Let's example backup levels in details.
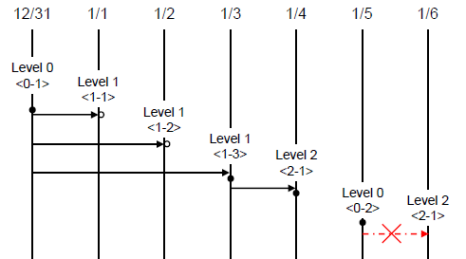
- Full backup (backup level 0) : Backup level 0 is a full backup that includes all database pages.
The level of a backup which is attempted first on the database naturally becomes a 0 level. DBA must perform full backups regularly to prepare for restore situations. In the example, full backups were performed on December 31st and January 5th.
- First incremental backup (backup level 1) : Backup level 1 is an incremental backup that only stores changes since the level 0 full backup, and is called a "first incremental backup."
Note that the first incremental backups are attempted sequentially such as <1-1>, <1-2> and <1-3> in the example, but they are always performed based on the level 0 full backup.
Suppose that backup files are created in the same directory. If the first incremental backup <1-1> is performed on January 1st and then the first incremental backup <1-2> is attempted again on January 2nd, the incremental backup file created in <1-1> is overwritten. The final incremental backup file is created on January 3rd because the first incremental backup is performed again on that day.
Since there can be a possibility that the database needs to be restored the state of January 1st or January 2nd, it is recommended for DBA to store the incremental backup files <1-1> and <1-2> separately in storage media before overwriting with the final incremental file.
- Second incremental backup (backup level 2) : Backup level 2 is an incremental backup that only stores data that have changed since the first incremental backup, and is called a "second incremental backup."
A second incremental backup can be performed only after the first incremental backup. Therefore, the second incremental backup attempted on January fourth succeeds; the one attempted on January sixth fails.
Backup files created for backup levels 0, 1 and 2 may all be required for database restore. To restore the database to its state on January fourth, for example, you need the second incremental backup generated at <2-1>, the first incremental backup file generated at <1-3>, and the full backup file generated at <0-1>. That is, for a full restore, backup files from the most recent incremental backup file to the earliest created full backup file are required.
Compress Backup
A compress backup is a method of backing up the database by compressing it. This type of backup reduces disk I/O costs and stores disk space because it requires less backup volume.
To perform a compress backup, use the cubrid backupdb -z | --compress command.
Parallel Backup Mode
A parallel or multi-thread backup is a method of performing as many backups as the number of threads specified. In this way, it reduces backup time significantly. Basically, threads are given as many as the number of CPUs in the system.
To perform a parallel backup, use the cubrid backupdb -t | --thread-count command.
Managing Backup Files
One or more backup files can be created in sequence based on the size of the database to be backed up. A unit number is given sequentially (000, 001-0xx) to the extension of each backup file based in the order of creation.
Managing Disk Capacity during the Backup
During the backup process, if there is not enough space on the disk to store the backup files, a message saying that the backup cannot continue appears on the screen. This message contains the name and path of the database to be backed up, the backup file name, the unit number of backup files and the backup level. To continue the backup process, the administrator can choose one of the following options:
- Option 0: An administrator enters 0 to discontinue the backup.
- Option 1: An administrator inserts a new disk into the current device and enters 1 to continue the backup.
- Option 2: An administrator changes the device or the path to the directory where backup files are stored and enters 2 to continue the backup.
******************************************************************
Backup destination is full, a new destination is required to continue:
Database Name: /local1/testing/demodb
     Volume Name: /dev/rst1
        Unit Num: 1
    Backup Level: 0 (FULL LEVEL)
Enter one of the following options:
Type
   -  0 to quit.
   -  1 to continue after the volume is mounted/loaded. (retry)
   -  2 to continue after changing the volume's directory or device.
******************************************************************
Managing Archive Logs
You must not delete archive logs by using the file deletion command such as rm or del by yourself; the archive logs should be deleted by system configuration or the cubrid backupdb utility. In the following three cases, archive logs can be deleted.
In non-HA environment (ha_mode=off):
If you configure the force_remove_log_archives value to yes, archive logs are kept only the number specified in log_max_archives value; and the left logs are automatically deleted. However, if tehre is an active tranaction in the oldest archive log file, this file is not deleted until the transaction is completed.
In an HA environment (ha_mode=on):
If you configure the force_remove_log_archives values to no and specify the number specfied in log_max_archives value, archive logs are automatically deleted after replication is applied.
Note
If you set force_remove_log_archives as yes when "ha_mode=on", unapplied archive logs can be deleted; therefore, this setting is not recommended. However, if keeping disk space is prior to keeping replication, set force_remove_log_archives as yes and set log_max_archives as a proper value.
Use cubrid backupdb -r and run this command then archive logs are deleted; note that -r option should not be used in an HA environment.
If you want to delete logs as much as possible while operating a database, configure the value of log_max_archives to a small value or 0 and configure the value of force_remove_log_archives to yes. Note that in an HA environment, if the value of force_remove_log_archives is yes, archive logs that have not replicated in a slave node are deleted, which can cause replication errors. Therefore, it is recommended that you configure it to no. Although the value of force_remove_log_archives is set to no, files that are complete for replication can be deleted by HA management process.
Restoring Database
A database restore is the procedure of restoring the database to its state at a certain point in time by using the backup files, active logs and archive logs which have been created in an environment of the same CUBRID version. To perform a database restore, use the cubrid restoredb utility or the CUBRID Manager.
The cubrid restoredb utility (restordb.exe on Windows) restores the database from the database backup by using the information written to all the active and archive logs since the execution of the last backup.
cubrid restoredb [options] database_name
If no option is specified, a database is restored to the point of the last commit by default. If no active/archive log files are required to restore to the point of the last commit, the database is restored only to the point of the last backup.
cubrid restoredb demodb
The following table shows options available with the cubrid restoredb utility (options are case sensitive).
-
-d,--up-to-date=DATE¶ A database can be restored to the given point by the date-time specified by the -d option. The user can specify the restoration point manually in the dd-mm-yyyy:hh:mi:ss (e.g. 14-10-2008:14:10:00) format. If no active log/archive log files are required to restore to the point specified, the database is restored only to the point of the last backup.
cubrid restoredb -d 14-10-2008:14:10:00 demodb
If the user specifies the restoration point by using the backuptime keyword, it restores a database to the point of the last backup.
cubrid restoredb -d backuptime demodb
-
--list¶ This option displays information on backup files of a database; restoration procedure is not performed.
cubrid restoredb --list demodb
The following example shows how to display backup information by using the --list option. You can specify the path to which backup files of the database are originally stored as well as backup levels.
*** BACKUP HEADER INFORMATION ***
Database Name: /local1/testing/demodb
 DB Creation Time: Mon Oct 1 17:27:40 2008
         Pagesize: 4096
Backup Level: 1 (INCREMENTAL LEVEL 1)
        Start_lsa: 513|3688
         Last_lsa: 513|3688
Backup Time: Mon Oct 1 17:32:50 2008
 Backup Unit Num: 0
Release: 8.1.0
     Disk Version: 8
Backup Pagesize: 4096
Zip Method: 0 (NONE)
        Zip Level: 0 (NONE)
Previous Backup level: 0 Time: Mon Oct 1 17:31:40 2008
(start_lsa was -1|-1)
Database Volume name: /local1/testing/demodb_vinf
     Volume Identifier: -5, Size: 308 bytes (1 pages)
Database Volume name: /local1/testing/demodb
     Volume Identifier: 0, Size: 2048000 bytes (500 pages)
Database Volume name: /local1/testing/demodb_lginf
     Volume Identifier: -4, Size: 165 bytes (1 pages)
Database Volume name: /local1/testing/demodb_bkvinf
     Volume Identifier: -3, Size: 132 bytes (1 pages)
With the backup information displayed by using the --list option, you can check that backup files have been created at the backup level 1 as well as the point where the full backup of backup level 0 has been performed. Therefore, to restore the database in the example, you must prepare backup files for backup levels 0 and 1.
-
-B,--backup-file-path=PATH¶ You can specify the directory where backup files are to be located by using the -B option. If this option is not specified, the system retrieves the backup information file (dbname _bkvinf) generated upon a database backup; the backup information file in located in the log-path directory specified in the database location information file (databases.txt). And then it searches the backup files in the directory path specified in the backup information file. However, if the backup information file has been damaged or the location information of the backup files has been deleted, the system will not be able to find the backup files. Therefore, the administrator must manually specify the directory where the backup files are located by using the -B option.
cubrid restoredb -B /home/cubrid/backup demodb
If the backup files of a database is in the current directory, the administrator can specify the directory where the backup files are located by using the -B option.
cubrid restoredb -B . demodb
-
-l,--level=LEVEL¶ You can perform restoration by specifying the backup level of the database to 0, 1, or 2. For details on backup levels, see Incremental Backup .
cubrid restoredb -l 1 demodb
-
-p,--partial-recovery¶ You can perform partial restoration without requesting for the user's response by using the -p option. If active or archive logs written after the backup point are not complete, by default the system displays a request message informing that log files are needed and prompting the user to enter an execution option. The partial restoration can be performed directly without such a request message by using the -p option. Therefore, if the -p option is used when performing restoration, data is always restored to the point of the last backup.
cubrid restoredb -p demodb
When the -p option is not specified, the message requesting the user to select the execution option is as follows:
***********************************************************
Log Archive /home/cubrid/test/log/demodb_lgar002
 is needed to continue normal execution.
   Type
   -  0 to quit.
   -  1 to continue without present archive. (Partial recovery)
   -  2 to continue after the archive is mounted/loaded.
   -  3 to continue after changing location/name of archive.
***********************************************************
- Option 0: Stops restoring
- Option 1: Performing partial restoration without log files.
- Option 2: Performing restoration after locating a log to the current device.
- Option 3: Resuming restoration after changing the location of a log
-
-o,--output-file=FILE¶ The following syntax shows how to write the restoration progress of a database to the info_restore file by using the -o option.
cubrid restoredb -o info_restore demodb
-
-u,--use-database-location-path¶ This option restores a database to the path specified in the database location file(databases.txt). The -u option is useful when you perform a backup on server A and store the backup file on server B.
cubrid restoredb -u demodb
NOTIFICATION messages, log recovery starting time and ending time are written into the server error log file or the restoredb error log file when database server is started or backup volume is restored; so you can check the elapsed time of these operations. In this message, the number of log records to be applied(redo) and the number of log pages are written together.
To print out the NOTIFICATION message, error_log_level parameter in cubrid.conf should be specified as NOTIFICATION.
Time: 06/14/13 21:29:04.059 - NOTIFICATION *** file ../../src/transaction/log_recovery.c, line 748 CODE = -1128 Tran = -1, EID = 1
Log recovery is started. The number of log records to be applied: 96916. Log page: 343 ~ 5104.
.....
Time: 06/14/13 21:29:05.170 - NOTIFICATION *** file ../../src/transaction/log_recovery.c, line 843 CODE = -1129 Tran = -1, EID = 4
Log recovery is finished.
Restoring Strategy and Procedure
You must consider the following before restoring databases.
- Preparing backup files
- Identify the directory where the backup and log files are to be stored.
- If the database has been incrementally backed up, check whether an appropriate backup file for each backup level exists.
- Check whether the backed-up CUBRID database and the CUBRID database to be backed up are the same version.
- Choosing restore method
- Determine whether to perform a partial or full restore.
- Determine whether or not to perform a restore using incremental backup files.
- Prepare restore tools and devices available.
- Determining restore point
- Identify the point in time when the database server was terminated.
- Identify the point in time when the last backup was performed before database failure.
- Identify the point in time when the last commit was made before database failure.
Database Restore Procedure
The following procedure shows how to perform backup and restoration described in the order of time.
- Performs a full backup of demodb which stopped running at 2008/8/14 04:30.
- Performs the first incremental backup of demodb running at 2008/8/14 10:00.
- Performs the first incremental backup of demodb running at 2008/8/14 15:00. Overwrites the first incremental backup file in step 2.
- A system failure occurs at 2008/8/14 15:30, and the system administrator prepares the restore of demodb. Sets the restore time as 15:25, which is the time when the last commit was made before database failure
- The system administrator prepares the full backup file created in Step 1 and the first incremental backup file created in Step 3, restores the demodb database up to the point of 15:00, and then prepares the active and archive logs to restore the database up to the point of 15:25.
| Time | Command | Description |
|---|---|---|
| 2008/8/14 04:25 | cubrid server stop demodb | Shuts down demodb. |
| 2008/8/14 04:30 | cubrid backupdb -S -D /home/backup -l 0 demodb | Performs a full backup of demodb in offline mode and creates backup files in the specified directory. |
| 2008/8/14 05:00 | cubrid server start demodb | Starts demodb. |
| 2008/8/14 10:00 | cubrid backupdb -C -D /home/backup -l 1 demodb | Performs the first incremental backup of demodb online and creates backup files in the specified directory. |
| 2008/8/14 15:00 | cubrid backupdb -C -D /home/backup -l 1 demodb | Performs the first incremental backup of demodb online and creates backup files in the specified directory. Overwrites the first incremental backup file created at 10:00. |
| 2008/8/14 15:30 | A system failure occurs. | |
| 2008/8/14 15:40 | cubrid restoredb -l 1 -d 08/14/2008:15:25:00 demodb | Restores demodb based on the full backup file, first incremental backup file, active logs and archive logs. The database is restored to the point of 15:25 by the full and first incremental backup files, the active and archive logs. |
Restoring Database to Different Server
The following shows how to back up demodb on server A and restore it on server B with the backed up files.
Backup and Restore Environments
Suppose that demodb is backed up in the /home/cubrid/db/demodb directory on server A and restored into /home/cubrid/data/demodb on server B.
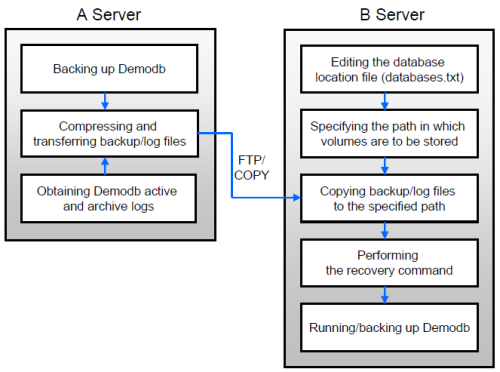
Backing up on server A
Back up demodb on server A. If a backup has been performed earlier, you can perform an incremental backup for data only that have changed since the last backup. The directory where the backup files are created, if not specified in the -D option, is created by default in the location where the log volume is stored. The following is a backup command with recommended options. For details on the options, see Database Backup .
cubrid backupdb -z demodb
Editing the database location file on Server B
Unlike a general scenario where a backup and restore are performed on the same server, in a scenario where backup files are restored using a different server, you need to add the location information on database restore in the database location file (databases.txt) on server B. In the diagram above, it is supposed that demodb is restored in the /home/cubrid/data/demodb directory on server B (hostname: pmlinux); edit the location information file accordingly and create the directory on server B.
Put the database location information in one single line. Separate each item with a space. The line should be written in [database name]. [data volume path] [host name] [log volume path] format; that is, write the location information of demodb as follows:
demodb /home/cubrid/data/demodb pmlinux /home/cubrid/data/demodb
Transferring backup files to server B
For a restore, you must prepare backup files. Therefore, transfer a backup file (e.g. demodb_bk0v000) from server A to server B. That is, a backup file must be located in a directory (e.g. /home/cubrid/temp) on server B.
Note
If you want to restore until the current time after the backup, logs after backup, that is, an active log (e.g. demodb_lgat) and archive logs (e.g. demodb_lgar000) are additionally required to copy.
An active log and archive logs should be located to the log directory of the database to be restored; that is, the directory of log files specified in $CUBRID/databases/databases.txt. (e.g. $CUBRID/databases/demodb/log)
Also, if you want to apply the added logs after backup, archive logs should be copied before they are removed. By the way, the default of log_max_archives, which is a system parameter related to delete archive logs, is 0; therefore, archive logs after backup can be deleted. To prevent this situation, the value of log_max_archives should be big enough. See log_max_archives.
Restoring the database on server B
Perform database restore by calling the cubrid restoredb utility from the directory into which the backup files which were transferred to server B had been stored. With the -u option, demodb is restored in the directory path from the databases.txt file.
cubrid restoredb -u demodb
To call the cubrid restoredb utility from a different path, specify the directory path to the backup file by using the -B option as follows:
cubrid restoredb -u -B /home/cubrid/temp demodb
Unloading and Loading Database
To use a new version of CUBRID database, you may need to migrate an existing data to a new one. For this purpose, you can use the "Export to an ASCII text file" and "Import from an ASCII text file" features provided by CUBRID.
Unloading Database
The purposes of loading/unloading databases are as follows:
- To rebuild databases by volume reconfiguration
- To migrate database in different system environments
- To migrate database in different versions
cubrid unloaddb [options] database_name
cubrid unloaddb utility creates the following files:
- Schema file(database-name_schema): A file that contains information on the schema defined in the database.
- Object file(database-name_objects): A file that contains information on the records in the database.
- Index file(database-name_indexes): A file that contains information on the indexes defined in the database.
- Trigger file(database-name_trigger): A file that contains information on the triggers defined in the database. If you don't want triggers to be running while loading the data, load the trigger definitions after the data loading has completed.
The schema, object, index, and trigger files are created in the same directory.
The following is [options] used in cubrid unloaddb.
-
-u,--user=ID¶ Specify a user account of a database to be unloaded. If this is not specified, the default is DBA.
cubrid unloaddb -u dba -i table_list.txt demodb
-
-p,--password=PASS¶ Specify a user's password of a database to be unloaded. If this is not specified, it is regarded as the empty string is entered.
cubrid unloaddb -u dba -p dba_pwd -i table_list.txt demodb
-
-i,--input-class-fileFILE¶ Unload all schema and index of all tables; however, only the data of specified tables in this file are unloaded.
cubrid unloaddb -i table_list.txt demodb
The following example shows an input file (table_list.txt).
table_1
table_2
..
table_n
If this option is used together with the --input-class-only option, it creates schema, index, and data files of tables only specified in the input file of -i option.
cubrid unloaddb --input-class-only -i table_list.txt demodb
If this option is used together with the --include-reference option, it unloads the referenced tables as well.
cubrid unloaddb --include-reference -i table_list.txt demodb
-
--include-reference¶ This option is used together with the -i option, and also unloads the referenced tables.
-
--input-class-only¶ This option is used together with the -i option, and creates only a schema file of tables specified in the input file of -i option.
-
--estimated-size=NUMBER¶ This option allows you to assign hash memory to store records of the database to be unloaded. If the --estimated-size option is not specified, the number of records of the database is determined based on recent statistics information. This option can be used if the recent statistics information has not been updated or if a large amount of hash memory needs to be assigned. Therefore, if the number given as the argument for the option is too small, the unload performance deteriorates due to hash conflicts.
cubrid unloaddb --estimated-size=1000 demodb
-
--cached-pages=NUMBER¶ The --cached-pages option specifies the number of pages of tables to be cached in the memory. Each page is 4,096 bytes. The administrator can configure the number of pages taking into account the memory size and speed. If this option is not specified, the default value is 100 pages.
cubrid unloaddb --cached-pages 500 demodb
-
-O,--output-path=PATH¶ This option specifies the directory in which to create schema and object files. If this is not specified, files are created in the current directory.
cubrid unloaddb -O ./CUBRID/Databases/demodb demodb
If the specified directory does not exist, the following error message will be displayed.
unloaddb: No such file or directory.
-
-s,--schema-only¶ This option specifies that only the schema file will be created from amongst all the output files which can be created by the unload operation.
cubrid unloaddb -s demodb
-
-d,--data-only¶ This option specifies that only the data file will be created from amongst all of the output files which can be created by the unload operation.
cubrid unloaddb -d demodb
-
--output-prefix=PREFIX¶ This option specifies the prefix for the names of schema and object files created by the unload operation. Once the example is executed, the schema file name becomes abcd_schema and the object file name becomes abcd_objects. If the --output-prefix option is not specified, the name of the database to be unloaded is used as the prefix.
cubrid unloaddb --output-prefix abcd demodb
-
--hash-file=FILE¶ This option specifies the name of the hash file.
-
-v,--verbose¶ This option displays detailed information on the database tables and records being unloaded while the unload operation is under way.
cubrid unloaddb -v demodb
-
--use-delimiter¶ This option writes the double quot(") on the beginning and end of an identifier. The default is not to write the double quot(").
-
-S,--SA-mode¶ The -S option performs the unload operation by accessing the database in standalone mode.
cubrid unloaddb -S demodb
-
-C,--CS-mode¶ The -C option performs the unload operation by accessing the database in client/server mode.
cubrid unloaddb -C demodb
-
--datafile-per-class¶ This option specifies that the output file generated through unload operation creates a data file per each table. The file name is generated as <Database Name>_<Table Name>_ objects for each table. However, all column values in object types are unloaded as NULL and %id class_name class_id part is not written in the unloaded file (see How to Write Files to Load Database).
cubrid unloaddb --datafile-per-class demodb
Loading Database
You can load a database by using the cubrid loaddb utility in the following situations:
- Migrating previous version of CUBRID database to new version of CUBRID database
- Migrating a third-party DBMS database to a CUBRID database
- Inserting massive amount of data faster than using the INSERT statement
In general, the cubrid loaddb utility uses files (schema definition, object input, and index definition files) created by the cubrid unloaddb utility.
cubrid loaddb [options] database_name
Input Files
- Schema file(database-name_schema): A file generated by the unload operation; it contains schema information defined in the database.
- Object file(database-name_objects): A file created by an unload operation. It contains information on the records in the database.
- Index file(database-name_indexes): A file created by an unload operation. It contains information on the indexes defined in the database.
- Trigger file(database-name_trigger): A file created by an unload operation. It contains information on the triggers defined in the database.
- User-defined object file(user_defined_object_file): A file in table format written by the user to enter mass data. (For details, see How to Write Files to Load Database .)
The following table shows [options] available with the cubrid loaddb utility.
-
-u,--user=ID¶ This option specifies the user account of a database where records are loaded. If the option is not specified, the default value is PUBLIC.
cubrid loaddb -u admin -d demodb_objects newdb
-
-p,--password=PASS¶ This option specifies the password of a database user who will load records. If the option is not specified, you will be prompted to enter the password.
cubrid loaddb -p admin -d demodb_objects newdb
-
--data-file-check-only¶ This option checks only the syntax of the data contained in demodb_objects, and does not load the data to the database.
cubrid loaddb --data-file-check-only -d demodb_objects newdb
-
-l,--load-only¶ This option loads data directly without checking the syntax of the data to be loaded. If the -l option is used, loading speed increases because data is loaded without checking the syntax included in demodb_objects, but an error might occur.
cubrid loaddb -l -d demodb_objects newdb
-
--estimated-size=NUMBER¶ This option can be used to improve loading performance when the number of records to be unloaded exceeds the default value of 5,000. You can improve the load performance by assigning large hash memory for record storage with this option.
cubrid loaddb --estimated-size 8000 -d demodb_objects newdb
-
-v,--verbose¶ This option shows how to display detailed information on the tables and records of the database being loaded while the database loading operation is performed. You can check the detailed information such as the progress, the class being loaded and the number of records to be entered.
cubrid loaddb -v -d demodb_objects newdb
-
-c,--periodic-commit=COUNT¶ This option commits periodically every time COUNT records are entered into the database. If this option is not specified, all records included in demodb_objects are loaded to the database before the transaction is committed. If this option is used together with the -s or -i option, commit is performed periodically every time 100 DDL statements are loaded.
The recommended commit interval varies depending on the data to be loaded. It is recommended that the parameter of the -c option be configured to 50 for schema loading, 1,000 for record loading, and 1 for index loading.
cubrid loaddb -c 100 -d demodb_objects newdb
-
--no-oid¶ The following is a command that loads records into newdb ignoring the OIDs in demodb_objects.
cubrid loaddb --no-oid -d demodb_objects newdb
-
--no-statistics¶ The following is a command that does not update the statistics information of newdb after loading demodb_objects. It is useful especially when small data is loaded to a relatively big database; you can improve the load performance by using this command.
cubrid loaddb --no-statistics -d demodb_objects newdb
-
-s,--schema-file=FILE[:LINE]¶ This option loads the schema information or the trigger information defined in the schema file or the trigger file, from the LINE-th. You can load the actual records after loading the schema information first by using the -s option.
On the following example, demodb_schema is a file created by the unload operation and contains the schema information of the unloaded database.
    cubrid loaddb -u dba -s demodb_schema newdb

    Start schema loading.
    Total       86 statements executed.
    Schema loading from demodb_schema finished.
    Statistics for Catalog classes have been updated.

The following loads the triggers defined in *demodb* into the newly created newdb database. demodb_trigger is a file created by the unload operation and contains the trigger information of the unloaded database. It is recommended to load the schema information after loading the records. ::

    cubrid loaddb -u dba -s demodb_trigger newdb
-
-i,--index-file=FILE[:LINE]¶ The following loads the index information defined in the index file, from the LINE-th. On the following example, demo_indexes is a file created by the unload operation and contains the index information of the unloaded database. You can create indexes with the -i option, after loading records with the -d option.
cubrid loaddb -c 100 -d demodb_objects newdb
cubrid loaddb -u dba -i demodb_indexes newdb
-
-d,--data-file=FILE¶ This option loads the record information into newdb by specifying the data file or the user-defined object file. demodb_objects is either an object file created by the unload operation or a user-defined object file written by the user for mass data loading.
cubrid loaddb -u dba -d demodb_objects newdb
-
-t,--table=TABLE¶ This option specifies the table name if a table name header is omitted in the data file to be loaded.
cubrid loaded -u dba -d demodb_objects -t tbl_name newdb
-
--error-control-file=FILE¶ This option specifies the file that describes how to handle specific errors occurring during database loading.
cubrid loaddb --error-control-file=error_test -d demodb_objects newdb
For the server error code name, see the $CUBRID/include/dbi.h file.
For error messages by error code (error number), see the number under $set 5 MSGCAT_SET_ERROR in the $CUBRID/msg/<character set name>/cubrid.msg file.
vi $CUBRID/msg/en_US/cubrid.msg

$set 5 MSGCAT_SET_ERROR
1 Missing message for error code %1$d.
2 Internal system failure: no more specific information is available.
3 Out of virtual memory: unable to allocate %1$ld memory bytes.
4 Has been interrupted.
...
670 Operation would have caused one or more unique constraint violations.
...
The format of a file that details specific errors is as follows:
- -<error code>: Configures to ignore the error that corresponds to the <error code> (loaddb is continuously executed even when an error occurs while it is being executed).
- +<error code>: Configures not to ignore the error that corresponds to the <error code> (loaddb is stopped when an error occurs while it is being executed).
- +DEFAULT: Configures not to ignore errors from 24 to 33.
If the file that details errors is not specified by using the --error-control-file option, the loaddb utility is configured to ignore errors from 24 to 33 by default. As a warning error, it indicates that there is no enough space in the database volume. If there is no space in the assigned database volume, a generic volume is automatically created.
The following example shows a file that details errors.
The warning errors from 24 to 33 indicating DB volume space is insufficient are not ignored by configuring +DEFAULT.
The error code 2 is not ignored because +2 has been specified later, even when -2 has been specified first.
-670 has been specified to ignore the error code 670, which is a unique violation error.
#-115 has been processed as a comment since # is added.
vi error_file

+DEFAULT
-2
-670
#-115 --> comment
+2
-
--ignore-class-file=FILE¶ You can specify a file that lists classes to be ignored during loading records. All records of classes except ones specified in the file will be loaded.
cubrid loaddb --ignore-class-file=skip_class_list -d demodb_objects newdb
Warning
The --no-logging option enables to load data file quickly when loaddb is executed by not storing transaction logs; however, it has risk, which data cannot be recovered in case of errors occurred such as incorrect file format or system failure. In this case, you must rebuild database to solve the problem. Thus, in general, it is not recommended to use this option exception of building a new database which does not require data recovery. If you use this option, loaddb does not check the errors like unique violation. To use this option, you should consider these issues.
How to Write Files to Load Database
You can add mass data to the database more rapidly by writing the object input file used in the cubrid loaddb utility. An object input file is a text file in simple table form that consists of comments and command/data lines.
Command Line
A command line begins with a percent character (%) and consists of %class and %id commands; the former defines classes, and the latter defines aliases and identifiers used for class identification.
Assigning an Identifier to a Class
You can assign an identifier to class reference relations by using the %id command.
%id class_name class_id
class_name:
    identifier
class_id:
    integer
The class_name specified by the %id command is the class name defined in the database, and class_id is the numeric identifier which is assigned for object reference.
%id employee 2
%id office 22
%id project 23
%id phone 24
Specifying the Class and Attribute
You can specify the classes (tables) and attributes (columns) upon loading data by using the %class command. The data line should be written based on the order of attributes specified. When a class name is provided by using the -t option while executing the cubrid loaddb utility, you don't have to specify the class and attribute in the data file. However, the order of writing data must comply with the order of the attribute defined when creating a class.
%class class_name ( attr_name [attr_name... ] )
The schema must be pre-defined in the database to be loaded.
The class_name specified by the %class command is the class name defined in the database and the attr_name is the name of the attribute defined.
The following example shows how to specify a class and three attributes by using the %class command to enter data into a class named employee. Three pieces of data should be entered on the data lines after the %class command. For this, see Configuring Reference Relation .
%class employee (name age department)
Data Line
A data line comes after the %class command line. Data loaded must have the same type as the class attributes specified by the %class command. The data loading operation stops if these two types are different.
Data for each attribute must be separated by at least one space and be basically written as a single line. However, if the data to be loaded takes more than one line, you should specify the plus sign (+) at the end of the first data line to enter data continuously on the following line. Note that no space is allowed between the last character of the data and the plus sign.
Loading an Instance
As shown below, you can load an instance that has the same type as the specified class attribute. Each piece of data is separated by at least one space.
%class employee (name)
'jordan'
'james'
'garnett'
'malone'
Assigning an Instance Number
You can assign a number to a given instance at the beginning of the data line. An instance number is a unique positive number in the specified class. Spaces are not allowed between the number and the colon (:). Assigning an instance number is used to configure the reference relation for later.
%class employee (name)
1: 'jordan'
2: 'james'
3: 'garnett'
4: 'malone'
Configuring Reference Relation
You can configure the object reference relation by specifying the reference class after an "at sign (@)" and the instance number after the "vertical line (|)."
@class_ref | instance_no
class_ref:
     class_name
     class_id
Specify a class name or a class id after the @ sign, and an instance number after a vertical line (|). Spaces are not allowed before and after a vertical line (|).
The following example shows how to load class instances into the paycheck class. The name attribute references an instance of the employee class. As in the last line, data is loaded as NULL if you configure the reference relation by using an instance number not specified earlier.
%class paycheck(name department salary)
@employee|1   'planning'   8000000
@employee|2   'planning'   6000000
@employee|3   'sales'   5000000
@employee|4   'development'   4000000
@employee|5   'development'   5000000
Since the id 21 was assigned to the employee class by using the %id command in the Assigning an Identifier to a Class section, the above example can be written as follows:
%class paycheck(name department salary)
@21|1   'planning'   8000000
@21|2   'planning'   6000000
@21|3   'sales'   5000000
@21|4   'development'   4000000
@21|5   'development'   5000000
Migrating Database
To use a new version of CUBRID database, you may need to migrate an existing data to a new one. For this purpose, you can use the "Export to an ASCII text file" and "Import from an ASCII text file" features provided by CUBRID.
The following section explains migration steps using the cubrid unloaddb and cubrid loaddb utilities.
Recommended Scenario and Procedures
The following steps describes migration scenario that can be applied while the existing version of CUBRID is running. For database migration, you should use the cubrid unloaddb and cubrid loaddb utilities. For details, see Unloading Database and Loading Database.
Stop the existing CUBRID service
Execute cubrid service stop to stop all service processes running on the existing CUBRID and then check whether all CUBRID-related processes have been successfully stopped.
To verify whether all CUBRID-related processes have been successfully stopped, execute ps -ef | grep cub_ in Linux. If there is no process starting with cub_, all CUBRID-related processes have been successfully stopped. In Windows, press the <Ctrl+Alt+Delete> key and select [Start Task Manager]. If there is no process starting with cub_ in the [Processes] tab, all CUBRID-related processes have been successfully stopped. In Linux, when the related processes remain even after the CUBRID service has been terminated, use kill command to forcibly terminate them, and use ipcs -m command to check and release the memory shard by CUBRID broker. To forcibly terminate related processes in Windows, go to the [Processes] tab of Task Manager, right-click the image name, and then select [End Process].
Back up the existing database
Perform backup of the existing version of the database by using the cubrid backupdb utility. The purpose of this step is to safeguard against failures that might occur during the database unload/load operations. For details on the database backup, see Database Backup.
Unload the existing database
Unload the database created for the existing version of CUBRID by using the cubrid unloaddb utility. For details on unloading a database, see Unloading Database .
Store the existing CUBRID configuration files
Store the configurations files such as cubrid.conf, cubrid_broker.conf and cm.conf ** in the **CUBRID/conf directory. The purpose of this step is to conveniently apply parameter values for the existing CUBRID database environment to the new one.
Install a new version of CUBRID
Once backing up and unloading of the data created by the existing version of CUBRID have been completed, delete the existing version of CUBRID and its databases and then install the new version of CUBRID. For details on installing CUBRID, see Getting Started.
Configure the new CUBRID environment
Configure the new version of CUBRID by referring to configuration files of the existing database stored in the step 3, " Store the existing CUBRID configuration files ." For details on configuring new environment, see Installing and Running CUBRID in "Getting Started."
Load the new database
Create a database by using the cubrid createdb utility and then load the data which had previously been unloaded into the new database by using the cubrid loaddb utility. Please see Creating Database for creating a database and Loading Database for loading a database.
Back up the new database
Once the data has been successfully loaded into the new database, back up the database created for the new version of CUBRID by using the cubrid backupdb utility. The reason for this step is because you cannot restore the data backed up in the existing version of CUBRID when using the new version. For details on backing up the database, see Database Backup .
Warning
Even if the version is identical, the 32-bit database volume and the 64-bit database volume are not compatible for backup and recovery. Therefore, it is not recommended to recover a 32-bit database backup on the 64-bit CUBRID or vice versa.
Checking and Compacting Database Space
Checking Used Space
The cubrid spacedb utility is used to check how much space of database volumes is being used. It shows a brief description of all permanent data volumes in the database. Information returned by the cubrid spacedb utility includes the ID, name, purpose and total/free space of each volume. You can also check the total number of volumes and used/unused database pages.
cubrid spacedb [options] database_name
- cubrid : An integrated utility for the CUBRID service and database management.
- spacedb : A command that checks the space in the database. It executes successfully only when the database is in a stopped state.
- database_name : The name of the database whose space is to be checked. The path-name to the directory where the database is to be created must not be included.
The following shows [options] available with the cubrid spacedb utility.
-
-oFILE¶ This option stores the result of checking the space information of testdb to a file named db_output.
cubrid spacedb -o db_output testdb
-
-S,--SA-mode¶ This option is used to access a database in standalone, which means it works without processing server; it does not have an argument. If -S is not specified, the system recognizes that a database is running in client/server mode.
cubrid spacedb --SA-mode testdb
-
-C,--CS-mode¶ This option is used to access a database in client/server mode, which means it works in client/server process respectively; it does not have an argument. If -C is not specified, the system recognize that a database is running in client/server mode by default.
cubrid spacedb --CS-mode testdb
-
--size-unit={PAGE|M|G|T|H}¶ This option specifies the size unit of the space information of the database to be one of PAGE, M(MB), G(GB), T(TB), H(print-friendly). The default value is H. If you set the value to H, the unit is automatically determined as follows: M if 1 MB = DB size < 1024 MB, G if 1 GB = DB size < 1024 GB.
$ cubrid spacedb --size-unit=M testdb
$ cubrid spacedb --size-unit=H testdb

Space description for database 'testdb' with pagesize 16.0K. (log pagesize: 16.0K)

Volid  Purpose    total_size   free_size  Vol Name

    0   GENERIC       20.0 M      17.0 M  /home1/cubrid/testdb
    1      DATA       20.0 M      19.5 M  /home1/cubrid/testdb_x001
    2     INDEX       20.0 M      19.6 M  /home1/cubrid/testdb_x002
    3      TEMP       20.0 M      19.6 M  /home1/cubrid/testdb_x003
    4      TEMP       20.0 M      19.9 M  /home1/cubrid/testdb_x004
-------------------------------------------------------------------------------
    5                100.0 M      95.6 M
Space description for temporary volumes for database 'testdb' with pagesize 16.0K.

Volid  Purpose    total_size   free_size  Vol Name

LOB space description file:/home1/cubrid/lob
-
-s,--summarize¶ This option aggregates total_pages, used_pages and free_pages by DATA, INDEX, GENERIC, TEMP and TEMP TEMP, and outputs them.
$ cubrid spacedb -s testdb

Summarized space description for database 'testdb' with pagesize 16.0K. (log pagesize: 16.0K)

Purpose     total_size   used_size   free_size  volume_count
-------------------------------------------------------------
      DATA      20.0 M       0.5 M      19.5 M          1
     INDEX      20.0 M       0.4 M      19.6 M          1
   GENERIC      20.0 M       3.0 M      17.0 M          1
      TEMP      40.0 M       0.5 M      39.5 M          2
 TEMP TEMP       0.0 M       0.0 M       0.0 M          0
-------------------------------------------------------------
     TOTAL     100.0 M       4.4 M      95.6 M          5
-
-p,--purpose¶ This option separates the used space as data_size, index_size and temp_size, and outputs them.
Space description for database 'testdb' with pagesize 16.0K. (log pagesize: 16.0K)

Volid  Purpose    total_size   free_size   data_size  index_size   temp_size  Vol Name

    0   GENERIC       20.0 M      17.0 M       2.1 M       0.9 M       0.0 M  /home1/cubrid/testdb
    1      DATA       20.0 M      19.5 M       0.4 M       0.0 M       0.0 M  /home1/cubrid/testdb_x001
    2     INDEX       20.0 M      19.6 M       0.0 M       0.4 M       0.0 M  /home1/cubrid/testdb_x002
    3      TEMP       20.0 M      19.6 M       0.0 M       0.0 M       0.3 M  /home1/cubrid/testdb_x003
    4      TEMP       20.0 M      19.9 M       0.0 M       0.0 M       0.1 M  /home1/cubrid/testdb_x004
----------------------------------------------------------------------------------------------------
    5                100.0 M      95.6 M       2.5 M       1.2 M       0.4 M
Space description for temporary volumes for database 'testdb' with pagesize 16.0K.

Volid  Purpose    total_size   free_size   data_size  index_size   temp_size  Vol Name

LOB space description file:/home1/cubrid/lob
Note
If you use -p and -s together, the summarized information of the used space will be separated as data_size, index_size and temp_size.
$ cubrid spacedb -s -p testdb
Summarized space description for database 'testdb' with pagesize 16.0K. (log pagesize: 16.0K)

Purpose     total_size   used_size   free_size   data_size  index_size   temp_size  volume_count
-------------------------------------------------------------------------------------------------
      DATA      20.0 M       0.5 M      19.5 M       0.4 M       0.0 M       0.0 M          1
     INDEX      20.0 M       0.4 M      19.6 M       0.0 M       0.4 M       0.0 M          1
   GENERIC      20.0 M       3.0 M      17.0 M       2.1 M       0.9 M       0.0 M          1
      TEMP      40.0 M       0.5 M      39.5 M       0.0 M       0.0 M       0.4 M          2
 TEMP TEMP       0.0 M       0.0 M       0.0 M       0.0 M       0.0 M       0.0 M          0
-------------------------------------------------------------------------------------------------
     TOTAL     100.0 M       4.4 M      95.6 M       2.5 M       1.2 M       0.4 M          5
Compacting Used Space
The cubrid compactdb utility is used to secure unused space of the database volume. In case the database server is not running (offline), you can perform the job in standalone mode. In case the database server is running, you can perform it in client-server mode.
The cubrid compactdb utility secures the space being taken by OIDs of deleted objects and by class changes. When an object is deleted, the space taken by its OID is not immediately freed because there might be other objects that refer to the deleted one.
Reference to the object deleted during compacting is displayed as NULL, which means this can be reused by OIDs.
cubrid compactdb [options] database_name [class_name], class_name2, ...]
- cubrid: An integrated utility for the CUBRID service and database management.
- compactdb: A command that compacts the space of the database so that OIDs assigned to deleted data can be reused.
- database_name: The name of the database whose space is to be compacted. The path name to the directory where the database is to be created must not be included.
- class_name_list: You can specify the list of tables names that you want to compact space after a database name; the -i option cannot be used together. It is used in client/server mode only.
-I, -i, -c, -d, -p options are applied in client/server mode only.
The following shows [options] available with the cubrid compactdb utility.
-
-v,--verbose¶ You can output messages that shows which class is currently being compacted and how many instances have been processed for the class by using the -v option.
cubrid compactdb -v testdb
-
-S,--SA-mode¶ This option specifies to compact used space in standalone mode while database server is not running; no argument is specified. If the -S option is not specified, system recognizes that the job is executed in client/server mode.
cubrid compactdb --SA-mode testdb
-
-C,--CS-mode¶ This option specifies to compact used space in client/server mode while database server is running; no argument is specified. Even though this option is omitted, system recognizes that the job is executed in client/server mode.
The following options can be used in client/server mode only.
-
-i,--input-class-file=FILE¶ You can specify an input file name that contains the table name with this option. Write one table name in a single line; invalid table name is ignored. Note that you cannot specify the list of the table names after a database name in case of you use this option.
-
-p,--pages-commited-once=NUMBER¶ You can specify the number of maximum pages that can be committed once with this option. The default value is 10, the minimum value is 1, and the maximum value is 10. The less option value is specified, the more concurrency is enhanced because the value for class/instance lock is small; however, it causes slowdown on operation, and vice versa.
cubrid compactdb --CS-mode -p 10 testdb tbl1, tbl2, tbl5
-
-d,--delete-old-repr¶ You can delete an existing table representation (schema structure) from catalog with this option. Generally you'd better keep the existing table representation because schema updating cost will be saved when you keep the status as referring to the past schema for the old records.
-
-I,--Instance-lock-timeout=NUMBER¶ You can specify a value of instance lock timeout with this option. The default value is 2 (seconds), the minimum value is 1, and the maximum value is 10. The less option value is specified, the more operation speeds up. However, the number of instances that can be processed becomes smaller, and vice versa.
-
-c,--class-lock-timeout=NUMBER¶ You can specify a value of instance lock timeout with this option. The default value is 10 (seconds), the minimum value is 1, and the maximum value is 10. The less option value is specified, the more operation speeds up. However, the number of tables that can be processed becomes smaller, and vice versa.
Updating Statistics and Checking Query Plan
Updating Statistics
Updates statistical information such as the number of objects, the number of pages to access, and the distribution of attribute values.
cubrid optimizedb [option] database_name
- cubrid: An integrated utility for the CUBRID service and database management.
- optimizedb: Updates the statistics information, which is used for cost-based query optimization of the database. If the option is specified, only the information of the specified class is updated.
- database_name: The name of the database whose cost-based query optimization statistics are to be updated.
The following shows [option] available with the cubrid optimizedb utility.
-
-n,--class-name¶ The following example shows how to update the query statistics information of the given class by using the -n option.
cubrid optimizedb -n event_table testdb
The following example shows how to update the query statistics information of all classes in the database.
cubrid optimizedb testdb
Checking the Query Plan Cache
The cubrid plandump utility is used to display information on the query plans stored (cached) on the server.
cubrid plandump [options] database_name
- cubrid: An integrated utility for the CUBRID service and database management.
- plandump: A utility that displays the query plans stored in the current cache of a specific database.
- database_name: The name of the database where the query plans are to be checked or dropped from its server cache.
If no option is used, it checks the query plans stored in the cache.
cubrid plandump testdb
The following shows [options] available with the cubrid plandump utility.
-
-d,--drop¶ This option drops the query plans stored in the cache.
cubrid plandump -d testdb
-
-o,--output-file=FILE¶ This option stores the results of the query plans stored in the cache to a file.
cubrid plandump -o output.txt testdb
Dumping Statistics Information of Server
cubrid statdump utility checks statistics information processed by the CUBRID database server. The statistics information mainly consists of the following: File I/O, Page buffer, Logs, Transactions, Concurrency/Lock, Index, and Network request.
You can also use CSQL's session commands to check the statistics information only about the CSQL's connection. For details, see Dumping CSQL execution statistics information.
cubrid statdump [options] database_name
- cubrid: An integrated utility for the CUBRID service and database management.
- installdb: A command that dumps the statistics information on the database server execution.
- database_name: The name of database which has the statistics data to be dumped.
The following shows [options] available with the cubrid statdump utility.
-
-i,--interval=SECOND¶ This option specifies the periodic number of Dumping statistics as seconds.
The following outputs the accumulated values per second.
cubrid statdump -i 1 -c demodb
The following outputs the accumulated values during 1 second, as starting with 0 value per every 1 second.
cubrid statdump -i 1 demodb
The following outputs the last values which were executed with -i option.
cubrid statdump demodb
The following outputs the same values with the above. -c option doesn't work if it is not used with -i option together.
cubrid statdump -c demodbThe following outputs the values per every 5 seconds.
cubrid statdump -i 5 testdb

Thu April 07 23:10:08 KST 2013

 *** SERVER EXECUTION STATISTICS ***
Num_file_creates              =          0
Num_file_removes              =          0
Num_file_ioreads              =          0
Num_file_iowrites             =          0
Num_file_iosynches            =          0
Num_data_page_fetches         =          0
Num_data_page_dirties         =          0
Num_data_page_ioreads         =          0
Num_data_page_iowrites        =          0
Num_data_page_victims         =          0
Num_data_page_iowrites_for_replacement =          0
Num_log_page_ioreads          =          0
Num_log_page_iowrites         =          0
Num_log_append_records        =          0
Num_log_archives              =          0
Num_log_start_checkpoints     =          0
Num_log_end_checkpoints       =          0
Num_log_wals                  =          0
Num_page_locks_acquired       =          0
Num_object_locks_acquired     =          0
Num_page_locks_converted      =          0
Num_object_locks_converted    =          0
Num_page_locks_re-requested   =          0
Num_object_locks_re-requested =          0
Num_page_locks_waits          =          0
Num_object_locks_waits        =          0
Num_tran_commits              =          0
Num_tran_rollbacks            =          0
Num_tran_savepoints           =          0
Num_tran_start_topops         =          0
Num_tran_end_topops           =          0
Num_tran_interrupts           =          0
Num_btree_inserts             =          0
Num_btree_deletes             =          0
Num_btree_updates             =          0
Num_btree_covered             =          0
Num_btree_noncovered          =          0
Num_btree_resumes             =          0
Num_btree_multirange_optimization =      0
Num_query_selects             =          0
Num_query_inserts             =          0
Num_query_deletes             =          0
Num_query_updates             =          0
Num_query_sscans              =          0
Num_query_iscans              =          0
Num_query_lscans              =          0
Num_query_setscans            =          0
Num_query_methscans           =          0
Num_query_nljoins             =          0
Num_query_mjoins              =          0
Num_query_objfetches          =          0
Num_network_requests          =          1
Num_adaptive_flush_pages      =          0
Num_adaptive_flush_log_pages  =          0
Num_adaptive_flush_max_pages  =        900
Time_ha_replication_delay     =          0

 *** OTHER STATISTICS ***
Data_page_buffer_hit_ratio    =       0.00
The following are the explanation about the above statistical information.
Category Item Description File I/O Num_file_removes The number of files removed Num_file_creates The number of files created Num_file_ioreads The number of files read Num_file_iowrites The number of files stored Num_file_iosynches The number of file synchronization Page buffer Num_data_page_fetches The number of pages fetched Num_data_page_dirties The number of duty pages Num_data_page_ioreads The number of pages read Num_data_page_iowrites The number of pages stored Num_data_page_victims The number specifying the victim data to be flushed from the data page to the disk Num_data_page_iowrites_for_replacement The number of the written data pages specified as victim Num_adaptive_flush_pages The number of data pages flushed from the data buffer to the disk Num_adaptive_flush_log_pages The number of log pages flushed from the log buffer to the disk Num_adaptive_flush_max_pages The maximum number of pages allowed to flush from data and the log buffer to the disk Logs Num_log_page_ioreads The number of log pages read Num_log_page_iowrites The number of log pages stored Num_log_append_records The number of log records appended Num_log_archives The number of logs archived Num_log_start_checkpoints The number of started checkpoints Num_log_end_checkpoints The number of ended checkpoints Num_log_wals Not used Transactions Num_tran_commits The number of commits Num_tran_rollbacks The number of rollbacks Num_tran_savepoints The number of savepoints Num_tran_start_topops The number of top operations started Num_tran_end_topops The number of top operations stopped Num_tran_interrupts The number of interruptions Concurrency/lock Num_page_locks_acquired The number of locked pages acquired Num_object_locks_acquired The number of locked objects acquired Num_page_locks_converted The number of locked pages converted Num_object_locks_converted The number of locked objects converted Num_page_locks_re-requested The number of locked pages requested Num_object_locks_re-requested The number of locked objects requested Num_page_locks_waits The number of locked pages waited Num_object_locks_waits The number of locked objects waited Index Num_btree_inserts The number of nodes inserted Num_btree_deletes The number of nodes deleted Num_btree_updates The number of nodes updated Num_btree_covered The number of cases in which an index includes all data upon query execution Num_btree_noncovered The number of cases in which an index includes some or no data upon query execution Num_btree_resumes The exceeding number of index scan specified in index_scan_oid_buffer_pages Num_btree_multirange_optimization The number of executions on multi-range optimization for the WHERE … IN … LIMIT condition query statement Query Num_query_selects The number of SELECT query execution Num_query_inserts The number of INSERT query execution Num_query_deletes The number of DELETE query execution Num_query_updates The number of UPDATE query execution Num_query_sscans The number of sequential scans (full scan) Num_query_iscans The number of index scans Num_query_lscans The number of LIST scans Num_query_setscans The number of SET scans Num_query_methscans The number of METHOD scans Num_query_nljoins The number of nested loop joins Num_query_mjoins The number of parallel joins Num_query_objfetches The number of fetch objects Network request Num_network_requests The number of network requested Buffer hit rate Data_page_buffer_hit_ratio Hit Ratio of page buffers (Num_data_page_fetches - Num_data_page_ioreads)*100 / Num_data_page_fetches HA Time_ha_replication_delay Replication latency time (sec.)
-
-o,--output-file=FILE¶ -o options is used to store statistics information of server processing for the database to a specified file.
cubrid statdump -o statdump.log testdb
-
-c,--cumulative¶ You can display the accumulated operation statistics information of the target database server by using the -c option. By combining this with the -i option, you can check the operation statistics information at a specified interval.
cubrid statdump -i 5 -c testdb
-
-s,--substr=STRING¶ You can display statistics about items, the names of which include the specified string by using -s option.
The following example shows how to display statistics about items, the names of which include "data".
cubrid statdump -s data testdb

*** SERVER EXECUTION STATISTICS ***
Num_data_page_fetches         =        135
Num_data_page_dirties         =          0
Num_data_page_ioreads         =          0
Num_data_page_iowrites        =          0
Num_data_page_victims         =          0
Num_data_page_iowrites_for_replacement =          0

 *** OTHER STATISTICS ***
Data_page_buffer_hit_ratio    =     100.00
Note
Each status information consists of 64-bit INTEGER data and the corresponding statistics information can be lost if the accumulated value exceeds the limit.
Checking Lock, Checking Transaction, Killing Transaction
Checking Lock Status
The cubrid lockdb utility is used to check the information on the lock being used by the current transaction in the database.
cubrid lockdb [options] database_name
- cubrid: An integrated utility for the CUBRID service and database management.
- lockdb: A command used to check the information on the lock being used by the current transaction in the database.
- database_name: The name of the database where lock information of the current transaction is to be checked.
The following example shows how to display lock information of the testdb database on a screen without any option.
cubrid lockdb testdb
The following shows [options] available with the cubrid statdump utility.
-
-o,--output-file=FILE¶ The -o option displays the lock information of the testdb database as a output.txt.
cubrid lockdb -o output.txt testdb
Output Contents
The output contents of cubrid lockdb are divided into three logical sections.
- Server lock settings
- Clients that are accessing the database
- The contents of an object lock table
Server lock settings
The first section of the output of cubrid lockdb is the database lock settings.
*** Lock Table Dump ***
 Lock Escalation at = 100000, Run Deadlock interval = 0
The lock escalation level is 100,000 records, and the interval to detect deadlock is set to 0 seconds.
For a description of the related system parameters, lock_escalation and deadlock_detection_interval, see Concurrency/Lock-Related Parameters.
Clients that are accessing the database
The second section of the output of cubrid lockdb includes information on all clients that are connected to the database. This includes the transaction index, program name, user ID, host name, process ID, isolation level and lock timeout settings of each client.
Transaction (index 1, csql, dba@cubriddb|12854)
Isolation READ COMMITTED CLASSES AND READ UNCOMMITTED INSTANCES
Timeout_period -1
Here, the transaction index is 1, the program name is csql, the user ID is dba, the host name is cubriddb, the client process identifier is 12854, the isolation level is READ COMMITTED CLASSES AND READ UNCOMMITTED INSTANCES, and the lock timeout is unlimited.
A client for which transaction index is 0 is the internal system transaction. It can obtain the lock at a specific time, such as the processing of a checkpoint by a database. In most cases, however, this transaction will not obtain any locks.
Because cubrid lockdb utility accesses the database to obtain the lock information, the cubrid lockdb is an independent client and will be output as such.
Object lock table
The third section of the output of the cubrid lockdb includes the contents of the object lock table. It shows which client has the lock for which object in which mode, and which client is waiting for which object in which mode. The first part of the result of the object lock table shows how many objects are locked.
Object lock Table:
    Current number of objects which are locked = 2001
cubrid lockdb outputs the OID, object type and table name of each object that obtained lock. In addition, it outputs the number of transactions that hold lock for the object (Num holders), the number of transactions (Num blocked-holders) that hold lock but are blocked since it could not convert the lock to the upper lock (e.g., conversion from U_LOCK to X_LOCK), and the number of different transactions that are waiting for the lock of the object (Num waiters). It also outputs the list of client transactions that hold lock, blocked client transactions and waiting client transactions.
The example below shows an object in which the object type is an instance of a class, or record that will be blocked, because the OID( 2| 50| 1) object that has S_LOCK for transaction 1 and S_LOCK for transaction 2 cannot be converted into X_LOCK. It also shows that transaction 3 is blocked because transaction 2 is waiting for X_LOCK even when transaction 3 is waiting for S_LOCK.
OID = 2| 50| 1
Object type: instance of class ( 0| 62| 5) = athlete
Num holders = 1, Num blocked-holders= 1, Num waiters = 1
LOCK HOLDERS :
    Tran_index = 2, Granted_mode = S_LOCK, Count = 1
BLOCKED LOCK HOLDERS :
    Tran_index = 1, Granted_mode = U_LOCK, Count = 3
    Blocked_mode = X_LOCK
                    Start_waiting_at = Fri May 3 14:44:31 2002
                    Wait_for_secs = -1
LOCK WAITERS :
    Tran_index = 3, Blocked_mode = S_LOCK
                    Start_waiting_at = Fri May 3 14:45:14 2002
                    Wait_for_secs = -1
It outputs the lock information on the index of the table when the object type is the Index key of class (index key).
OID = -662|   572|-32512
Object type: Index key of class ( 0|   319|  10) = athlete.
Index name: pk_athlete_code
Total mode of holders =   NX_LOCK, Total mode of waiters = NULL_LOCK.
Num holders=  1, Num blocked-holders=  0, Num waiters=  0
LOCK HOLDERS:
    Tran_index =   1, Granted_mode =  NX_LOCK, Count =   1
Granted_mode refers to the mode of the obtained lock, and Blocked_mode refers to the mode of the blocked lock. Starting_waiting_at refers to the time at which the lock was requested, and Wait_for_secs refers to the waiting time of the lock. The value of Wait_for_secs is determined by lock_timeout, a system parameter.
When the object type is a class (table), Nsubgranules is displayed, which is the sum of the record locks and the key locks obtained by a specific transaction in the table.
OID = 0| 62| 5
Object type: Class = athlete
Num holders = 2, Num blocked-holders= 0, Num waiters= 0
LOCK HOLDERS:
Tran_index = 3, Granted_mode = IS_LOCK, Count = 2, Nsubgranules = 0
Tran_index = 1, Granted_mode = IX_LOCK, Count = 3, Nsubgranules = 1
Tran_index = 2, Granted_mode = IS_LOCK, Count = 2, Nsubgranules = 1
Checking Transaction
The cubrid tranlist is used to check the transaction information of the target database. Only DBA or DBA group can use this utility.
cubrid tranlist [options] database_name
If you omit the [options], it displays the total information about each transaction.
"cubrid tranlist demodb" outputs the similar result with "cubrid killtran -q demodb", but tranlist outputs more items; "User name" and "Host name". "cubrid tranlist -s demodb" outputs the same result with "cubrid killtran -d demodb".
The following shows what information is displayed when you run "cubrid tranlist demodb".
$ cubrid tranlist demodb

Tran index          User name      Host name      Process id    Program name              Query time    Tran time       Wait for lock holder      SQL_ID       SQL Text
--------------------------------------------------------------------------------------------------------------------------------------------------------------------------
   1(ACTIVE)           public     test-server           1681    broker1_cub_cas_1               0.00         0.00                       -1     *** empty ***
   2(ACTIVE)           public     test-server           1682    broker1_cub_cas_2               0.00         0.00                       -1     *** empty ***
   3(ACTIVE)           public     test-server           1683    broker1_cub_cas_3               0.00         0.00                       -1     *** empty ***
   4(ACTIVE)           public     test-server           1684    broker1_cub_cas_4               1.80         1.80                  3, 2, 1     e5899a1b76253   update ta set a = 5 where a > 0
   5(ACTIVE)           public     test-server           1685    broker1_cub_cas_5               0.00         0.00                       -1     *** empty ***
--------------------------------------------------------------------------------------------------------------------------------------------------------------------------

SQL_ID: e5899a1b76253
Tran index : 4
update ta set a = 5 where a > 0
In the above example, when each three transaction is running INSERT statement, UPDATE statement is tried to run in the other transaction. In the above, UPDATE statement with "Tran index" 4 waits for the transactions 3,2,1, which are found in "Wait for lock holder", to be ended.
"SQL Text" is SQLs which are stored into the query plan cache; INSERT statements cannot be printed out on "cubrid tranlist" because it is not stored in the query plan cache.
Each column's meaning is as following.
- Tran index : the index of transaction
- User name: database user's name
- Host name: host name of CAS which running this transaction
- Process id : client's process id
- Program name : program name of a client
- Query time : total execution time for the running query (unit: second)
- Tran time : total run time for the current transaction (unit: second)
- Wait for lock holder : the list of transactions which own the lock when the current transaction is waiting for a lock
- SQL_ID: an ID for SQL Text
- SQL Text : running SQL text (maximum 30 characters)
Transaction status messages, which are shown on "Tran index", are as follows.
- ACTIVE : active state
- RECOVERY : recovering transaction
- COMMITTED : transaction which is already committed and will be ended soon.
- COMMITTING : transaction which is committing
- ABORTED : transaction which is rolled back and will be ended soon.
- KILLED : transaction which is forcefully killed by the server.
The following shows [options] available with the cubrid tranlist utility.
-
-u,--user=USER¶ USER is DB user's ID to log-in. It only allows DBA and DBA group users.(The default: DBA)
-
-p,--password=PASSWORD¶ PASSWORD is DB user's password.
-
-s,--summary¶ This option outputs only summarized information(it omits query execution information or locking information).
$ cubrid tranlist -s demodb

Tran index          User name      Host name      Process id      Program name
-------------------------------------------------------------------------------
   1(ACTIVE)           public     test-server           1681 broker1_cub_cas_1
   2(ACTIVE)           public     test-server           1682 broker1_cub_cas_2
   3(ACTIVE)           public     test-server           1683 broker1_cub_cas_3
   4(ACTIVE)           public     test-server           1684 broker1_cub_cas_4
   5(ACTIVE)           public     test-server           1685 broker1_cub_cas_5
-------------------------------------------------------------------------------
-
--sort-key=NUMBER¶ This option outputs the ascending values sorted by the NUMBERth column. If the type of the column is the number, it is sorted by the number; if not, it is sorted by the string. If this option is omitted, the output is sorted by "Tran index".
The following is an example which outputs the sorted information by specifying the "Process id", the 4th column.
$ cubrid tranlist --sort-key=4 demodb

Tran index          User name      Host name      Process id    Program name              Query time    Tran time       Wait for lock holder      SQL_ID       SQL Text
--------------------------------------------------------------------------------------------------------------------------------------------------------------------------
   1(ACTIVE)           public     test-server           1681    broker1_cub_cas_1               0.00         0.00                       -1     *** empty ***
   2(ACTIVE)           public     test-server           1682    broker1_cub_cas_2               0.00         0.00                       -1     *** empty ***
   3(ACTIVE)           public     test-server           1683    broker1_cub_cas_3               0.00         0.00                       -1     *** empty ***
   4(ACTIVE)           public     test-server           1684    broker1_cub_cas_4               1.80         1.80                  3, 1, 2     e5899a1b76253   update ta set a = 5 where a > 0
   5(ACTIVE)           public     test-server           1685    broker1_cub_cas_5               0.00         0.00                       -1     *** empty ***
--------------------------------------------------------------------------------------------------------------------------------------------------------------------------

SQL_ID: e5899a1b76253
Tran index : 4
update ta set a = 5 where a > 0
-
--reverse¶ This option outputs the reversely sorted values.
The following is an example which outputs the reversely sorted values by the "Tran index".
Tran index          User name      Host name      Process id    Program name              Query time    Tran time     Wait for lock holder      SQL_ID       SQL Text
------------------------------------------------------------------------------------------------------------------------------------------------------------------------
   5(ACTIVE)           public     test-server           1685    broker1_cub_cas_5               0.00         0.00                     -1     *** empty ***
   4(ACTIVE)           public     test-server           1684    broker1_cub_cas_4               1.80         1.80                3, 2, 1     e5899a1b76253   update ta set a = 5 where a > 0
   3(ACTIVE)           public     test-server           1683    broker1_cub_cas_3               0.00         0.00                     -1     *** empty ***
   2(ACTIVE)           public     test-server           1682    broker1_cub_cas_2               0.00         0.00                     -1     *** empty ***
   1(ACTIVE)           public     test-server           1681    broker1_cub_cas_1               0.00         0.00                     -1     *** empty ***
------------------------------------------------------------------------------------------------------------------------------------------------------------------------

SQL_ID: e5899a1b76253
Tran index : 4
update ta set a = 5 where a > 0
Killing Transactions
The cubrid killtran is used to check transactions or abort specific transaction. Only a DBA can execute this utility.
cubrid killtran [options] database_name
- cubrid: An integrated utility for the CUBRID service and database management
- killtran: A utility that manages transactions for a specified database
- database_name: The name of database whose transactions are to be killed
Some [options] refer to killing specified transactions; others refer to print active transactions. If no option is specified, -d is specified by default so all transactions are displayed on the screen.
cubrid killtran demodb

Tran index      User name   Host name      Process id      Program name
-------------------------------------------------------------------------------
   1(ACTIVE)          dba      myhost             664           cub_cas
   2(ACTIVE)          dba      myhost            6700              csql
   3(ACTIVE)          dba      myhost            2188           cub_cas
   4(ACTIVE)          dba      myhost             696              csql
   5(ACTIVE)       public      myhost            6944              csql
-------------------------------------------------------------------------------
The following shows [options] available with the cubrid killtran utility.
-
-i,--kill-transaction-index=ID1,ID2,ID3¶ This option kills transactions in a specified index. Several transaction indexes can be specified by separating with comma(,). If there is an invalid transaction ID among several IDs, it is ignored.
$ cubrid killtran -i 1 demodb
Ready to kill the following transactions:

Tran index          User name      Host name      Process id      Program name
-------------------------------------------------------------------------------
   1(ACTIVE)              DBA         myhost           15771              csql
   2(ACTIVE)              DBA         myhost            2171              csql
-------------------------------------------------------------------------------
Do you wish to proceed ? (Y/N)y
Killing transaction associated with transaction index 1
Killing transaction associated with transaction index 2
-
--kill-user-name=ID¶ This option kills transactions for a specified OS user ID.
cubrid killtran --kill-user-name=os_user_id demodb
-
--kill-host-name=HOST¶ This option kills transactions of a specified client host.
cubrid killtran --kill-host-name=myhost demodb
-
--kill-program-name=NAME¶ This option kills transactions for a specified program.
cubrid killtran --kill-program-name=cub_cas demodb
-
--kill-sql-id=SQL_ID¶ This option kills transactions for a specified SQL ID.
cubrid killtran --kill-sql-id=5377225ebc75a demodb
-
-pPASSWORD¶ A value followed by the -p option is a password of the DBA, and should be entered in the prompt.
-
-q,--query-exec-info¶ The difference with the output of "cubrid tranlist" command is that there are no "User name" column and "Host name" column. See Checking Transaction.
-
-d,--display¶ This is the default option and it displays the summary of transactions. Its output is the same as the output of "cubrid tranlist" with -s option. See
tranlist -s
-
-f,--force¶ This option omits a prompt to check transactions to be stopped.
cubrid killtran -f -i 1 demodb
Diagnosing database and dumping parameter
Checking Database Consistency
The cubrid checkdb utility is used to check the consistency of a database. You can use cubrid checkdb to identify data structures that are different from indexes by checking the internal physical consistency of the data and log volumes. If the cubrid checkdb utility reveals any inconsistencies, you must try automatic repair by using the --repair option.
cubrid checkdb [options] database_name [table_name1 table_name2 ...]
- cubrid: An integrated utility for CUBRID service and database management.
- checkdb: A utility that checks the data consistency of a specific database.
- database_name: The name of the database whose consistency status will be either checked or restored.
- table_name1 table_name2: List the table names for consistency check or recovery
The following shows [options] available with the cubrid checkdb utility.
-
-S,--SA-mode¶ This option is used to access a database in standalone, which means it works without processing server; it does not have an argument. If -S is not specified, the system recognizes that a database is running in client/server mode.
cubrid checkdb -S demodb
-
-C,--CS-mode¶ This option is used to access a database in client/server mode, which means it works in client/server process respectively; it does not have an argument. If -C is not specified, the system recognize that a database is running in client/server mode by default.
cubrid checkdb -C demodb
-
-r,--repair¶ This option is used to restore an issue if a consistency error occurs in a database.
cubrid checkdb -r demodb
-
--check-prev-link¶ This option is used to check if there are errors on previous links of an index.
$ cubrid checkdb --check-prev-link demodb
-
--repair-prev-link¶ This option is used to restore if there are errors on previous links of an index.
$ cubrid checkdb --repair-prev-link demodb
-
-i,--input-class-file=FILE¶ You can specify tables to check the consistency or to restore, by specifying the -i FILE option or listing the table names after a database name. Both ways can be used together. If a target is not specified, entire database will be a target of consistency check or restoration.
cubrid checkdb demodb tbl1 tbl2
cubrid checkdb -r demodb tbl1 tbl2
cubrid checkdb -r -i table_list.txt demodb tbl1 tbl2
Empty string, tab, carriage return and comma are separators among table names in the table list file specified by -i option. The following example shows the table list file; from t1 to t10, it is recognized as a table for consistency check or restoration.
t1 t2 t3,t4 t5
t6, t7 t8   t9

     t10
Dumping Internal Database Information
You can check various pieces of internal information on the database with the cubrid diagdb utility. Information provided by cubrid diagdb is helpful in diagnosing the current status of the database or figuring out a problem.
cubrid diagdb options database_name
- cubrid: An integrated utility for the CUBRID service and database management.
- diagdb: A command that is used to check the current storage state of the database by Dumping the information contained in the binary file managed by CUBRID in text format. It normally executes only when the database is in a stopped state. You can check the whole database or the file table, file size, heap size, class name or disk bitmap selectively by using the provided option.
- database_name: The name of the database whose internal information is to be diagnosed.
The following shows [options] available with the cubrid diagdb utility.
-
-d,--dump-type=TYPE¶ This option specifies the output range when you display the information of all files in the demodb database. If any option is not specified, the default value of -1 is used.
cubrid diagdb -d 1 demodb
The utility has 9 types of -d options as follows:
Type Description -1 Displays all database information. 1 Displays file table information. 2 Displays file capacity information. 3 Displays heap capacity information. 4 Displays index capacity information. 5 Displays class name information. 6 Displays disk bitmap information. 7 Displays catalog information. 8 Displays log information. 9 Displays heap information.
Dumping Parameters Used in Server/Client
The cubrid paramdump utility outputs parameter information used in the server/client process.
cubrid paramdump [options] database_name
- cubrid: An integrated utility for the CUBRID service and database management
- paramdump: A utility that outputs parameter information used in the server/client process
- database_name: The name of the database in which parameter information is to be displayed.
The following shows [options] available with the cubrid paramdump utility.
-
-o,--output-file=FILE¶ The -o option is used to store information of the parameters used in the server/client process of the database into a specified file. The file is created in the current directory. If the -o option is not specified, the message is displayed on a console screen.
cubrid paramdump -o db_output demodb
-
-b,--both¶ The -b option is used to display parameter information used in server/client process on a console screen. If the -b option is not specified, only server-side information is displayed.
cubrid paramdump -b demodb
-
-S,--SA-mode¶ This option displays parameter information of the server process in standalone mode.
cubrid paramdump -S demodb
-
-C,--CS-mode¶ This option displays parameter information of the server process in client/server mode.
cubrid paramdump -C demodb
Changing HA Mode, Copying/Applying Logs
cubrid changemode utility prints or changes the HA mode.
cubrid applyinfo utility prints the information of applied transaction logs in the HA environment.
For more details, see Registering HA to cubrid service.
Compiling/Dumping Locale
cubrid genlocale utility compiles the locale information to use. This utility is executed in the make_locale.sh script ( .bat for Windows).
cubrid dumplocale utility dumps the compiled binary locale file as a human-readable format on the console. It is better to save the output as a file by output redirection.
cubrid synccolldb utility checks if the collations between database and locale library are consistent or not, and synchronize them.
For more detailed usage, see Locale Setting.