Controlling CUBRID Processes
CUBRID processes can be controlled by cubrid utility.
Controlling CUBRID Service
The following cubrid utility syntax shows how to control services registered in the configuration file. One of the followings can be specified in command: start, stop, restart, or status; start is used to run services; stop is used to stop services; restart is used to restart services; status is used to check status. No additional options or arguments are required.
cubrid service <command>
<command>: {start|stop|restart|status}
Controlling Database Server
The following cubrid utility syntax shows how to control database server process. One of the followings can be specified in command: start, stop, restart, or status. start, stop, restart, or status; start is used to run services; stop is used to stop services; restart is used to restart services; status is used to check status. Every command except status must have a database name as an argument.
cubrid server <command> [database_name]
<command>: {start|stop|restart|status}
Controlling Broker
The following cubrid utility syntax shows how to control CUBRID broker process. One of the followings can be specified in command: start, stop, restart, or status; start is used to run services; stop is used to stop services; restart is used to restart services; status is used to checkstatus. In addition, on (to start a specific broker) and off (to stop a specific broker) are provided.
cubrid broker <command>
<command>: {start|stop|restart|status [broker_name]
           |info
           |on broker_name |off broker_name
           |reset broker_name |acl {status|reload} broker_name }
Controlling CUBRID Manager Server
To use the CUBRID Manager, the Manager server must be running where database server is running. The following cubrid utility syntax shows how to control the CUBRID Manager processes. One of the followings can be specified in command: start, stop, or status; start is used to run services; stop is used to stop services; status is used to check status.
cubrid manager <command>
<command>: {start|stop|status}
Controlling CUBRID HA
The following cubrid heartbeat utility syntax shows how to use CUBRID HA. One of the followings can be specified in command: start, stop, reload, deact, or act; start is used to run HA-related processes; stop is used to stop them; reload is used to reload information on HA configuration; deact is used to exclude nodes from the CUBRID HA groups; act is used to include nodes which have been excluded from the CUBRID HA groups. For details, see Utilities of cubrid heartbeat.
cubrid heartbeat <command>
<command>: {start|stop|reload|deact|act}
CUBRID Services
Registering Services
You can register one or more database servers, CUBRID brokers, CUBRID Manager(s) or CUBRID HAs as CUBRID service in the configuration file ( cubrid.conf ). If you do not register any service, only master process is registered by default. It is convenient for you to view status of all related processes at a glance or start and stop the processes at once with the cubrid service utility once it is registered as CUBRID service. For details on CUBRID HA configuration, see Utilities of cubrid service.
The following example shows how to register database server and broker as service in the cubrid.conf file and enable databases ( demodb and testdb ) to start automatically at once when CUBRID server starts running.
# cubrid.conf
...

[service]

# The list of processes to be started automatically by 'cubrid service start' command
# Any combinations are available with server, broker, manager and heartbeat.
service=server,broker

# The list of database servers in all by 'cubrid service start' command.
# This property is effective only when the above 'service' property contains 'server' keyword.
server=demodb,testdb
Starting Services
In Linux environment, you can enter the code below to start CUBRID after installation. If no server is registered in the configuration file, only master process (cub_master) runs by default.
In the Windows environment, the code below is normally executed only if a user with system permission has logged in. An administrator or general user can start or stop the CUBRID server by clicking its icon on the taskbar tray.
% cubrid service start

@ cubrid master start
++ cubrid master start: success
The following message is returned if master process is already running.
% cubrid service start

@ cubrid master start
++ cubrid master is running.
The following message is returned if master process fails to run. The example shows that service fails to start due to conflicts of the cubrid_port_id parameter value specified in the cubrid.conf file. In such a case, you can resolve the problem by changing the port. If it fails to start even though no port is occupied by process, delete /tmp/CUBRID1523 file and then restart the process.
% cubrid service start

@ cubrid master start
cub_master: '/tmp/CUBRID1523' file for UNIX domain socket exist.... Operation not permitted
++ cubrid master start: fail
After registering service as explained in CUBRID Services, enter the code below to start the service. You can verify that database server process and broker as well as registered demodb and testdb are starting at once.
% cubrid service start

@ cubrid master start
++ cubrid master start: success
@ cubrid server start: demodb

This may take a long time depending on the amount of restore works to do.
CUBRID 9.0

++ cubrid server start: success
@ cubrid server start: testdb

This may take a long time depending on the amount of recovery works to do.
CUBRID 9.0

++ cubrid server start: success
@ cubrid broker start
++ cubrid broker start: success
Stopping Services
Enter code below to stop CUBRID service. If no services are registered by a user, only master process stops and then restarts.
% cubrid service stop
@ cubrid master stop
++ cubrid master stop: success
Enter code below to stop registered CUBRID service. You can verify that server process, broker process, and master process as well as demodb and testdb stop at once.
% cubrid service stop
@ cubrid server stop: demodb

Server demodb notified of shutdown.
This may take several minutes. Please wait.
++ cubrid server stop: success
@ cubrid server stop: testdb
Server testdb notified of shutdown.
This may take several minutes. Please wait.
++ cubrid server stop: success
@ cubrid broker stop
++ cubrid broker stop: success
@ cubrid master stop
++ cubrid master stop: success
Restarting Services
Enter code below to restart CUBRID service. If no services are registered by a user, only master process stops and then restarts.
% cubrid service restart

@ cubrid master stop
++ cubrid master stop: success
@ cubrid master start
++ cubrid master start: success
Enter code below to restart registered CUBRID service. You can verify that server process, broker process, and master process as well as demodb and testdb stop and then restart at once.
% cubrid service restart

@ cubrid server stop: demodb
Server demodb notified of shutdown.
This may take several minutes. Please wait.
++ cubrid server stop: success
@ cubrid server stop: testdb
Server testdb notified of shutdown.
This may take several minutes. Please wait.
++ cubrid server stop: success
@ cubrid broker stop
++ cubrid broker stop: success
@ cubrid master stop
++ cubrid master stop: success
@ cubrid master start
++ cubrid master start: success
@ cubrid server start: demodb

This may take a long time depending on the amount of recovery works to do.

CUBRID 9.0

++ cubrid server start: success
@ cubrid server start: testdb

This may take a long time depending on the amount of recovery works to do.

CUBRID 9.0

++ cubrid server start: success
@ cubrid broker start
++ cubrid broker start: success
Managing Service Status
The following example shows how to check the status of master process and database server registered.
% cubrid service status

@ cubrid master status
++ cubrid master is running.
@ cubrid server status

Server testdb (rel 9.0, pid 31059)
Server demodb (rel 9.0, pid 30950)

@ cubrid broker status
% query_editor
----------------------------------------
ID   PID   QPS   LQS PSIZE STATUS
----------------------------------------
 1 15465     0     0 48032 IDLE
 2 15466     0     0 48036 IDLE
 3 15467     0     0 48036 IDLE
 4 15468     0     0 48036 IDLE
 5 15469     0     0 48032 IDLE

% broker1 OFF

@ cubrid manager server status
++ cubrid manager server is not running.
The following message is returned if master process has stopped.
% cubrid service status
@ cubrid master status
++ cubrid master is not running.
Database Server
Starting Database Server
The following example shows how to run demodb server.
% cubrid server start demodb

@ cubrid server start: demodb

This may take a long time depending on the amount of recovery works to do.

CUBRID 9.0

++ cubrid server start: success
If you start demodb server while master process has stopped, master process automatically runs at first and then a specified database server runs.
% cubrid server start demodb

@ cubrid master start
++ cubrid master start: success
@ cubrid server start: demodb

This may take a long time depending on the amount of recovery works to do.

CUBRID 9.0

++ cubrid server start: success
The following message is returned while demodb server is running.
% cubrid server start demodb

@ cubrid server start: demodb
++ cubrid server 'demodb' is running.
cubrid server start runs cub_server process of a specific database regardless of HA mode configuration. To run database in HA environment, you should use cubrid heartbeat start.
Stopping Database Server
The following example shows how to stop demodb server.
% cubrid server stop demodb

@ cubrid server stop: demodb
Server demodb notified of shutdown.
This may take several minutes. Please wait.
++ cubrid server stop: success
The following message is returned while demodb server has stopped.
% cubrid server stop demodb

@ cubrid server stop: demodb
++ cubrid server 'demodb' is not running.
cubrid server stop stops cub_server process of a specific database regardless of HA mode configuration. Be careful not to restart the database server or occur failover. To stop database in HA environment, you should use cubrid heartbeat stop .
Restarting Database Server
The following example shows how to restart demodb server. demodb server that has already run stops and the server restarts.
% cubrid server restart demodb

@ cubrid server stop: demodb
Server demodb notified of shutdown.
This may take several minutes. Please wait.
++ cubrid server stop: success
@ cubrid server start: demodb

This may take a long time depending on the amount of recovery works to do.

CUBRID 9.0

++ cubrid server start: success
Checking Database Server Status
The following example shows how to check the status of a database server. Names of currently running database servers are displayed.
% cubrid server status

@ cubrid server status
Server testdb (rel 9.0, pid 24465)
Server demodb (rel 9.0, pid 24342)
The following example shows the message when master process has stopped.
% cubrid server status

@ cubrid server status
++ cubrid master is not running.
Limiting Database Server Access
To limit brokers and the CSQL Interpreter connecting to the database server, configure the parameter value of access_ip_control in the cubrid.conf file to yes and enter the path of a file in which the list of IP addresses allowed to access the access_ip_control_file parameter value is written. You should enter the absolute file path. If you enter the relative path, the system will search the file under the $CUBRID/conf directory on Linux and under the %CUBRID%\conf directory on Windows.
The following example shows how to configure the cubrid.conf file.
# cubrid.conf
access_ip_control=yes
access_ip_control_file="/home1/cubrid1/CUBRID/db.access"
The following example shows the format of the access_ip_control_file file.
[@<db_name>]
<ip_addr>
...
- <db_name> : The name of a database in which access is allowed
- <ip_addr> : The IP address allowed to access a database. Using an asterisk (*) at the last digit means that all IP addresses are allowed. Several lines of <ip_addr> can be added in the next line of the name of a database.
To configure several databases, it is possible to specify additional [@<db_name>] and <ip_addr>.
Accessing any IP address except localhost is blocked by server if access_ip_control is set to yes but ip_control_file is not configured. A server will not run if analyzing access_ip_control_file fails caused by incorrect format.
The following example shows access_ip_control_file.
[@dbname1]
10.10.10.10
10.156.*

[@dbname2]
*

[@dbname3]
192.168.1.15
The example above shows that dbname1 database allows the access of IP addresses starting with 10.156; dbname2 database allows the access of every IP address; dbname3 database allows the access of an IP address, 192.168.1.15, only.
For the database which has already been running, you can modify a configuration file or you can check the currently applied status by using the following commands.
To change the contents of access_ip_control_file and apply it to server, use the following command.
cubrid server acl reload <database_name>
To display the IP configuration of a server which is currently running, use the following command.
cubrid server acl status <database_name>
Database Server Log
The following log is created in the file of a server error log if an IP address that is not allowed to access is used.
Time: 10/29/10 17:32:42.360 - ERROR *** ERROR CODE = -1022, Tran = 0, CLIENT = (unknown):(unknown)(-1), EID = 2
Address(10.24.18.66) is not authorized.
Note
For details on how to limit an access to the broker server, see Limiting Broker Server Access.
Database Server Errors
Database server error processes use the server error code when an error has occurred. A server error can occur in any task that uses server processes. For example, server errors may occur while using the query handling program or the cubrid utility.
Checking the Database Server Error Codes
- Every data definition statement starting with #define ER_ in the $CUBRID/include/dbi.h file indicate the serer error codes.
- All message groups under "$set 5 MSGCAT_SET_ERROR" in the CUBRID/msg/en_US (in Korean, ko_KR.eucKR or ko_KR.utf8)/cubrid.msg $ file indicates the server error messages.
When you write code, it is recommended to use the error code name rather than the error code number. For example, the error code number for violating the unique key is -670 or -886. However, users can easily recognize the error when it is written as ER_BTREE_UNIQUE_FAILED or ER_UNIQUE_VIOLATION_WITHKEY .
$ vi $CUBRID/include/dbi.h

#define NO_ERROR                                       0
#define ER_FAILED                                     -1
#define ER_GENERIC_ERROR                              -1
#define ER_OUT_OF_VIRTUAL_MEMORY                      -2
#define ER_INVALID_ENV                                -3
#define ER_INTERRUPTED                                -4
...
#define ER_LK_OBJECT_TIMEOUT_SIMPLE_MSG              -73
#define ER_LK_OBJECT_TIMEOUT_CLASS_MSG               -74
#define ER_LK_OBJECT_TIMEOUT_CLASSOF_MSG             -75
#define ER_LK_PAGE_TIMEOUT                           -76
...
#define ER_PT_SYNTAX                                -493
...
#define ER_BTREE_UNIQUE_FAILED                      -670
...
#define ER_UNIQUE_VIOLATION_WITHKEY                 -886
...
#define ER_LK_OBJECT_DL_TIMEOUT_SIMPLE_MSG          -966
#define ER_LK_OBJECT_DL_TIMEOUT_CLASS_MSG           -967
#define ER_LK_OBJECT_DL_TIMEOUT_CLASSOF_MSG         -968
...
#define ER_LK_DEADLOCK_CYCLE_DETECTED               -1021
#define ER_LK_DEADLOCK_SPECIFIC_INFO                -1083
...
#define ER_LAST_ERROR                               -1089
The following are some of the server error code names, error code numbers, and error messages.
| Error Code Name | Error Code Number | Error Message |
|---|---|---|
| ER_LK_OBJECT_TIMEOUT_SIMPLE_MSG | -73 | Your transaction (index ?, ?@?|?) timed out waiting on ? lock on object ?|?|?. You are waiting for user(s) ? to finish. |
| ER_LK_OBJECT_TIMEOUT_CLASS_MSG | -74 | Your transaction (index ?, ?@?|?) timed out waiting on ? lock on class ?. You are waiting for user(s) ? to finish. |
| ER_LK_OBJECT_TIMEOUT_CLASSOF_MSG | -75 | Your transaction (index ?, ?@?|?) timed out waiting on ? lock on instance ?|?|? of class ?. You are waiting for user(s) ? to finish. |
| ER_LK_PAGE_TIMEOUT | -76 | Your transaction (index ?, ?@?|?) timed out waiting on ? on page ?|?. You are waiting for user(s) ? to release the page lock. |
| ER_PT_SYNTAX | -493 | Syntax: ? |
| ER_BTREE_UNIQUE_FAILED | -670 | Operation would have caused one or more unique constraint violations. |
| ER_UNIQUE_VIOLATION_WITHKEY | -886 | "?" caused unique constraint violation. |
| ER_LK_OBJECT_DL_TIMEOUT_SIMPLE_MSG | -966 | Your transaction (index ?, ?@?|?) timed out waiting on ? lock on object ?|?|? because of deadlock. You are waiting for user(s) ? to finish. |
| ER_LK_OBJECT_DL_TIMEOUT_CLASS_MSG | -967 | Your transaction (index ?, ?@?|?) timed out waiting on ? lock on class ? because of deadlock. You are waiting for user(s) ? to finish. |
| ER_LK_OBJECT_DL_TIMEOUT_CLASSOF_MSG | -968 | Your transaction (index ?, ?@?|?) timed out waiting on ? lock on instance ?|?|? of class ? because of deadlock. You are waiting for user(s) ? to |
| ER_LK_DEADLOCK_CYCLE_DETECTED | -1021 | A deadlock cycle is detected. ?. |
| ER_LK_DEADLOCK_SPECIFIC_INFO | -1083 | Specific information about deadlock. |
Broker
Starting Broker
Enter the command below to start the broker.
$ cubrid broker start
@ cubrid broker start
++ cubrid broker start: success
The following message is returned if the broker is already running.
$ cubrid broker start
@ cubrid broker start
++ cubrid broker is running.
Stopping Broker
Enter the command below to stop the broker.
$ cubrid broker stop
@ cubrid broker stop
++ cubrid broker stop: success
The following message is returned if the broker has stopped.
$ cubrid broker stop
@ cubrid broker stop
++ cubrid broker is not running.
Checking Broker Status
The cubrid broker status utility allows you to check the broker status such as number of completed jobs and the number of standby jobs by providing various options.
cubrid broker status [options] [expr]
Specifying [expr] performs that the status of specific brokers which include [expr] in their names is monitored; specifying no argument means that status of all brokers which are registered in the broker environment configuration file ( cubrid_broker.conf ) is monitored.
The following [options] are available with the cubrid broker status utility.
-
-b¶ Displays the status information of a broker but does not display information on broker application server. the name of a broker is displayed until 20 characters; if the length is over 20, by adding "..." after the name.
-
-f¶ Displays information of DB and host accessed by broker.
If it is used with the -b option, additional information on CAS is displayed. But SELECT, INSERT, UPDATE, DELETE, OTHERS items which shown on -b option are excluded.
-
-lSECOND¶ The -l option is only used with -f option together. It specifies accumulation period (unit : sec.) when displaying the number of application servers whose client status is Waiting or Busy. If it is omitted, the default value (1 second) is specified.
-
-q¶ Displays standby jobs in the job queue.
-
-t¶ Displays results in tty mode on the screen. The output can be redirected and used as a file.
-
-sSECOND¶ Regularly displays the status of broker based on specified period. It returns to a command prompt if q is entered.
If you do not specify an option or argument to check the status of all brokers, the following result is displayed.
$ cubrid broker status
@ cubrid broker status
% query_editor
----------------------------------------
ID   PID   QPS   LQS PSIZE STATUS
----------------------------------------
 1 28434     0     0 50144 IDLE
 2 28435     0     0 50144 IDLE
 3 28436     0     0 50144 IDLE
 4 28437     0     0 50140 IDLE
 5 28438     0     0 50144 IDLE

% broker1 OFF
- % query_editor: The broker name
- ID: Serial number of CAS within the broker
- PID: CAS process ID within the broker
- QPS: The number of queries processed per second
- LQS: The number of long-duration queries processed per second
- PSIZE: Size of CAS
- STATUS: The current status of CAS (BUSY, IDLE, CLIENT_WAIT, CLOSE_WAIT)
- % broker1 OFF: broker1's SERVICE parameter is set to OFF. So, broker1 is not started.
To check the detail status of broker for 5 seconds, enter the command as below. The display will reset per 5 seconds as the new status information. To escape the display of the status, press <Q>.
$ cubrid broker status -b -s 5
@ cubrid broker status

 NAME                   PID  PORT    AS   JQ                  TPS                  QPS   SELECT   INSERT   UPDATE   DELETE   OTHERS     LONG-T     LONG-Q         ERR-Q  UNIQUE-ERR-Q  #CONNECT
=================================================================================================================================================================================================
* query_editor         13200 30000     5    0                    0                    0        0        0        0        0        0     0/60.0     0/60.0             0             0         0
* broker1              13269 33000     5    0                   70                   60       10       20       10       10       10     0/60.0     0/60.0            30            10       213
- NAME: The broker name
- PID: Process ID of the broker
- PORT: Port number of the broker
- AS: The number of CAS
- JQ: The number of standby jobs in the job queue
- TPS: The number of transactions processed per second (calculated only when the option is configured to "-b -s <sec>")
- QPS: The number of queries processed per second (calculated only when the option is configured to "-b -s <sec>")
- SELECT: The number of SELECT queries after staring of the broker. When there is an option of "-b -s <sec>", it is updated every time with the number of SELECTs which have been executed during the seconds specified by this option.
- INSERT: The number of INSERT queries after staring of the broker. When there is an option of "-b -s <sec>", it is updated every time with the number of INSERTs which have been executed during the seconds specified by this option.
- UPDATE: The number of UPDATE queries after staring of the broker. When there is an option of "-b -s <sec>", it is updated every time with the number of UPDATEs which have been executed during the seconds specified by this option.
- DELETE: The number of DELETE queries after staring of the broker. When there is an option of "-b -s <sec>", it is updated every time with the number of DELETEs which have been executed during the seconds specified by this option.
- OTHERS: The number of queries like CREATE and DROP except for SELECT, INSERT, UPDATE, DELETE. When there is an option of "-b -s <sec>", it is updated every time with the number of queries which have been executed during the seconds specified by this option.
- LONG-T: The number of transactions which exceed LONG_TRANSACTION_TIME. / the value of the LONG_TRANSACTION_TIME parameter. When there is an option of "-b -s <sec>", it is updated every time with the number of transactions which have been executed during the seconds specified by this option.
- LONG-Q: The number of queries which exceed LONG_QUERY_TIME. / the value of the LONG_QUERY_TIME parameter. When there is an option of "-b -s <sec>", it is updated every time with the number of queries which have been executed during the seconds specified by this option.
- ERR-Q: The number of queries with errors found. When there is an option of "-b -s <sec>", it is updated every time with the number of errors which have occurred during the seconds specified by this option.
- UNIQUE-ERR-Q: The number of queries with unique key errors found. When there is an option of "-b -s <sec>", it is updated every time with the number of unique key errors which have occurred during the seconds specified by this option.
- #CONNECT: The number of connections that an application client accesses to CAS after starting the broker.
Enter code below to check the status of broker whose name includes broker1 with the -q option and job status of a specific broker in the job queue. If you do not specify broker1 as an argument, list of jobs in the job queue for all brokers is displayed.
% cubrid broker status -q broker1
@ cubrid broker status
% broker1
----------------------------------------
ID   PID   QPS   LQS PSIZE STATUS
----------------------------------------
 1 28444     0     0 50144 IDLE
 2 28445     0     0 50140 IDLE
 3 28446     0     0 50144 IDLE
 4 28447     0     0 50144 IDLE
 5 28448     0     0 50144 IDLE
Enter code below to input the monitoring interval of broker whose name includes broker1 with the -s option and monitor broker status regularly. If you do not specify broker1 as an argument, monitoring status for all brokers is performed regularly. It returns to a command prompt if q is not entered.
% cubrid broker status -s 5 broker1
% broker1
----------------------------------------
ID   PID   QPS   LQS PSIZE STATUS
----------------------------------------
 1 28444     0     0 50144 IDLE
 2 28445     0     0 50140 IDLE
 3 28446     0     0 50144 IDLE
 4 28447     0     0 50144 IDLE
 5 28448     0     0 50144 IDLE
Display information of TPS and QPS to a file with the -t option. To cancel the process, press <Ctrl+C> to stop program.
% cubrid broker status -b -t -s 1 > log_file
Enter code below to regularly monitor status of all brokers including TPS and QPS with the -b and -s options.
% cubrid broker status -b -s 1
NAME           PID  PORT  AS  JQ      REQ  TPS  QPS  LONG-T  LONG-Q ERR-Q
===========================================================================
* query_editor 28433 40820   5   0        0    0    0    0/60    0/60    0
* broker1      28443 40821   5   0        0    0    0    0/60    0/60    0
Enter code below to view information of server/database accessed by broker, access time, the IP addresses accessed to CAS with the -f option.
$ cubrid broker status -f broker1
@ cubrid broker status
% broker1
---------------------------------------------------------------------------------------------------------------------------------------------------------------------------
ID   PID   QPS   LQS PSIZE STATUS         LAST ACCESS TIME      DB       HOST   LAST CONNECT TIME       CLIENT IP   SQL_LOG_MODE   TRANSACTION STIME # CONNECT # RESTART
---------------------------------------------------------------------------------------------------------------------------------------------------------------------------
1 26946     0     0 51168 IDLE         2011/11/16 16:23:42  demodb  localhost 2011/11/16 16:23:40      10.0.1.101           NONE 2011/11/16 16:23:42         0         0
2 26947     0     0 51172 IDLE         2011/11/16 16:23:34      -          -                   -          0.0.0.0              -                   -         0         0
3 26948     0     0 51172 IDLE         2011/11/16 16:23:34      -          -                   -          0.0.0.0              -                   -         0         0
4 26949     0     0 51172 IDLE         2011/11/16 16:23:34      -          -                   -          0.0.0.0              -                   -         0         0
5 26950     0     0 51172 IDLE         2011/11/16 16:23:34      -          -                   -          0.0.0.0              -                   -         0         0
Meaning of every column in code above is as follows:
- LAST ACCESS TIME: Time when CAS runs or the latest time when an application client accesses CAS
- DB: Name of a database which CAS accesses most recently
- HOST: Name of a which CAS accesses most recently
- LAST CONNECT TIME: Most recent time when CAS accesses a database
- CLIENT IP: IP of an application clients currently being connected to an application server (CAS). If no application client is connected, 0.0.0.0 is displayed.
- SQL_LOG_MODE: SQL logging mode of CAS. If the mode is same as the mode configured in the broker, "-" is displayed.
- TRANSACTION STIME: Transaction start time
- # CONNECT: The number of connections that an application client accesses to CAS after starting the broker
- # RESTART: The number of connection that CAS is re-running after starting the broker
Enter code below to display information on AS (T W B Ns-W Ns-B) and CANCELED with the -b and -f options.
// The -f option is added upon execution of broker status information. Configuring Ns-W and Ns-B are displayed as long as N seconds by using the -l.
% cubrid broker status -b -f -l 2
@ cubrid broker status
NAME          PID    PSIZE PORT  AS(T W B 2s-W 2s-B) JQ REQ TPS QPS LONG-T LONG-Q ERR-Q CANCELED ACCESS_MODE SQL_LOG
====================================================================================================================
query_editor 16784 56700 30000      5 0 0     0   0   0   0  0    0 0/60.0 0/60.0     0        0          RW     ALL
Meaning of every column in code above is as follows:
- AS(T): Total number of CAS being executed
- AS(W): The number of CAS in the status of Waiting
- AS(B): The number of CAS in the status of Busy
- AS(Ns-W): The number of CAS that the client belongs to has been waited for N seconds.
- AS(Ns-B): The number of CAS that the client belongs to has been Busy for N seconds.
- CANCELED: The number of queries have canceled by user interruption since the broker starts (if it is used with the -l N option, it specifies the number of accumulations for N seconds).
- CANCELED: The number of queries have canceled by user interruption since the broker starts (if it is used with the -l N option, it specifies the number of accumulations for N seconds).
Limiting Broker Server Access
To limit the client applications accessing the broker, set to ON for the ACCESS_ CONTROL parameter in the cubrid_broker.conf file, and enter a name of the file in which the users and the list of databases and IP addresses allowed to access the ACCESS_CONTROL_FILE parameter value are written. The default value of the ACCESS_CONTROL broker parameter is OFF. The ACCESS_CONTROL and ACCESS_CONTROL_FILE parameters must be written under [broker] which common parameters are specified.
The format of ACCESS_CONTROL_FILE is as follows:
[%<broker_name>]
<db_name>:<db_user>:<ip_list_file>
...
- <broker_name>: A broker name. It is the one of broker names specified in cubrid_broker.conf .
- <db_name>: A database name. If it is specified as *, all databases are allowed to access the broker server.
- <db_user>: A database user ID. If it is specified as *, all database user IDs are allowed to access the broker server.
- <ip_list_file>: Names of files in which the list of accessible IPs are stored. Several files such as ip_list_file1, ip_list_file2, ... can be specified by using a comma (,).
[%<broker_name>] and <db_name>:<db_user>:<ip_list_file> can be specified separately for each broker.
The format of the ip_list_file is as follows:
<ip_addr>
...
- <ip_addr>: An IP address that is allowed to access the server. If the last digit of the address is specified as *, all IP addresses in that rage are allowed to access the broker server.
If a value for ACCESS_CONTROL is set to ON and a value for ACCESS_CONTROL_FILE is not specified, the broker will only allow the access requests from the localhost.
If the analysis of ACCESS_CONTROL_FILE and ip_list_file fails when starting a broker, the broker will not be run.
# cubrid_broker.conf
[broker]
MASTER_SHM_ID           =30001
ADMIN_LOG_FILE          =log/broker/cubrid_broker.log
ACCESS_CONTROL   =ON
ACCESS_CONTROL_FILE     =/home1/cubrid/access_file.txt
[%QUERY_EDITOR]
SERVICE                 =ON
BROKER_PORT             =30000
......
The following example shows the content of ACCESS_CONTROL_FILE. The * symbol represents everything, and you can use it when you want to specify database names, database user IDs and IPs in the IP list file which are allowed to access the broker server.
[%QUERY_EDITOR]
dbname1:dbuser1:READIP.txt
dbname1:dbuser2:WRITEIP1.txt,WRITEIP2.txt
*:dba:READIP.txt
*:dba:WRITEIP1.txt
*:dba:WRITEIP2.txt

[%BROKER2]
dbname:dbuser:iplist2.txt

[%BROKER3]
dbname:dbuser:iplist2.txt

[%BROKER4]
dbname:dbuser:iplist2.txt
The brokers specified above are QUERY_EDITOR, BROKER2, BROKER3, and BROKER4.
The QUERY_EDITOR broker only allows the following application access requests.
- When a user logging into dbname1 with a dbuser1 account connects from IPs registered in READIP.txt
- When a user logging into dbname1 with a dbuser2 account connects from IPs registered in WRITEIP1.txt and WRITEIP2.txt
- When a user logging into every database with a DBA account connects from IPs registered in READIP.txt, WRITEIP1.txt, and WRITEIP2.txt
The following example shows how to specify the IPs allowed in ip_list_file.
192.168.1.25
192.168.*
10.*
*
The descriptions for the IPs specified in the example above are as follows:
- The first line setting allows an access from 192.168.1.25.
- The second line setting allows an access from all IPs starting with 192.168.
- The third line setting allows an access from all IPs starting with 10.
- The fourth line setting allows an access from all IPs.
For the broker which has already been running, you can modify the configuration file or check the currently applied status of configuration by using the following commands.
To configure databases, database user IDs and IPs allowed to access the broker and then apply the modified configuration to the server, use the following command.
cubrid broker acl reload [<BR_NAME>]
- <BR_NAME>: A broker name. If you specify this value, you can apply the changes only to specified brokers. If you omit it, you can apply the changes to all brokers.
To display the databases, database user IDs and IPs that are allowed to access the broker in running on the screen, use the following command.
cubrid broker acl status [<BR_NAME>]
- <BR_NAME>: A broker name. If you specify the value, you can display the specified broker configuration. If you omit it, you can display all broker configurations.
Broker Logs
If you try to access brokers through IP addresses that are not allowed, the following logs will be created.
- ACCESS_LOG
1 192.10.10.10 - - 1288340944.198 1288340944.198 2010/10/29 17:29:04 ~ 2010/10/29 17:29:04 14942 - -1 db1 dba : rejected
- SQL LOG
10/29 10:28:57.591 (0) CLIENT IP 192.10.10.10 10/29 10:28:57.592 (0) connect db db1 user dba url jdbc:cubrid:192.10.10.10:30000:db1::: - rejected
Note
For details on how to limit an access to the database server, see Limiting Database Server Access.
Managing a Specific Broker
Enter the code below to run broker1 only. Note that broker1 should have already been configured in the shared memory.
% cubrid broker on broker1
The following message is returned if broker1 has not been configured in the shared memory.
% cubrid broker on broker1
Cannot open shared memory
Enter the code below to stop broker1 only. Note that service pool of broker1 can also be removed.
% cubrid broker off broker1
The broker reset feature enables broker application servers (CAS) to disconnect the existing connection and reconnect when the servers are connected to unwanted databases due to failover, etc. in HA. For example, once Read Only broker is connected to active servers, it is not automatically connected to standby servers although standby servers are available. Connecting to standby servers is allowed only with the cubrid broker reset command.
Enter the code below to reset broker1.
% cubrid broker reset broker1
Dynamically Changing Broker Parameters
You can configure the parameters related to running the broker in the configuration file ( cubrid_broker.conf ). You can also modify some broker parameters temporarily while the broker is running by using the broker_changer utility. For details, see Broker Configuration.
The syntax for the broker_changer utility, which is used to change broker parameters while the broker is running, is as follows. Enter the name of the currently running broker for the broker_name . The parameters can be used only for dynamically modifiable parameters. The value must be specified based on the parameter to be modified. You can specify the broker CAS identifier ( cas_id ) to apply the changes to the specific broker CAS. cas_id is an ID to be output by cubrid broker status command.
broker_changer broker_name [cas_id] parameters value
Enter the following to configure the SQL_LOG parameter to ON so that SQL logs can be written to the currently running broker. Such dynamic parameter change is effective only while the broker is running.
% broker_changer query_editor sql_log on
OK
Enter the following to change the ACCESS_MODE to Read Only and automatically reset the broker in HA environment.
% broker_changer broker_m access_mode ro
OK
Note
If you want to control the service using cubrid utilities on Windows Vista or the later versions of Window, you are recommended to open the command prompt window as an administrator. For details, see the notes of CUBRID Utilities.
Broker configuration information
cubrid broker info dumps the currently "working" broker parameters' configuration information(cubrid_broker.conf). broker parameters' information can be dynamically changed by broker_changer command; with cubrid broker info command, you can see the configuration information of the working broker.
% cubrid broker info
As a reference, to see the configuration information of the currently "working" system(cubrid.conf), use cubrid paramdump database_name command. By SET SYSTEM PARAMETERS syntax, the configuration information of the system parameters can be changed dynamically; with cubrid broker info command, you can see the configuration information of the system parameters.
Broker Logs
There are three types of logs that relate to starting the broker: access, error and SQL logs. Each log can be found in the log directory under the installation directory. You can change the directory where these logs are to be stored through LOG_DIR and ERROR_LOG_DIR parameters of the broker configuration file (cubrid_broker.conf).
Checking the Access Log
The access log file records information on the application client and is stored with the name of broker_name.access . If the LOG_BACKUP parameter is configured to ON in the broker configuration file, when the broker stops properly, the access log file is stored with the date and time that the broker has stopped. For example, if broker1 stopped at 12:27 P.M. on June 17, 2008, an access file named broker1.access.20080617.1227 is generated in the log/broker directory. The following example shows an access log.
The following example and description show an access log file created in the log directory:
1 192.168.1.203 - - 972523031.298 972523032.058 2008/06/17 12:27:46~2008/06/17 12:27:47 7118 - -1
2 192.168.1.203 - - 972523052.778 972523052.815 2008/06/17 12:27:47~2008/06/17 12:27:47 7119 ERR 1025
1 192.168.1.203 - - 972523052.778 972523052.815 2008/06/17 12:27:49~2008/06/17 12:27:49 7118 - -1
- 1: ID assigned to the application server of the broker
- 192.168.1.203: IP address of the application client
- 972523031.298: UNIX timestamp value when the client's request processing started
- 2008/06/17 12:27:46: Time when the client's request processing started
- 972523032.058: UNIX timestamp value when the client's request processing finished
- 2008/06/17 12:27:47: Time when the client's request processing finished
- 7118: Process ID of the application server
- -1: No error occurred during the request processing
- ERR 1025: Error occurred during the request processing. Error information exists in offset=1025 of the error log file
Checking the Error Log
The error log file records information on errors that occurred during the client's request processing and is stored with the name of <broker_name>_<app_server_num>.err.
The following example and description show an error log:
Time: 02/04/09 13:45:17.687 - SYNTAX ERROR *** ERROR CODE = -493, Tran = 1, EID = 38
Syntax: Unknown class "unknown_tbl". select * from unknown_tbl
- Time: 02/04/09 13:45:17.687: Time when the error occurred
- SYNTAX ERROR: Type of error (e.g. SYNTAX ERROR, ERROR, etc.)
- *** ERROR CODE = -493: Error code
- Tran = 1: Transaction ID. -1 indicates that no transaction ID is assigned.
- EID = 38: Error ID. This ID is used to find the SQL log related to the server or client logs when an error occurs during SQL statement processing.
- Syntax ...: Error message (An ellipsis ( ... ) indicates omission.)
Managing the SQL Log
The SQL log file records SQL statements requested by the application client and is stored with the name of <broker_name>_<app_server_num>. sql.log. The SQL log is generated in the log/broker/sql_log directory when the SQL_LOG parameter is set to ON. Note that the size of the SQL log file to be generated cannot exceed the value set for the SQL_LOG_MAX_SIZE parameter. CUBRID offers the broker_log_top, broker_log_converter, and broker_log_runner utilities to manage SQL logs. Each utility should be executed in a directory where the corresponding SQL log exists.
The following examples and descriptions show SQL log files:
02/04 13:45:17.687 (38) prepare 0 insert into unique_tbl values (1)
02/04 13:45:17.687 (38) prepare srv_h_id 1
02/04 13:45:17.687 (38) execute srv_h_id 1 insert into unique_tbl values (1)
02/04 13:45:17.687 (38) execute error:-670 tuple 0 time 0.000, EID = 39
02/04 13:45:17.687 (0) auto_rollback
02/04 13:45:17.687 (0) auto_rollback 0
*** 0.000

02/04 13:45:17.687 (39) prepare 0 select * from unique_tbl
02/04 13:45:17.687 (39) prepare srv_h_id 1 (PC)
02/04 13:45:17.687 (39) execute srv_h_id 1 select * from unique_tbl
02/04 13:45:17.687 (39) execute 0 tuple 1 time 0.000
02/04 13:45:17.687 (0) auto_commit
02/04 13:45:17.687 (0) auto_commit 0
*** 0.000
- 02/04 13:45:17.687: Time when the application sent the request
- (39): Sequence number of the SQL statement group. If prepared statement pooling is used, it is uniquely assigned to each SQL statement in the file.
- prepare 0: Whether or not it is a prepared statement
- prepare srv_h_id 1: Prepares the SQL statement as srv_h_id 1.
- (PC): It is displayed if the data in the plan cache is used.
- SELECT...: SQL statement to be executed. (An ellipsis ( ... ) indicates omission.) For statement pooling, the binding variable of the WHERE clause is represented as a question mark (?).
- Execute 0 tuple 1 time 0.000: One row is executed. The time spent is 0.000 seconds.
- auto_commit/auto_rollback: Automatically committed or rolled back. The second auto_commit/auto_rollback is an error code. 0 indicates that the transaction has been completed without an error.
The broker_log_top utility analyzes the SQL logs which are generated for a specific period. As a result, the information of SQL statements and time execution are displayed in files by order of the longest execution time; the results of SQL statements are stored in log.top.q and those of execution time are stored in log.top.res, respectively.
The broker_log_top utility is useful to analyze a long running query. The syntax is as follows:
broker_log_top [options] sql_log_file_list
- sql_log_file_list: names of log files to analyze.
The following is [options] used on broker_log_top.
-t¶The result is displayed in transaction unit.
-FDATE¶This option specifies the execution start date of the SQL statements to be analyzed. The input format is MM[/DD[ hh[:mm[:ss[.msec]]]]], and the part enclosed by [] can be omitted. If you omit the value, it is regarded as that 01 is input for DD, and 0 is input for hh, mm, ss and msec.
:: option:: -T DATE
This option specifies the execution end date of the SQL statements to be analyzed. The input format is the same with the DATE in the -F options.All logs are displayed by SQL statement if any option is not specified.
The following sets the search range to milliseconds
broker_log_top -F "01/19 15:00:25.000" -T "01/19 15:15:25.180" log1.logThe part where the time format is omitted is set to 0 by default. This means that -F "01/19 00:00:00.000" -T "01/20 00:00:00.000" is input.
broker_log_top -F "01/19" -T "01/20" log1.logThe following logs are the results of executing the broker_log_top utility; logs are generated from Nov. 11th to Nov. 12th, and it is displayed in the order of the longest execution of SQL statements. Each month and day are separated by a slash (/) when specifying period. Note that "*.sql.log" is not recognized so the SQL logs should be separated by a white space on Windows.
--Execution broker_log_top on Linux
% broker_log_top -F "11/11" -T "11/12" -t *.sql.log

query_editor_1.sql.log
query_editor_2.sql.log
query_editor_3.sql.log
query_editor_4.sql.log
query_editor_5.sql.log

--Executing broker_log_top on Windows
% broker_log_top -F "11/11" -T "11/12" -t query_editor_1.sql.log query_editor_2.sql.log query_editor_3.sql.log query_editor_4.sql.log query_editor_5.sql.log
The log.top.q and log.top.res files are generated in the same directory where the analyzed logs are stored when executing the example above; In the log.top.q file, you can see each SQL statement, and its line number. In the log.top.res file, you can see the minimum execution time, the maximum execution time, the average execution time, and the number of execution queries for each SQL statement.
--log.top.q file
[Q1]-------------------------------------------
broker1_6.sql.log:137734
11/11 18:17:59.396 (27754) execute_all srv_h_id 34 select a.int_col, b.var_col from dml_v_view_6 a, dml_v_view_6 b, dml_v_view_6 c , dml_v_view_6 d, dml_v_view_6 e where a.int_col=b.int_col and b.int_col=c.int_col and c.int_col=d.int_col and d.int_col=e.int_col order by 1,2;
11/11 18:18:58.378 (27754) execute_all 0 tuple 497664 time 58.982
.
.
[Q4]-------------------------------------------
broker1_100.sql.log:142068
11/11 18:12:38.387 (27268) execute_all srv_h_id 798 drop table list_test;
11/11 18:13:08.856 (27268) execute_all 0 tuple 0 time 30.469

--log.top.res file

              max       min        avg   cnt(err)
-----------------------------------------------------
[Q1]        58.982    30.371    44.676    2 (0)
[Q2]        49.556    24.023    32.688    6 (0)
[Q3]        35.548    25.650    30.599    2 (0)
[Q4]        30.469     0.001     0.103 1050 (0)
To store SQL logs created in log/broker/sql_log under the installation directory to a separate file, the broker_log_converter utility is executed. The syntax of the broker_log_converter utility is as follows. The example shows how to store queries in the query_editor_1.sql.log file to the query_convert.in file.
broker_log_converter [option] SQL_log_file output_file
- SQL_log_file: SQL log file located in $CUBRID/log/broker/sql_log directory. It only saves SQL log when the application sends a query through only a driver, and does not save SQL log when the query is executed through CSQL interpreter.
- output_file: an output file which the input format is followed by broker_log_runner
The following is the [option] used in broker_log_converter.
-i¶It prints QUERY_ID comment in front of the query.
If QUERY_ID comment exists on the query, tracing a query is easier since QUERY_ID information is printed to the SQL log(located in $CUBRID/log/broker/sql_log) of the broker when replaying the queries of output_file.
The following example shows how to convert the query in the query_editor_1.sql.log file into the query_convert.in file.
% cd CUBRID/log/broker/sql_log
% broker_log_converter query_editor_1.sql.log query_convert.in
To re-execute queries stored in the query file which has been created by the broker_log_converter utility, execute the broker_log_runner utility.
The syntax of the broker_log_runner utility is as follows:
broker_log_runner -I broker_host -P broker_port -d dbname [options] exec_script_file
- broker_host: IP address or host name of the CUBRID broker
- broker_port: Port number of the CUBRID broker
- dbname: Name of the database against which queries are to be executed
- exec_script_file: Name of the file where execution results are to be stored.
The following is [options] used in broker_log_runner.
-uNAME¶Database user name (default: PUBLIC)
-pPASSWORD¶Database password
-tNUMBER¶스레드의 개수 지정(기본값: 1)
-rCOUNT¶The number of times that the query is to be executed (default value : 1)
-oFILE¶Name of the file where execution results are to be stored
-Q¶Stores the query plan in the FILE specified in the -o option.
-s¶Prints the information by the "cubrid statdump" command per each query. See Dumping Statistics Information of Server.
-a¶Sets autocommit mode as ON.
The following example re-executes the queries saved on query_convert.in on demodb, and it assumes that the broker IP is specified in 192.168.1.10, and broker port is specified in 30000.
% broker_log_runner -I 192.168.1.10  -P 30000 -d demodb -t 2 query_convert.in
broker_ip = 192.168.1.10
broker_port = 30000
num_thread = 2
repeat = 1
dbname = demodb
dbuser = public
dbpasswd =
exec_time : 0.001
exec_time : 0.000
0.000500 0.000500
The following example saves the query plan only without running the query.
% broker_log_runner -I 192.168.1.10 -P 30000 -d demodb -o result -Q query_convert.in
...
%cat result.0
-------------- query -----------------
SELECT * FROM athlete where code=10099;
cci_prepare exec_time : 0.000
cci_execute_exec_time : 0.000
cci_execute:1
---------- query plan --------------
Join graph segments (f indicates final):
seg[0]: [0]
seg[1]: code[0] (f)
seg[2]: name[0] (f)
seg[3]: gender[0] (f)
seg[4]: nation_code[0] (f)
seg[5]: event[0] (f)
Join graph nodes:
node[0]: athlete athlete(6677/107) (sargs 0)
Join graph terms:
term[0]: (athlete.code=10099) (sel 0.000149768) (sarg term) (not-join eligible) (indexable code[0]) (loc 0)

Query plan:

iscan
    class: athlete node[0]
    index: pk_athlete_code term[0]
    cost:  0 card 1

Query stmt:

select athlete.code, athlete.[name], athlete.gender, athlete.nation_code, athlete.event from athlete athlete where (athlete.code=  :0 )

---------- query result --------------
10099|Andersson Magnus|M|SWE|Handball|
-- 1 rows ----------------------------

cci_end_tran exec_time : 0.000
CUBRID Manager Server
Starting the CUBRID Manager Server
The following example shows how to start the CUBRID Manager server.
% cubrid manager start
The following message is returned if the CUBRID Manager server is already running.
% cubrid manager start
@ cubrid manager server start
++ cubrid manager server is running.
Stopping the CUBRID Manager Server
The following example shows how to stop the CUBRID Manager server.
% cubrid manager stop
@ cubrid manager server stop
++ cubrid manager server stop: success
CUBRID Manager Server Log
The logs of CUBRID Manager server are stored in the log/manager directory under the installation directory. There are four types of log files depending on server process of CUBRID Manager.
- cub_auto.access.log: Access log of a client that has successfully logged into and out of the CUBRID Manager server
- cub_auto.error.log: Access log of a client that failed to log into or out of the CUBRID Manager Server
- cub_js.access.log: Job log processed by the CUBRID Manager server
- cub_js.error.log: Error log that occurred while the CUBRID Manager server has been processing jobs
Configuring CUBRID Manager Server
The configuration file name for the CUBRID Manager server is cm.conf and located in the $CUBRID/conf directory. In the CUBRID Manager server configuration file, where parameter names and values are stored, comments are prefaced by "#." Parameter names and values are separated by spaces or an equal sign (=).
This page describes parameters that are specified in the cm.conf file.
cm_port
cm_port is a parameter used to configure a communication port for the connection between the CUBRID Manager server and the client. The default value is 8001 . It is used by cub_auto and cm_js automatically adds 1 to the value specified by cub_auto . For example, if cm_port is set to 8001, cub_auto uses the port 8001, and cub_js uses 8002. Therefore, to run the CUBRID Manager in an environment where a firewall has been installed, you must open two ports which will be actually used.
monitor_interval
monitor_interval is a parameter used to configure the monitoring interval of cub_auto in seconds. The default value is 5 .
allow_user_multi_connection
allow_user_multi_connection is a parameter used to have multiple client connections allowed to the CUBRID Manager server. The default value is YES . Therefore, more than one CUBRID Manager client can connect to the CUBRID Manager server, even with the same user name.
server_long_query_time
server_long_query_time is a parameter used to configure delay reference time in seconds when configuring slow_query which is one of server diagnostics items. The default value is 10 . If the execution time of the query performed on the server exceeds this parameter value, the number of the slow_query parameters will increase.
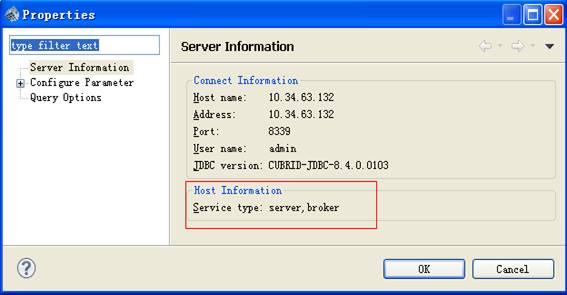
cm_target
cm_target is a parameter used to display appropriate menus of the CUBRID Manager depending on the service being provided where the broker and the database server have been separated. The default value means the environment where both broker and database server have been installed. You can set required values as follows:
- cm_target broker, server: Both broker and database server exist.
- cm_target broker: Only broker exists.
- cm_target server: Only database server exists.
If you set broker only, broker-related menus will be shown; if you set database server only, server-related menus will be displayed.
If you right-click the host in the navigation tree and then select [Properties], you can check the setting information under [Host Information].
CUBRID Manager User Management Console
The account and password of CUBRID Manager user are used to access the CUBRID Manager server when starting the CUBRID Manager client, distinguishing this user from the database user. CUBRID Manager Administrator (cm_admin) is a CLI tool that manages user information and it executes commands in the console window to manage users. This utility only supports Linux OS.
The following shows how to use the CUBRID Manager (hereafter, CM) Administrator utilities. The utilities can be used through GUI on the CUBRID Manager client.
cm_admin <utility_name>
<utility_name>:
    adduser [<option>] <cmuser-name> <cmuser-password>   --- Adds a CM user
    deluser <cmuser-name>   --- Deletes a CM user
    viewuser [<cmuser-name>]   --- Displays CM user information
    changeuserauth [<option>] <cmuser-name>  --- Changes the CM user authority
    changeuserpwd [<option>] <cmuser-name>  --- Changes the CM user password
    adddbinfo [<option>] <cmuser-name> <database-name>  --- Adds database information of the CM user
    deldbinfo <cmuser-name> <database-name>  --- Deletes database information of the CM user
    changedbinfo [<option>] <database-name> number-of-pages --- Changes database information of the CM user
CM Users
Information about CM users consists of the followings:
- CM user authority: Includes the following information.
- The permission to configure broker
- The permission to create a database. For now, this authority is only given to the admin user.
- The permission to monitor status
- Database information: A database that a CM user can use
- CM user password
The default user authority of CUBRID Manager is admin and its password is admin. Users who has admin authority have full administrative controls.
Adding CM Users
The cm_admin adduser utility creates a CM user who has been granted a specific authority and has database information. The permissions to configure broker, create a database, and monitor status can be granted to the CM user.
cm_admin adduser [options] cmuser-name cmuser-password
- cm_admin: An integrated utility to manage CUBRID Manager
- adduser: A command to create a new CM user
- cmuser-name: Specifies a unique name to a CM user. The name must have at least 4 characters in length. If the specified name in cmuser-name is identical to the existing one, cm_admin will stop creating a new CM user.
- cmuser-password: A password of a CM user. The password must have at least 4 characters in length.
The following is [options] of cm_admin adduser.
-b,--brokerAUTHORITY¶Specifies the broker authority which will be granted to a new CM user.
You can use admin, none (default), and monitor as AUTHORITY
The following example shows how to create a CM user whose name is testcm and password is testcmpwd and then configure broker authority to monitor.
cm_admin adduser -b monitor testcm testcmpwd
-c,--dbcreateAUTHORITY¶Specifies the authority to create a database which will be granted to a new CM user.
You can use none (default) and admin as AUTHORITY.
The following example shows how to create a CM user whose name is testcm and password is testcmpwd and then configure database creation authority to admin.
cm_admin adduser -c admin testcm testcmpwd
-m,monitorAUTHORITY¶Specifies the authority to monitor status which will be granted to a new CM user. You can use admin, none (default), and monitor as AUTHORITY
The following example shows how to create a CM user whose name is testcm and password is testcmpwd and then configure monitoring authority to admin.
cm_admin adduser -m admin testcm testcmpwd
-d,--dbinfoINFO_STRING¶Specifies database information of a new CM user. The format of INFO_STRING must be "<dbname>;<uid>;<broker_ip>,<broker_port>".
The following example shows how to add database information "testdb;dba;localhost,30000" to a CM user named testcm .
cm_admin adduser -d "testdb;dba;localhost,30000" testcm testcmpwd
Deleting CM Users
The cm_admin deluser utility deletes a CM user.
cm_admin deluser cmuser-name
- cm_admin: An integrated utility to manage CUBRID Manager
- deluser: A command to delete an existing CM user
- cmuser-name: The name of a CM user to be deleted
The following example shows how to delete a CM user named testcm.
cm_admin deluser testcm
Displaying CM User information
The cm_admin viewuser utility displays information of a CM user.
cm_admin viewuser cmuser-name
- cm_admin: An integrated utility to manage CUBRID Manager
- viewuser: A command to display the CM user information
- cmuser-name: A CM user name. If this value is entered, information only for the specified user is displayed; if it is omitted, information for all CM users is displayed.
The following example shows how to display information of a CM user named testcm .
cm_admin viewuser testcmThe information will be displayed as follows:
CM USER: testcm
  Auth info:
    broker: none
    dbcreate: none
    statusmonitorauth: none
  DB info:
    ==========================================================================================
     DBNAME                                           UID               BROKER INFO
    ==========================================================================================
     testdb                                           dba               localhost,30000
Changing the Authority of CM Users
The cm_admin changeuserauth utility changes the authority of a CM user.
cm_admin changeuserauth options cmuser-name
- cm_admin: An integrated utility to manage CUBRID Manager
- changeuserauth: A command to change the authority of a CM user
- cmuser-name: The name of a CM user whose authority to be changed
The following is [options] of cm_admin changeuserauth.
-b,--brokerAUTHORITY¶Specifies the broker authority that will be granted to a CM user. You can use admin, none, and monitor as AUTHORITY .
The following example shows how to change the broker authority of a CM user named testcm to monitor.
cm_admin changeuserauth -b monitor testcm
-c,--dbcreate¶Specifies the authority to create a database which will be granted to a CM user. You can use admin and none as AUTHORITY .
The following example shows how to change the database creation authority of a CM user named testcm to admin.
cm_admin changeuserauth -c admin testcm
-m,--monitor¶Specifies the authority to monitor status which will be granted to a CM user. You can use admin, none, and monitor as AUTHORITY .
The following example shows how to change the monitoring authority of a CM user named testcm to admin.
cm_admin changeuserauth -m admin testcm
Changing the CM User Password
The cm_admin changeuserpwd utility changes the password of a CM user.
cm_admin changeuserpwd [options] cmuser-name
- cm_admin: An integrated utility to manage CUBRID Manager
- changeuserpwd: A command to change the password of a CM user
- cmuser-name: The name of a CM user whose password to be changed
The following is [options] of cm_admin changeuserpwd.
-o,--oldpassPASSWORD¶Specifies the existing password of a CM user.
The following example shows how to change a password of a CM user named testcm .
cm_admin changeuserpwd -o old_password -n new_password testcm
--adminpassPASSWORD¶The password of an admin user can be specified instead of old CM user's password that you don't know.
The following example shows how to change a password of a CM user named testcm by using an admin password.
cm_admin changeuserauth --adminpass admin_password -n new_password testcm
-n,--newpassPASSWORD¶Specifies a new password of a CM user.
Adding Database Information to CM Users
The cm_admin adddbinfo utility adds database information (database name, UID, broker IP, and broker port) to a CM user.
cm_admin adddbinfo options cmuser-name database-name
- cm_admin: An integrated utility to manage CUBRID Manager
- adddbinfo: A command to add database information to a CM user
- cmuser-name: CM user name
- database-name: The name of a database to be added
The following example shows how to add a database without specifying any user-defined values to a CM user named testcm .
cm_admin adddbinfo testcm testdbThe following is [options] of cm_admin adddbinfo.
-u,--uidID¶Specifies the ID of a database user to be added. The default value is dba.
The following example shows how to add a database of which name is testdb and user ID is uid to a CM user named testcm.
cm_admin adddbinfo -u uid testcm testdb
-h,--hostIP¶Specifies the host IP of a broker used when clients access a database. The default value is localhost.
The following example shows how to add a database of which name is testdb and the host IP of is 127.0.0.1 to a CM user named testcm.
cm_admin adddbinfo -h 127.0.0.1 testcm testdb
-p,--port¶Specifies the port number of a broker used when clients access a database. The default value: 30000 .
Deleting database information from CM Users
The cm_admin deldbinfo utility deletes database information of a specified CM user.
cm_admin deldbinfo cmuser-name database-name
- cm_admin: An integrated utility to manage CUBRID Manager
- deldbinfo: A command to delete database information of a CM user
- cmuser-name: CM user name
- database-name: The name of a database to be deleted
The following example shows how to delete database information of which name is testdb from a CM user named testcm .
cm_admin deldbinfo testcm testdb
Changing Database Information of a CM user
The cm_admin changedbinfo utility changes database information of a specified CM user.
cm_admin changedbinfo [options] cmuser-name database-name
- cm_admin: An integrated utility to manage CUBRID Manager
- changedbinfo: A command to change database information of a CM user
- cmuser-name: CM user name
- database-name: The name of a database to be changed
The following is [options] of cm_admin changedbinfo.
-u,--uidID¶Specifies the ID of a database user.
The following example shows how to update user ID information to uid in the testdb database which belongs to a CM user named testcm .
cm_admin changedbinfo -u uid testcm testdb
-h,--hostIP¶Specifies the host of a broker used when clients access a database.
The following example shows how to update host IP information to 10.34.63.132 in the testdb database which belongs to a CM user named testcm .
cm_admin changedbinfo -h 10.34.63.132 testcm testdb
-p,--portNUMBER¶Specifies the port number of a broker used when clients access a database.
The following example shows how to update broker port information to 33000 in the testdb database which belongs to a CM user named testcm .
cm_admin changedbinfo -p 33000 testcm testdb