
This tutorial is part of CUBRID Data Modeling with ERwin series. We will illustrate how to forward engineer a data model and apply it to the actual database.
In ERwin terms Forward Engineering is the process of transforming a Logical Data Model (LDM) from ERwin Data Modeler to a Physical Data Model (PDM) on the actual database.
Once you have installed ERwin (in this tutorial we use version 2020 R2 14677), start the program and choose from the main menu File -> New.... In the opened modal window choose Logical/Physical as a Model Type, and in Target Database select ODBC/Generic Version 3.0 (CUBRID ODBC is based on 3.0 spec). Then click OK.

Create Entity
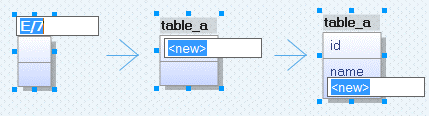
In ERwin language, Entity is a table object. To create a table representation, choose Entity tool from the main toolbar at the top.

Then click on any place in your workspace. It will automatically place a new table object. Start typing its name in the text field. Once finished, press Tab key on your keyboard to jump to Keys section to add Primary Key. Then again press the Tab key to jump to the next section to enter other column. To enter more columns of the same type, hit Enter key on your keyboard. Once finished entering all columns, hit Esc key.
For this tutorial we will create two tables table_a and table_b and will forward engineer it to our existing demodb database.

Setting Column Attributes
Once we have created our tables and the necessary columns, we need to set the data types and other attributes to each column. For this double click on any column to get started. Choose the parent domain, data type, check if a column is a primary or foreign key. Similarly, repeat for all new your tables.


Entity Relationships
In ERwin there are several types of Relationships. For our example we are interested in Identifying Relationship and Non-identifying Relationship.
-
Identifying Relationship
The main difference between these two types of relationships is that a Foreign Key of type Identifying Relationship is automatically added as a part of Composed Primary Key (a PK defined by multiple columns) as you can see below or in the output of this demodb example. In other words:
“An identifying relationship is a relationship between two entities in which an instance of a child entity is identified through its association with a parent entity, which means the child entity is dependent on the parent entity for its identify and cannot exist without it. In an identifying relationship, one instance of the parent entity is related to multiple instances of the child. (ERwin documentation)”
So, if you want to create a Foreign Key which is also a part of Composite Primary Key, choose Identifying Relationship. For this choose Identifying Relationship tool from the main toolbar.

Since we need to reference table_a in table_b (FK will be created in table_b), once Identifying Relationships tool has been selected, first click on table_a then on table_b or simply click on table_a and drag your mouse to table_b. If the referencing table already contains a column with the same name as the primary key of referenced table (like in our case the column id exists in both tables), the program will popup a Key Migration Conflict modal window.

Since we want both tables have their own id columns and do not want to replace the child attribute, we will choose Rolename migrating attribute and enter our custom Foreign Key column name. Then click OK. You will notice that a new FK column has been added and become a part of Composed Primary Key.

-
Non-identifying Relationship
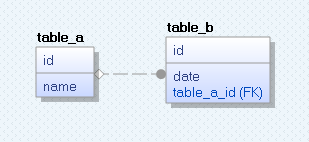
Now let's perform the same steps but choose Non-identifying Relationship for our FK and see what model will be created. For this choose Non-identifying Relationship tool from the main toolbar. You can notice here that Non-identifying Relationship tool is represented like a dashed line while Identifying Relationship tool is a solid line.

Like before, click on table_a and drag your mouse to table_b. Also as before to resolve id column name conflicts choose Rolename migrating attribute and enter a custom Foreign Key column name like table_a_id. Then click OK. Now notice that the model is different from the previous one in the way that our FK is no more part of Composed PK.
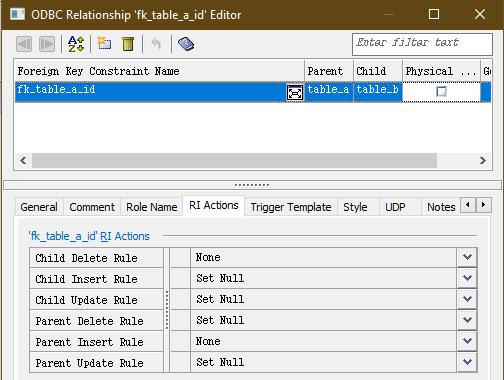
To finalize your changes you may double click on a relationship line between these two tables to change FK attributes like values for ON UPDATE or ON DELETE Referential Integrity actions, or the name of this foreign key index. In our case we will set the constraint name as fk_table_a_id and set RI Actions as displayed below.
“The important fact to know here is that index names in CUBRID are unique per table meaning that two random tables can have same index names. Therefore in CUBRID you can give simple and clear names to indexes like fk_col_name instead of cluttering them with table names or with other identifiers. For more, refer to Manual.”
Forward Engineering Data Model
Finally, lets proceed to forward engineering our newly created data model to the existing demodb database.
-
Schema Generation Preview
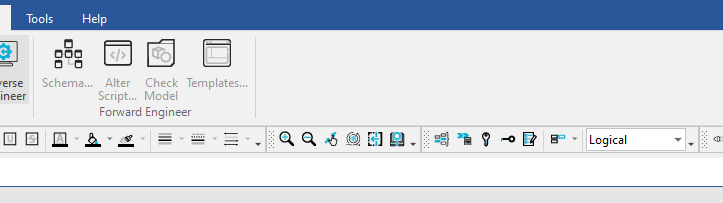
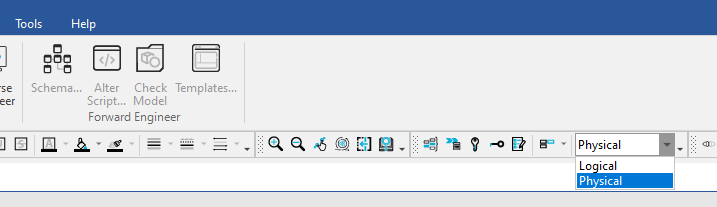
Now choose from the main menu Actions -> Forward Engineer... -> Schema....
If this menu item is not enabled, it is likely you are still viewing the Logical Model. To switch to Physical Model choose View -> Physical Model. Now the menu items should be enabled.

To preview the script which will be executed on your database server, press on Preview tab located at the bottom of the side menu. If necessary you can manually modify the SQL in this editor.

-
Quoting Reserved Words
In this example we can see that table_b contains a column which has a name called date. In CUBRID, date is a reserved word to represent DATE data type. So if we try to directly execute the given script above, we will get an error saying:
[CUBRID][ODBC CUBRID Driver][-493]Syntax: syntax error, unexpected Date, expecting CHECK or FOREIGN or PRIMARY or UNIQUE
Execution Failed!
To resolve similar errors when we need to have a column which has the same name as one of the reserved words, we simply need to quote such column names either in backticks (``), or double quotes (""), or square brackets ([]) . For more info about reserved words, see the Reserved Words section in CUBRID Manual.
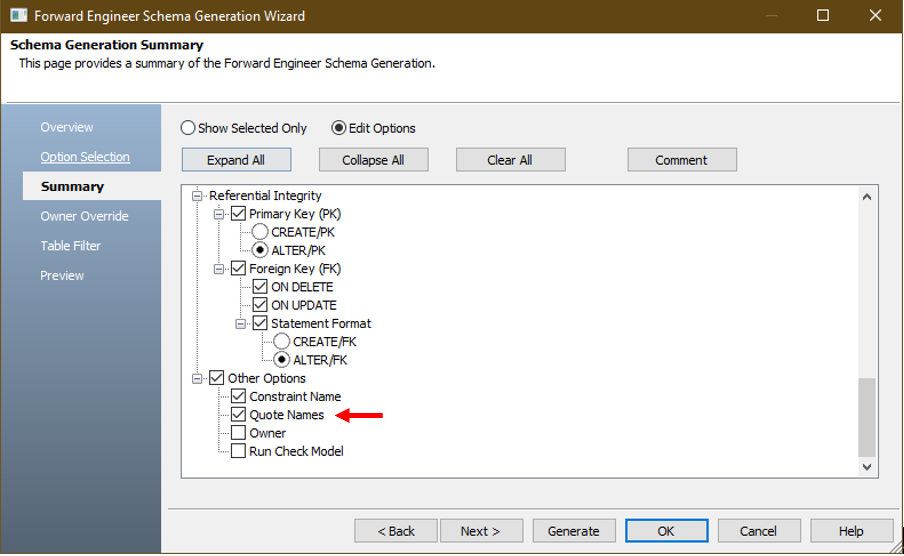
Instead of manually quoting each column name, we can rely on ERwin which provides an option to automatically Quote Names. For this to work, before pressing on Preview tab, click on the Summary tab, check Edit Options, scroll down and check the Quote Names box (default: unchecked).
Now again press on the preview tab to see the changes. Notice that all identifiers, including tables names and key names, are now escaped with double quotes which is now ready to be executed on CUBRID Server.

Once ready, click on the Generate... button.
-
Set Database Connection
Once you open Database Connections window, enter the database connection information such as User Name and Password. If "CUBRID' is not automatically selected as a value for ODBC Data Source parameter, click on it and choose "CUBRID". Then click on Connect button. This will establish a connection with our database on the background.

If everything is correct, a success message will be displayed.
Important thing to notice here is that all statements are executed one by one, not in one batch. This means that if one of the statements fail somewhere in the middle, the previous success executions will not be rolled back.

To confirm whether or not everything was correctly executed on the server side, we can open CUBRID Admin, a GUI database management tool for CUBRID, and check the tables and their attributes. We can see that both columns are now in our localhost, all columns are in-place, the data types are correct, PK and FK constraints have been successfully created and their names are exactly as we have set in our Data Model.

-
Other Options
What you can also do before you generate the schema is check the DROP TABLE box. It is useful when the target database already contains the tables you are going to push from your model. If checked, in the Preview window you can notice a separate DROP TABLE statement for each table you are going to create.

 Reverse Engineering CUBRID Database with ERwin